


Setting up Google Analytics for PPC campaigns isn’t as simple as just dropping a tracking code on your website and looking at session numbers.
When talking about data collection and analysis, it’s rare that we go back to the basics and talk about proper ways of setting up Google Analytics.
That’s where it all starts. If you don’t have a proper setup, your data will be incomplete or inaccurate.
Setting up Google Analytics is a big topic. And a lot of it depends on what type of company you have and how mature your data collection is.
Therefore, this article may not cover enterprise fringe cases or advanced tracking capabilities, as GA is massively customizable. But it will show you how to get a good baseline Google Analytics account setup.
Consider it a beginner’s guide that will put you on the right path towards robust data collection and utilization.
- Setting Up Google Analytics: Your First Steps
- Setting Up Google Analytics for Shopify
- Setting Up Google Analytics for WordPress
- Organize Your Accounts, Sites, & Views
- Setting Up Google Analytics Goals
- Setting Up Google Analytics Events
- Beyond the Basics: Where to Go Next
- Wrap Up on Setting Up Google Analytics
Get brand new analytics strategies straight to your inbox every week. 23,739 people already are!
Setting Up Google Analytics: Your First Steps
Before you can worry about things like eCommerce attribution, finding insights for CRO, or sharing and visualizing your data, you have to set up Google Analytics the right way to actually collect the data.
The first thing we need to concern ourselves with is putting the tracking code onto your site to allow data collection.
There are typically two ways to set up Google Analytics:
- Google Analytics Tracking Code: This is the traditional old school way. You just copy and paste the tracking code on your site.
- Google Tag Manager (GTM) Script: Install the Google Tag Manager script and setup the Pageview tag.
(We highly recommend using Google Tag Manager.)
If you set things up with Google Tag Manager, you have a much clearer view of your tags and data overall, you can scale out your tagging strategy with greater clarity, and you can (later on) build out some more advanced tracking mechanisms.
In addition, it’s arguably easier to set up using Google Tag Manager. Here’s a solid guide from Google on how to set up Google Analytics via GTM. And here's a more generic guide to set up your Google Analytics tracking code.
Setting Up Google Analytics With Google Tag Manager
To set up Google Analytics using Google Tag Manager, here’s a brief walkthrough:
Sign into Google Tag Manager (create an account and add the code to your site first, of course). Once logged in, click “Add a New Tag”.
Make sure you name your tags something specific. As you scale out your measurement and tagging implementation, things can get confusing when you have ambiguous names. Start early with good naming conventions.
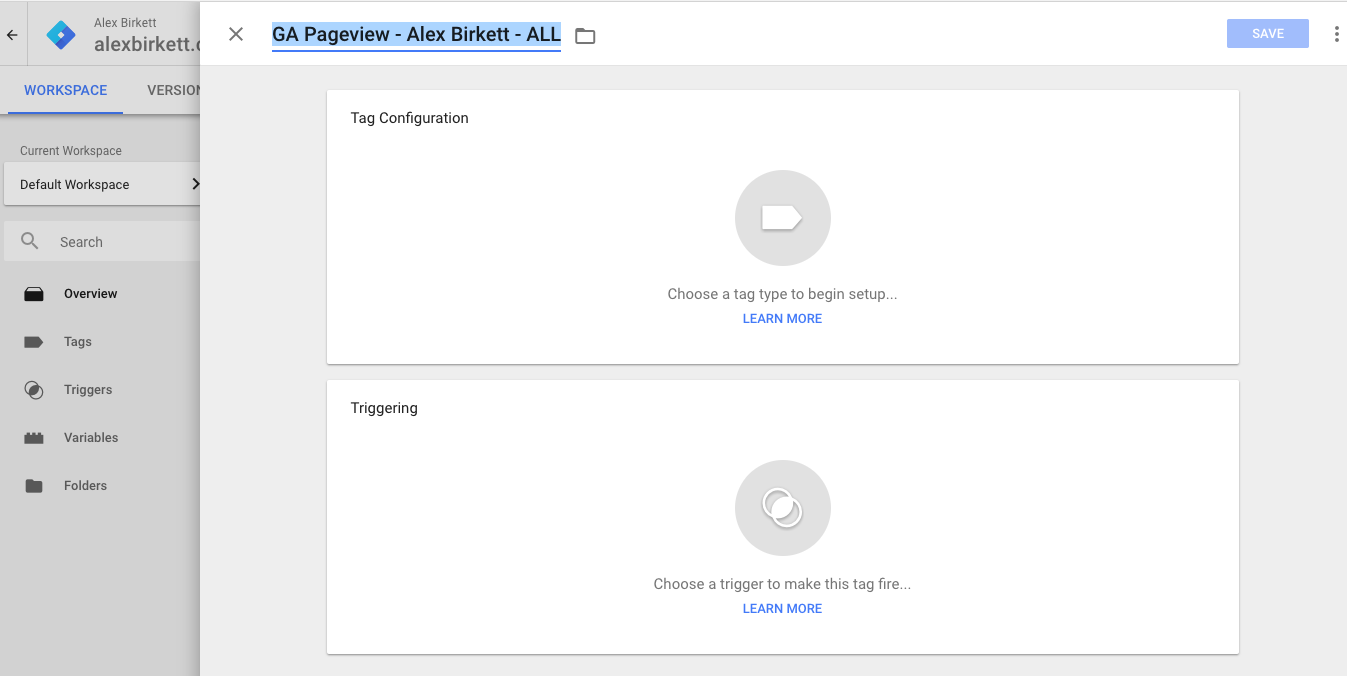
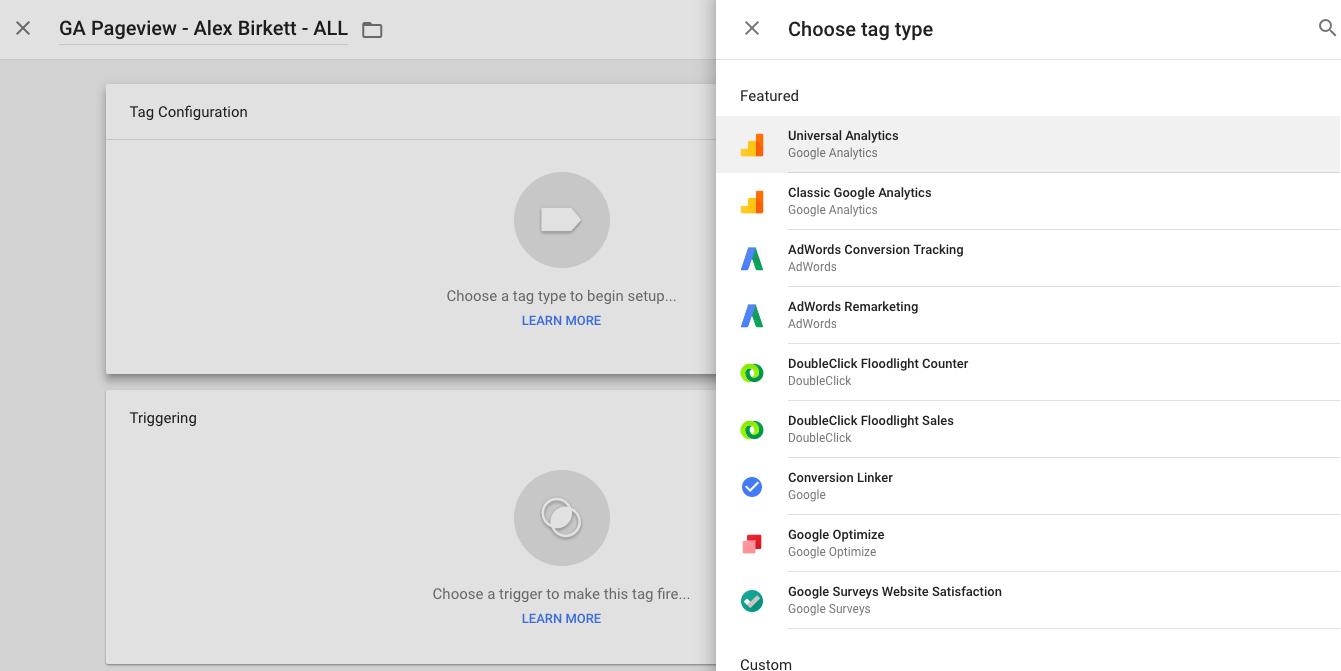
Now simply click on “Tag Configuration” and select the Universal Analytics tag. Since we’re dealing with two Google products here, there’s a really smooth integration. Unsurprisingly, it’s much easier to set up Google Analytics tracking with GTM than it may be with other software.
From here, select “Pageview” as the Track Type and enter your tracking ID.
You can also create a variable that includes your tracking ID, so you don’t have to remember or look up your ID each time -- see how to do that here.

Customized Google Tag Manager Settings and Attribution Tracking
Next, you can customize your settings and add custom dimensions, custom metrics, enhanced eCommerce, and advertising features.
You can also set up your cross-domain tracking. These things are a bit more advanced though, and if you have specific issues (like an eCommerce site that has subdomains), they’re important to get right.
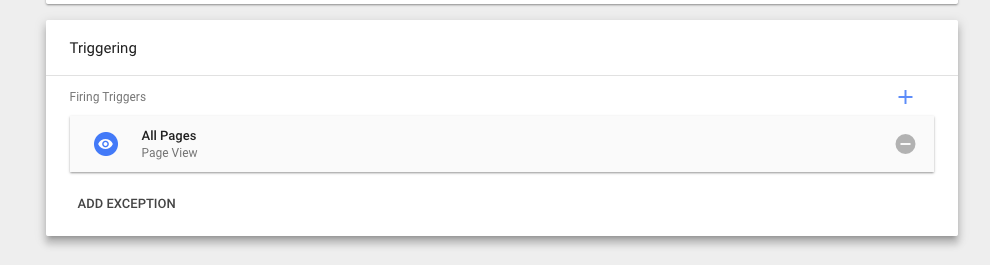
Next, you’ll need to determine when you want to fire this tag, which is called a “Trigger” in Google Tag Manager. Since this is your Google Analytics tracking code and you presumably want to track all pages, you simply set your tag to trigger on all pages:
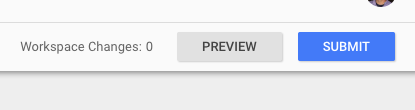
With the exception of advanced tracking and fringe cases, that’s pretty much all you need to do to get things set up in GTM. Of course, you should Preview/QA all changed and then you’ll need to publish them live for them to take effect.
Analytics Audit -- Check Tracking Status on Active Pages
It’s important to make sure you’re tracking every page that you need to be. Do an Analytics audit and make sure you’re not missing any URLs or data. If you’re missing data, check that:
- The GA tracking code is on the page. (You can “right-click” and select “View Source,” and then search for “UA-” to find the GA code.)
- The Google Tag Manager code is on each page and the Pageview tag is set up correctly.
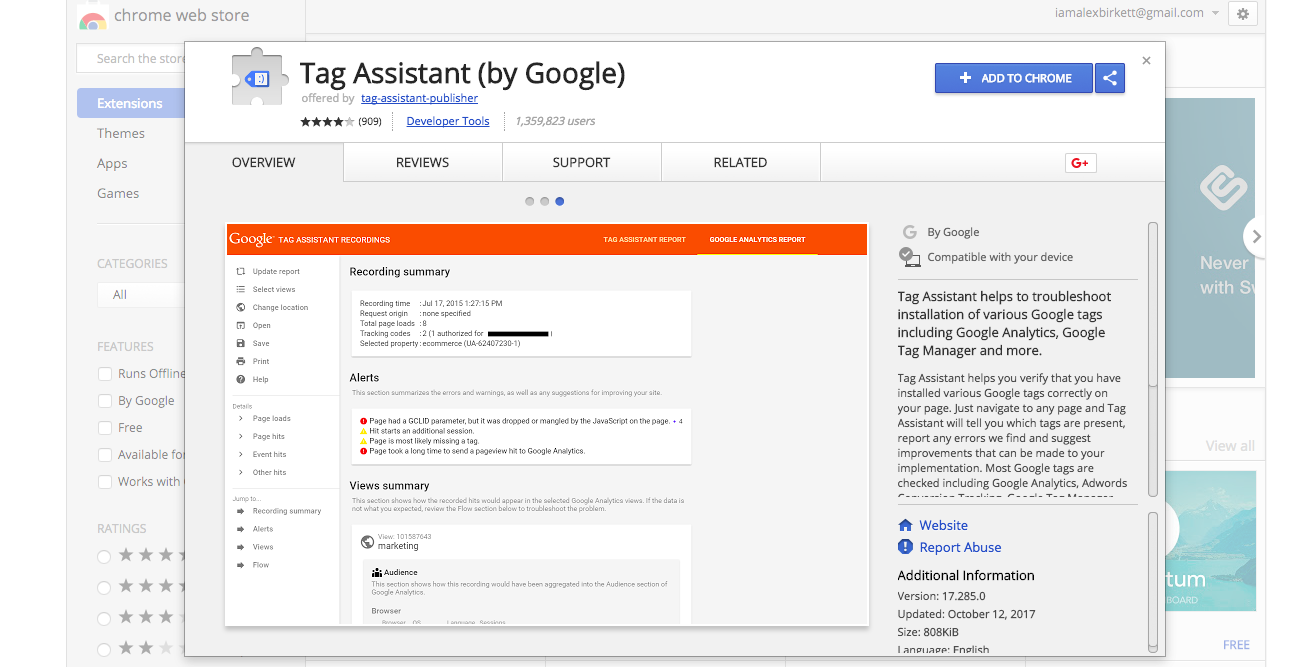
Here are a few tools you can use to check that your Google Analytics tracking code is set up properly and everywhere on the site:
Finally, this may be too basic to note, but here goes: you need a Google account to use Google Analytics.
Almost all Google products use a Google account to authenticate your login, and Google Analytics is no different.
Setting Up Google Analytics for Shopify
Different eCommerce platforms may have an easier way to set up Google Analytics.
If you’re in the eCommerce space, the first thing you should do is search “[Your Platform] + Google Analytics” on Google and see what documentation there is.
For example, here’s how you set up Google Analytics if you’re using Magento.
Just to add clarity here, I want to walk through the process of adding Google Analytics to Shopify. I’ll use my friend Luiz Centenaro’s site, Hammock Town, as an example.
Like with any eCommerce system, I recommend following the platform’s guidelines if possible. If you add the Google Analytics tracking code directly to your codebase when you update themes, it could override that customization. A proper installation will also ensure all your eCommerce data is passing through.
Steps To Add Google Analytics to Shopify
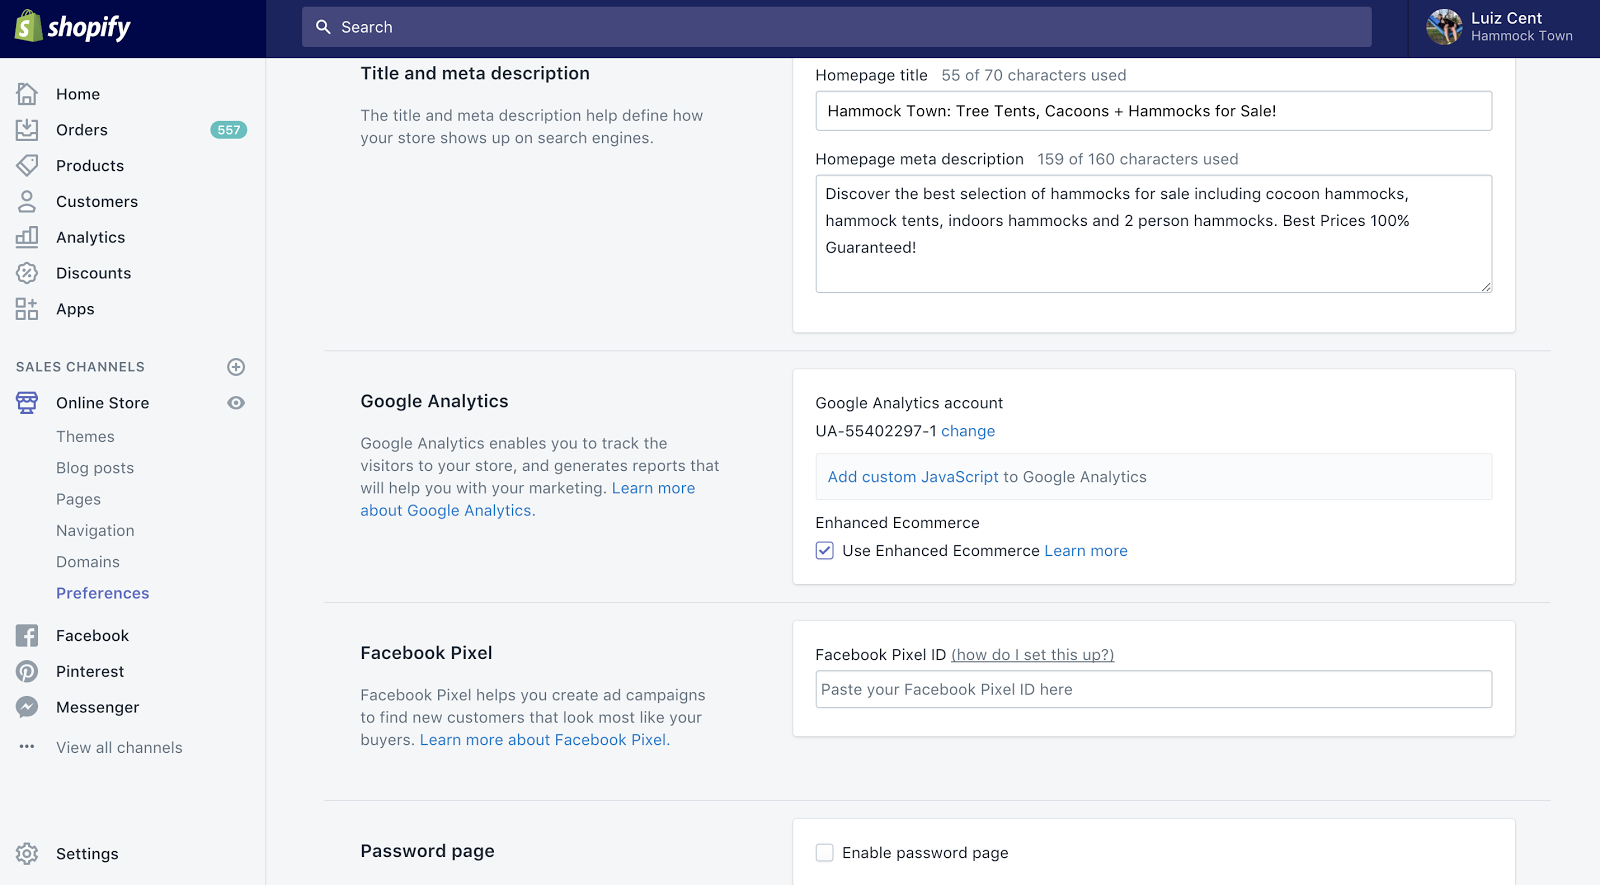
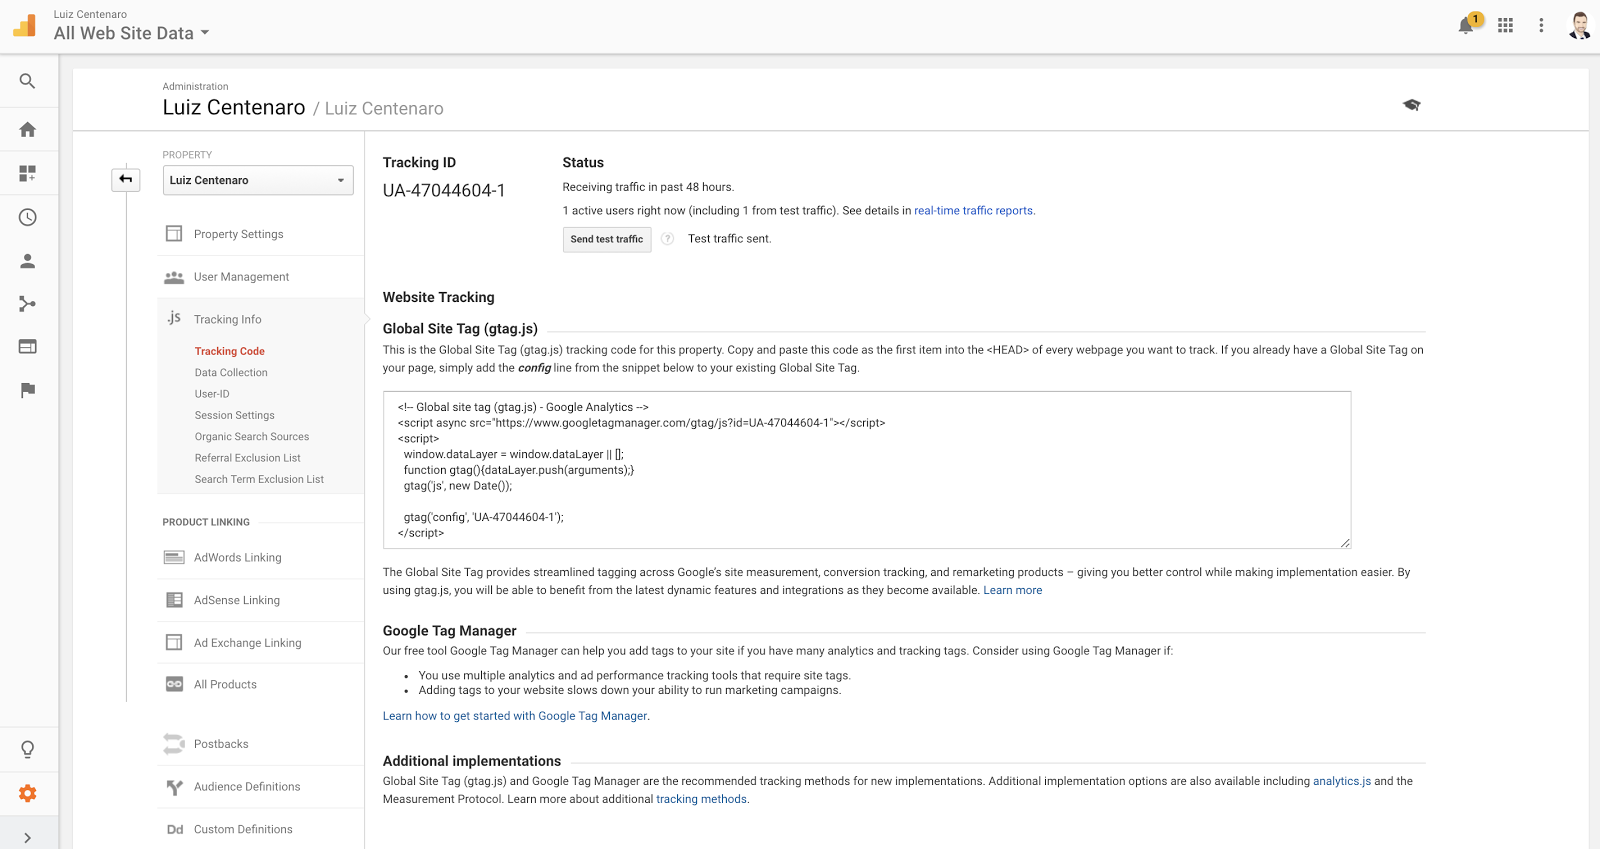
Step 1: Login to your Google Analytics account. Under tracking info, find “tracking code”.
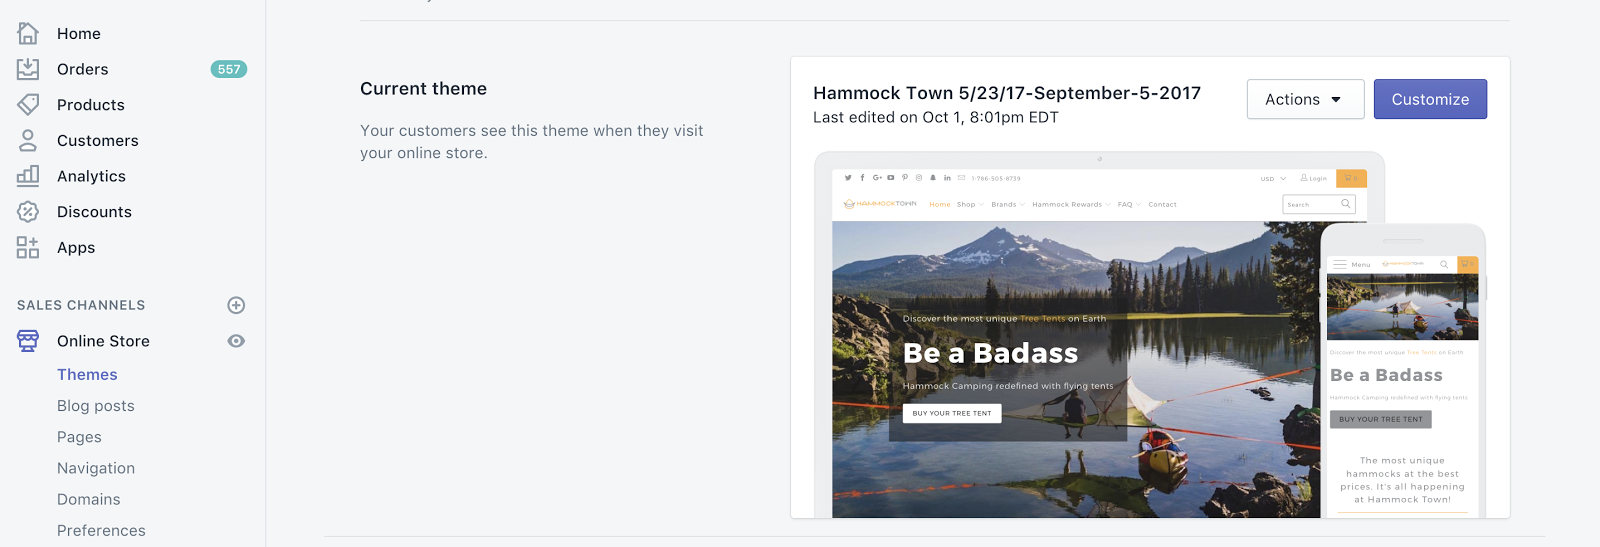
Step 2: Login to Shopify & under “Sales Channels” on the left side navigation. Click “Online Store” and then click “Preferences”.
Step 3: Paste your tracking code from Step 1 into the field labeled “Google Analytics Account”.
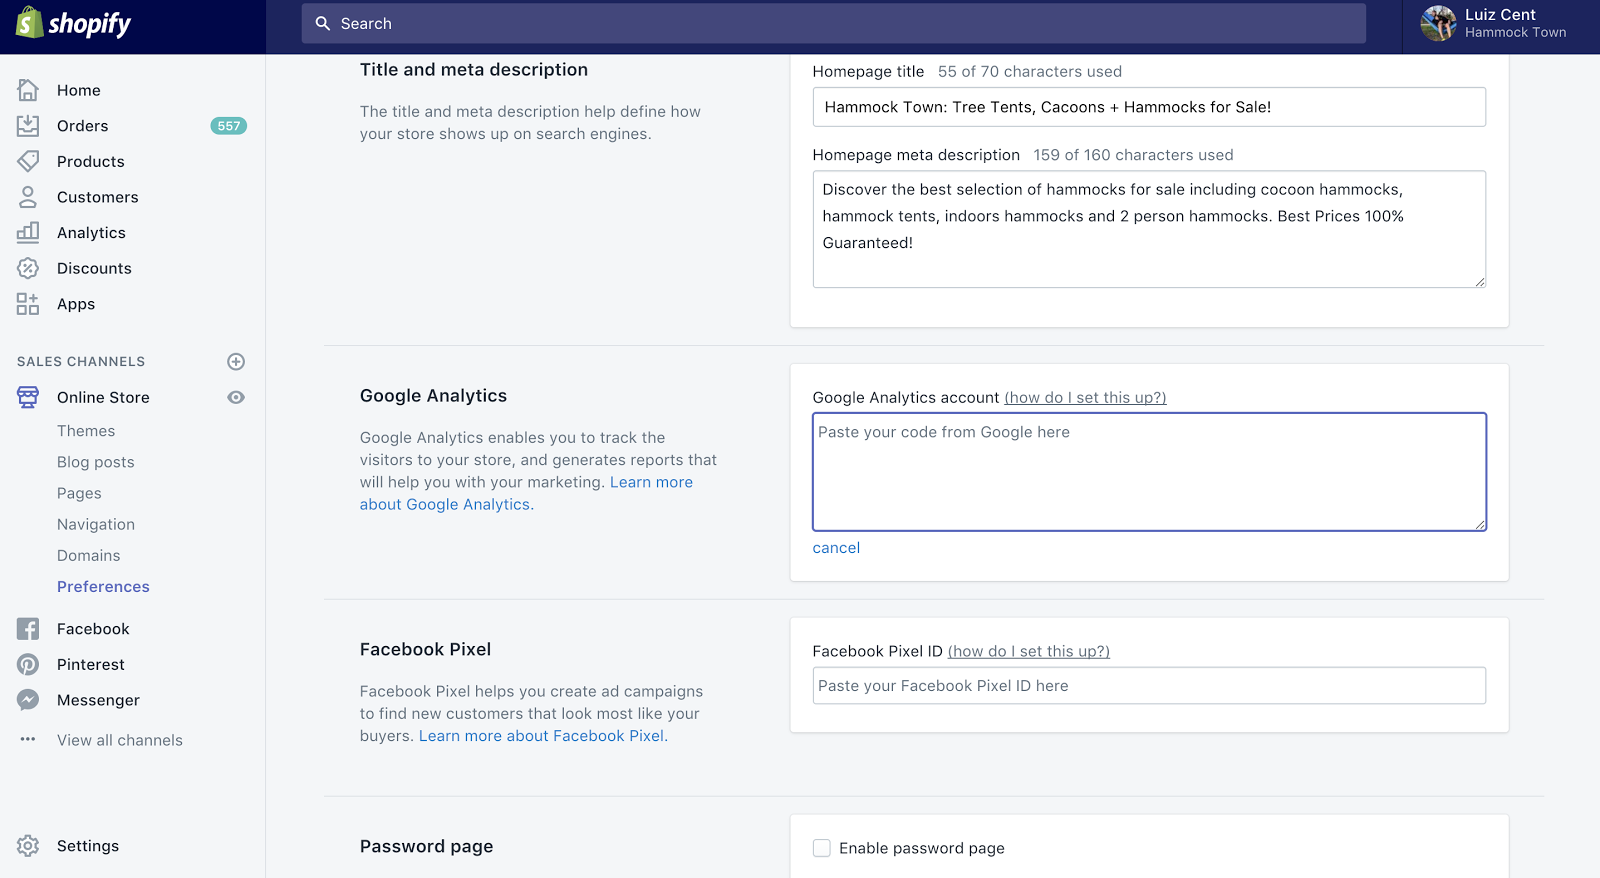
Step 4: Double-check Enhanced ECommerce. Make sure you set that up in Google Analytics as mentioned above.
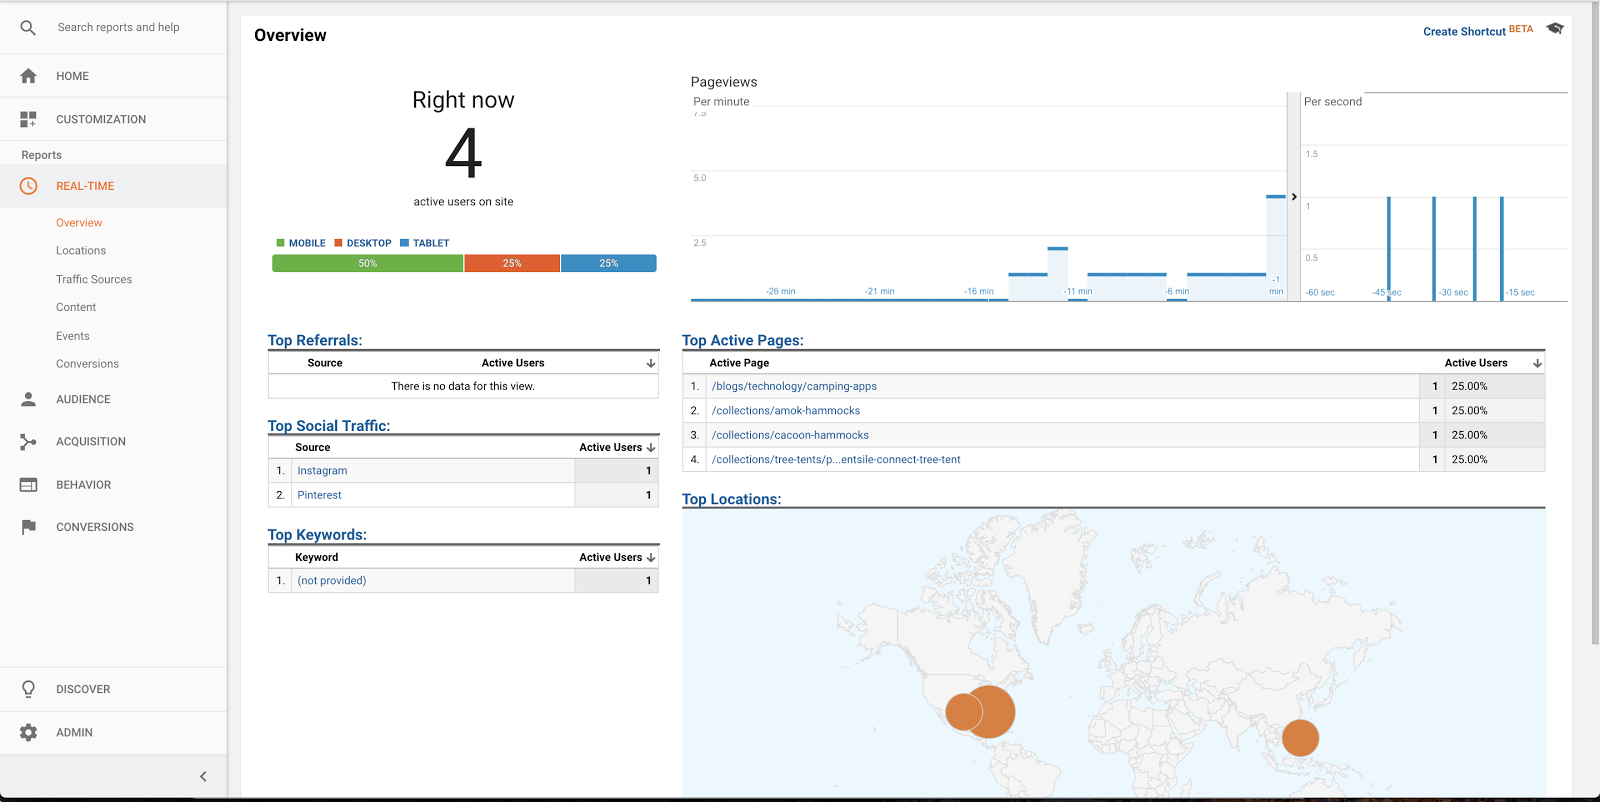
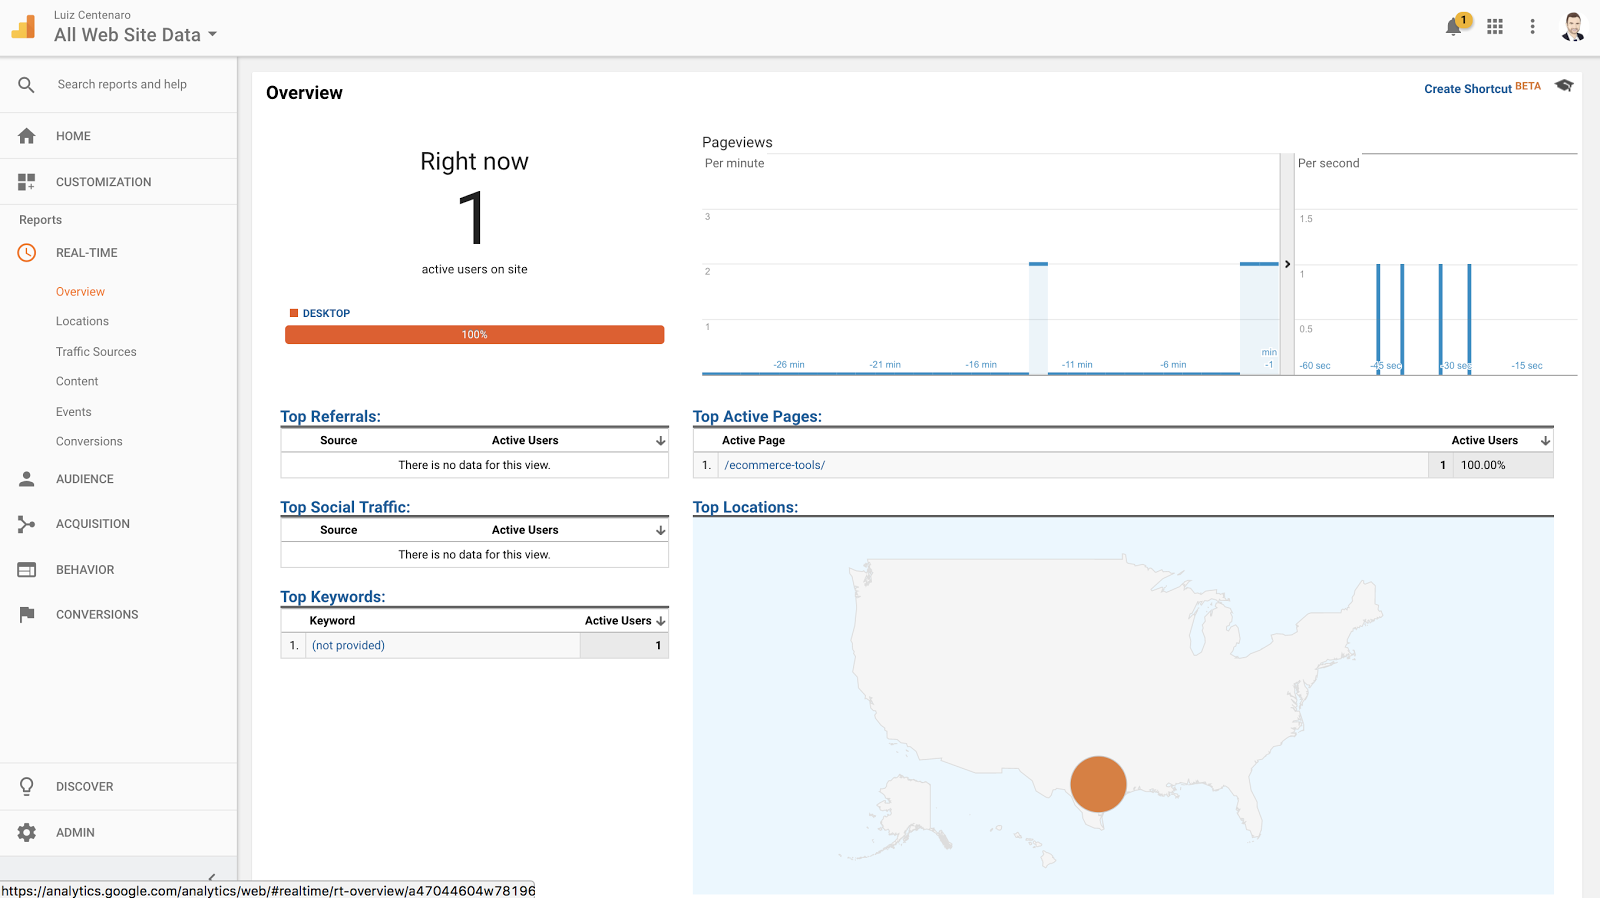
Step 5: Verify everything is working correctly using Google Analytics Real Time reports. As you can see here, there are only four people visiting Hammock Town.
Setting Up Google Analytics for WordPress
WordPress is a super popular platform as well, especially if you run a blog or content site (but also for eCommerce or otherwise). So, let's walk through setting up Google Analytics for WordPress.
Steps To Add Google Analytics to WordPress
Step 1: Login to your Google Analytics account. Under tracking information, find “tracking code”.
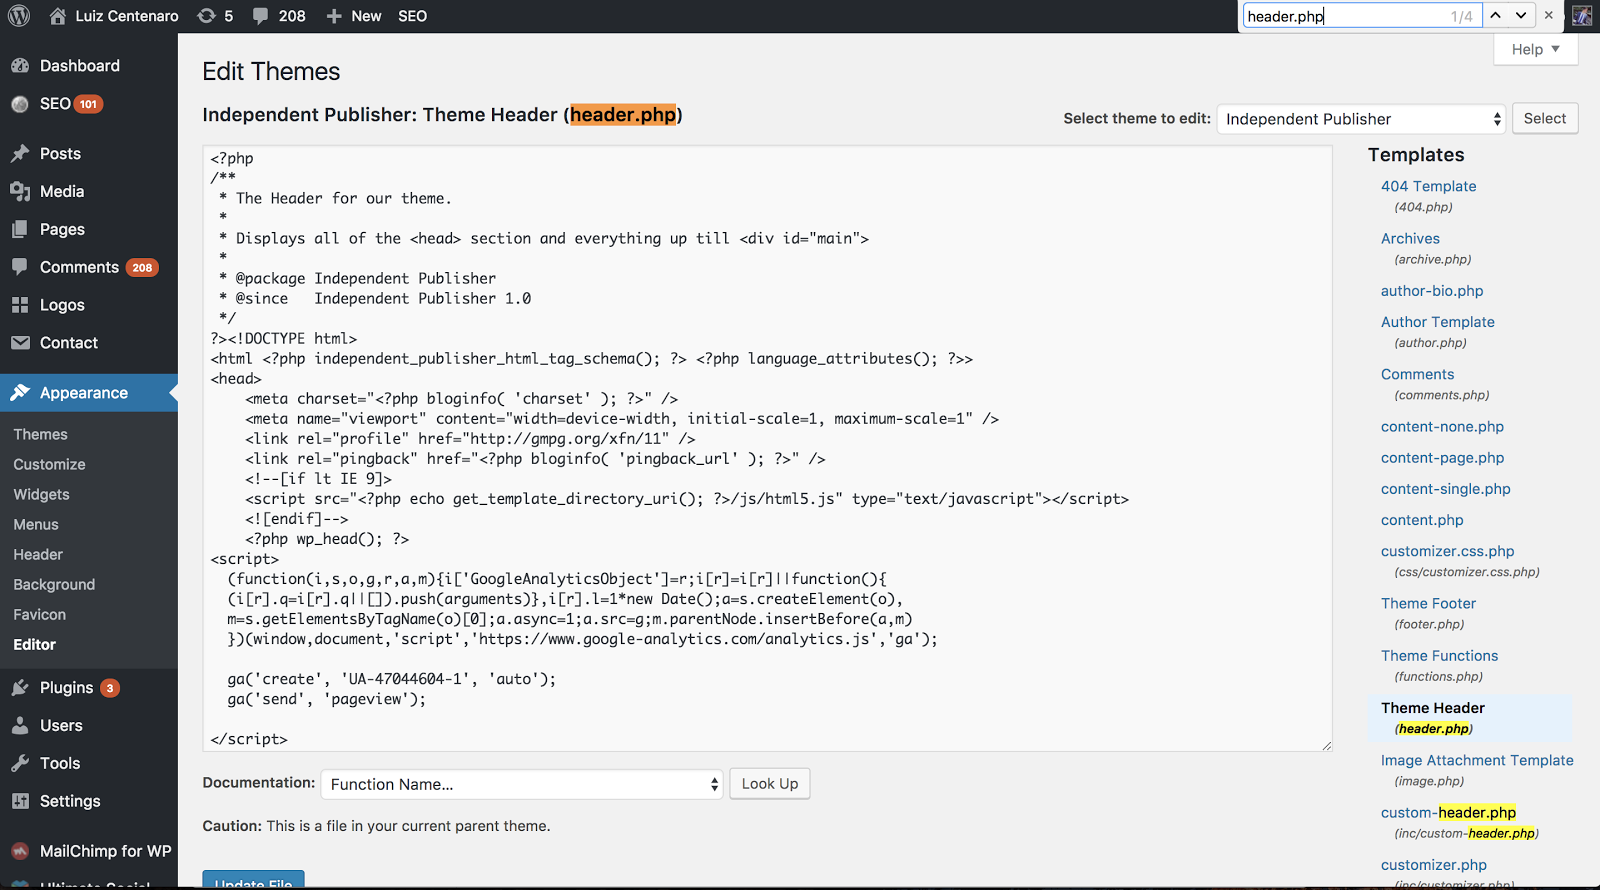
Step 2: Login to your WordPress Admin & Click “Editor” on the left navigation. Click Command + F on your keyboard to enable the search function and search for header.php.
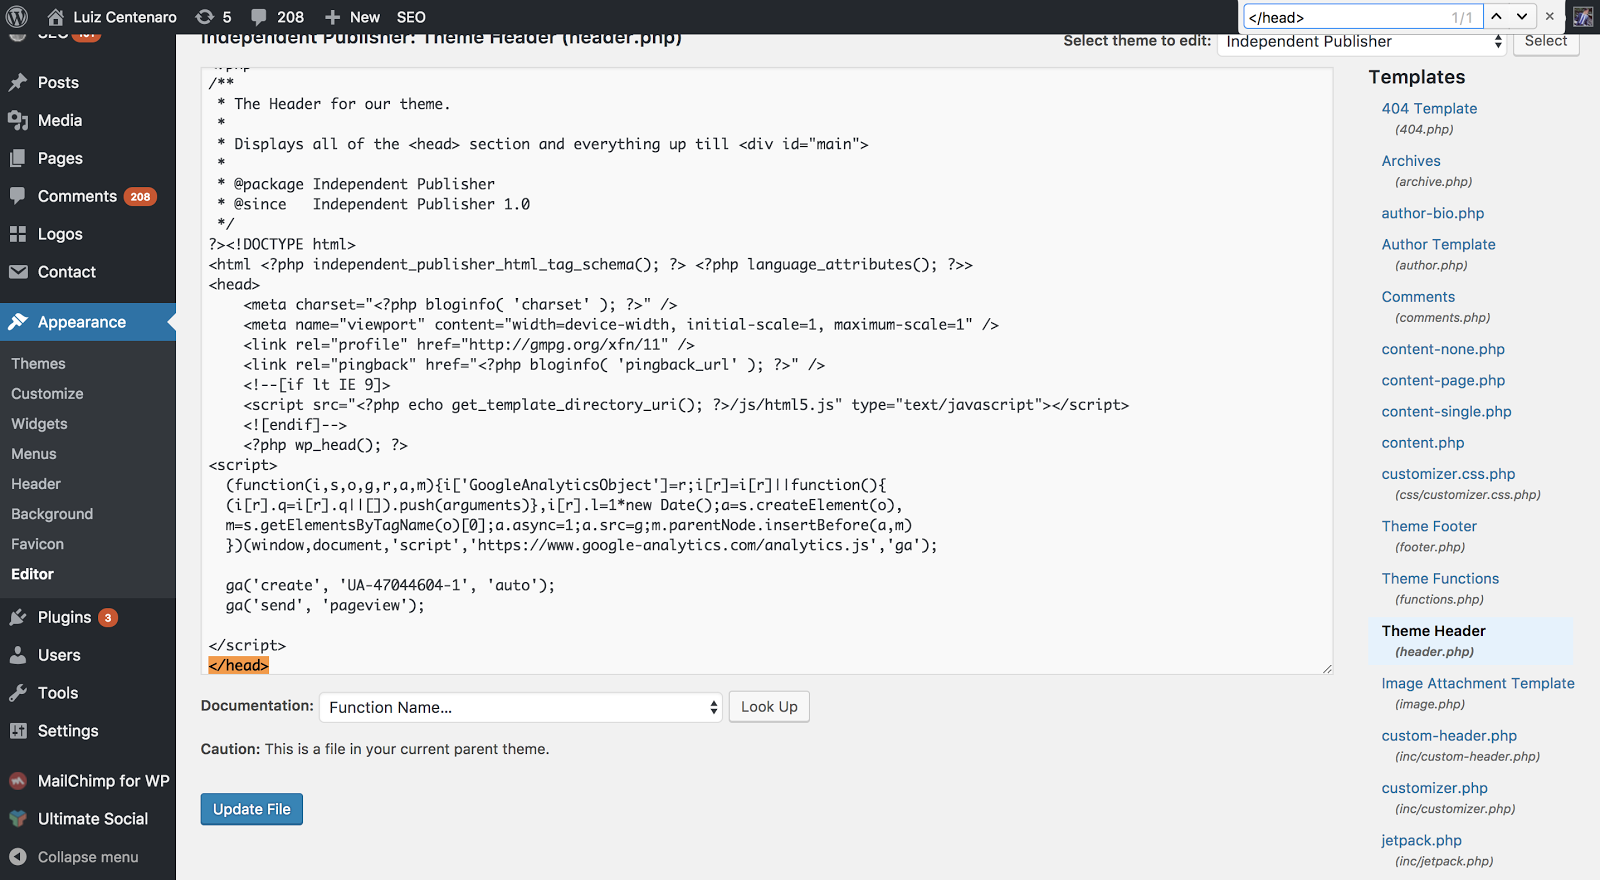
Step 3: Enable the search function again using Command + F on your keyboard, and this time search for </head>. Paste your code from Step 1 directly above the end of the head tag, which is </head>.
Step 4: Verify all is working in Google Analytics real-time reports. As you can see, there’s only one user on the site now.
Organize Your Accounts, Sites, & Views
Let’s back up a minute and talk about about how Google Analytics accounts are actually structured.
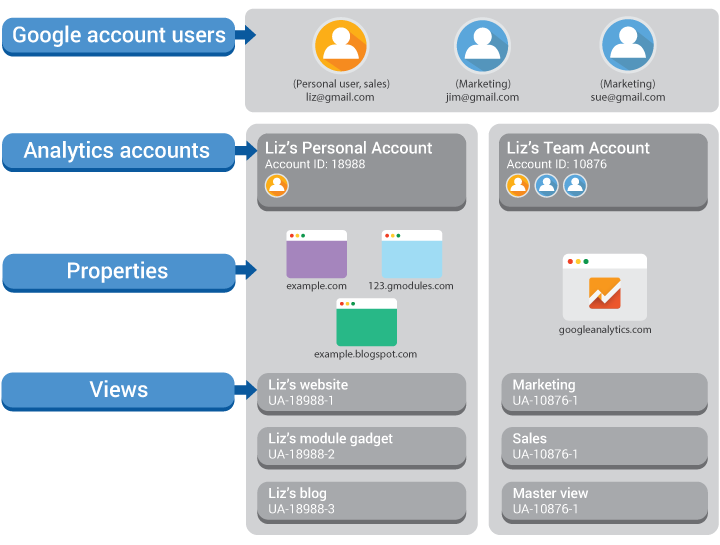
Google Analytics Accounts
Basically, a user can be a member of multiple Google Analytics accounts (in the example above, they could have access to both Business A and B).
Why have more than one Google Analytics account? Maybe you have a personal site and a business site, and you want to track them separately. Perhaps you have a few different clients. You might be in a large organization with many stakeholders and separate goals.
Here’s an example Google gave:
“For example, if you administer Analytics tracking for two companies, you would set up a separate Analytics account for the websites owned by each company. Since you might want to provide administrative access to individuals in each company, you would not want to expose sensitive reporting data between companies, so it makes sense to track the websites from different companies in separate accounts.”
Then, below accounts in the hierarchy, you’ll find properties.
Google Analytics Properties
Properties are your individual sites, which could include subdomain or simply separate properties like minisites.
There are lots of things you can customize under the property settings (Admin > Property > Property Settings). You can change your default URL and default view (more on views in a minute), as well as your industry category.
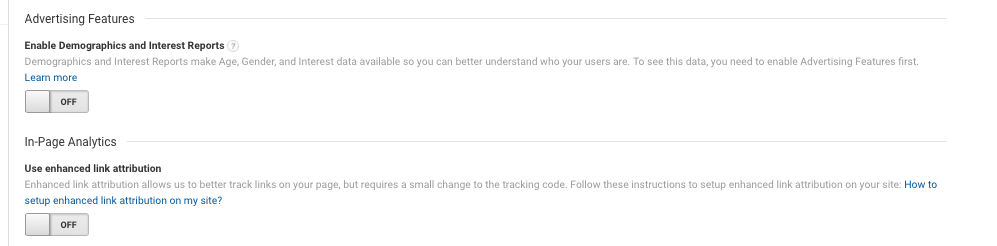
You can also enable demographic and interest reporting, which helps you target those attributes in display ads.
Two things to keep in mind with properties:
- Make sure you enable “Demographics and Interest Reports” under “Property Settings.”
- Link other accounts like AdWords and Search Console. You can do this under “All Products.” Linking other Google accounts gives you massive leverage and value when it comes to marketing and data integration.
Google Analytics Views
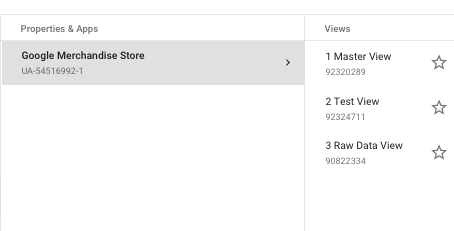
Next, you have Views, which is where the actual reports exist. It’s a best practice to always set up a few views:
- Raw data view
- Sandbox view
- Master view
The raw data view is an untouched data collection view, so you can always start over if need be. Your raw view should only have default tracking features for data collection like eCommerce, site search, etc., and it should not have any goals or filters set up.
The sandbox view is so you can test out implementations before you set them up in your main working view, which is your master view. You can also set up different views based on your organizational setup, such as blog views and views that filter out eCommerce information.
In fact, you can customize your views settings with eCommerce data collection, site search, goals, filters, segments, channel groupings, customer reports, content groupings, and more.
Each property can have multiple views. (i.e. each Analytics account can have up to 50 properties, and each property can have up to 25 views.)
It’s really easy to create new views, by the way. In the Admin section of your Google Analytics account, go to the View section, and click the dropdown menu. There will be an option to “Create New View.”
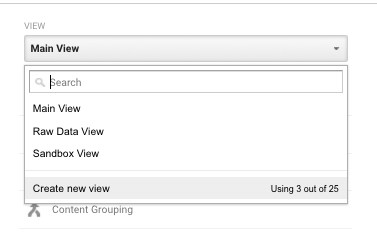
Click on that and name your view. After that, you can customize and work from the view as you see fit.

Also, make sure you set your timezone accurately. Surprisingly, this is a common mistake.
Views are commonly utilized in large organizations where you have many different teams who are working within the same property, but don’t need or shouldn’t have the same information. Marketing teams, and content makers specifically, need to see traffic and likely conversion data. Oftentimes, however, they don’t get access to an in-app analytics view with product usage data.
As I mentioned above, views are where you can do things like set up content groupings.
Google Analytics Content Groupings
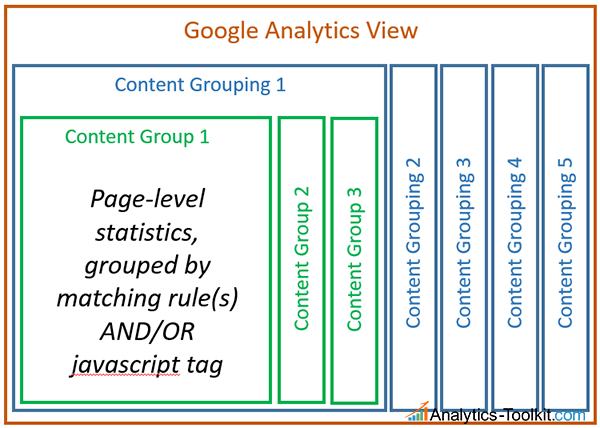
Content grouping is basically an intuitive way to group content based on rules that you set. It allows you to customize how your content is reported to you, so that it more closely reflects how you think about your site.
Quick note: A content grouping is a collection of content groups. The structure of content grouping looks like this…
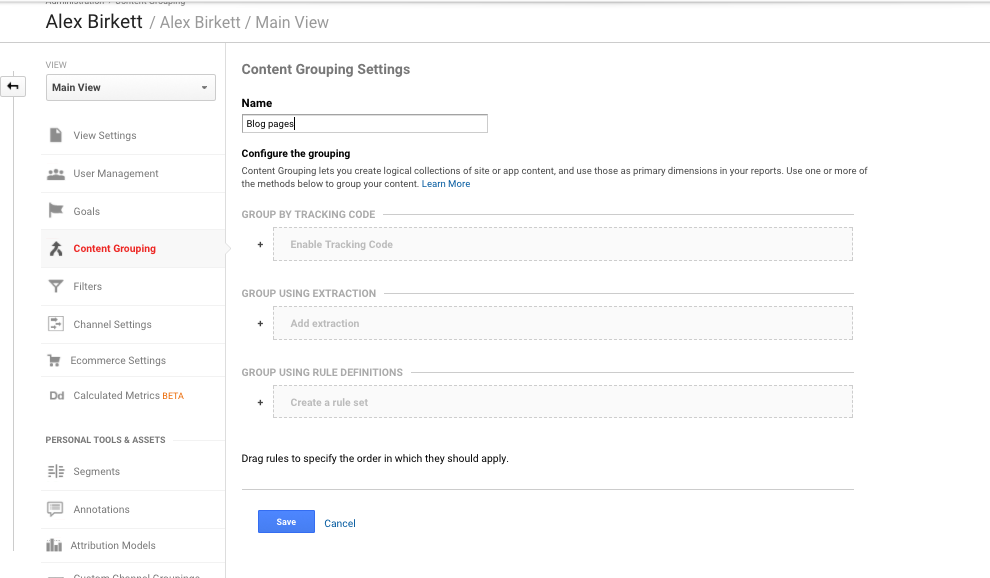
There are three ways to set up content groupings and assign content to them:
- Tracking Code: Modifies the tracking code on each web page by adding a line of code that identifies the content index number and the Content Group.
- Extraction: Extract content based on URL or page title by using a regular expression to identify a full or partial URL, page title, or screen name.
- Rule Definitions: Use the rules editor to create simple rules to identify content.
The strategy for content groupings gets kind of advanced, so we won’t dive too deeply in this article. Just two pieces of advice, if you want to get started in that direction: learn Regex, and read this article.
The views section also offers some impressive and underutilized personal tools -- things like segments, annotations, and scheduled emails.
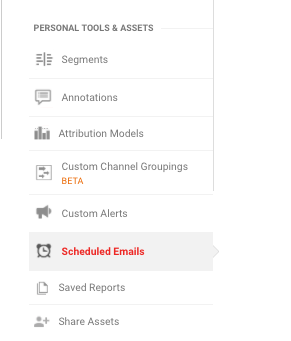
Google Analytics Annotations
Let’s take a closer look at one of those features: annotations.
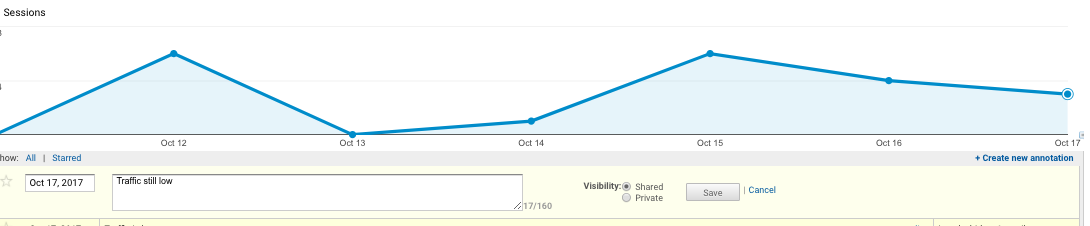
Annotations give you a way to mark important notes in your Google Analytics interface. They’re sort of like the margin notes of Google Analytics.
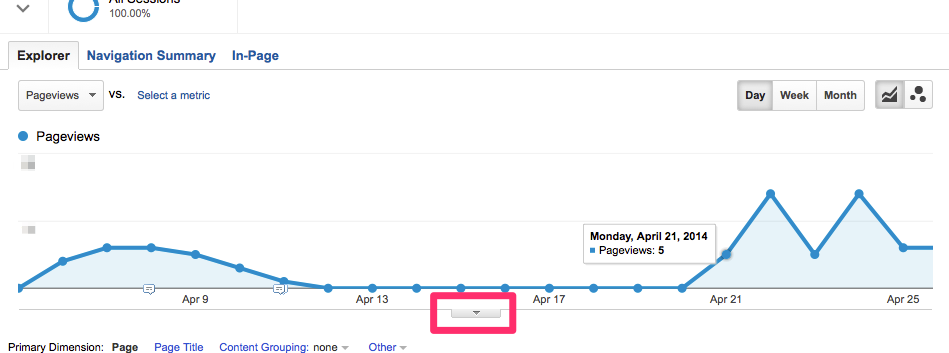
The way you set them up is usually within a specific report. You just click the arrow here…
Then, you simply create a new annotation and choose whether you’d like it to be shared or private (meaning only you would see it).
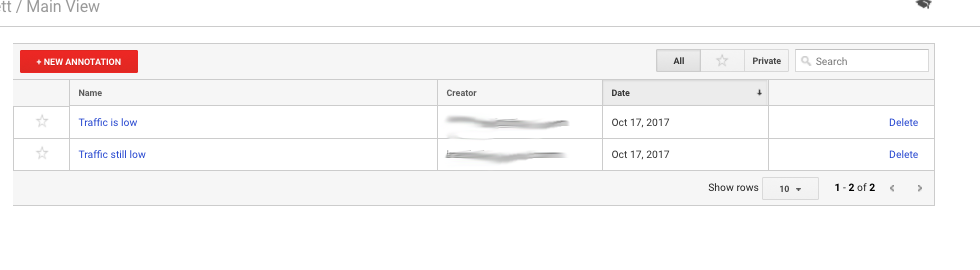
Then, you can view them from within your views tab in Admin settings. You can also create annotations from here, but I prefer doing so from the actual reporting interface.
Similarly, you can view your segments in view settings (though you would normally create them in the reporting interface).
Google Analytics Segments
Segments allow you to view the characteristics and behaviors of a specific subset of your visitor population. Your options for creating segments are pretty much endless. Some examples could be:
- Users who have logged in and visited more than three pages
- Chrome sessions with less than 3 page views
- Non-bounce sessions
- Desktop only sessions
- Mobile only sessions
- Users who visited X page directly after visiting Y page
...and on and on. There really are unlimited options here, so it’s tough to cover this in-depth in such a short space. Here’s some recommended reading on Google Analytics segments.
Another feature worth knowing is scheduled emails.
Google Analytics Scheduled Emails
With this feature, you can schedule automated email reports to be sent out. That’s it.
Want a specific report emailed out to specific people? Use this feature. If not? Ignore it. It’s really easy to set up scheduled emails, too. Here’s a guide on how to do it.
Google Analytics Custom Channel Groupings
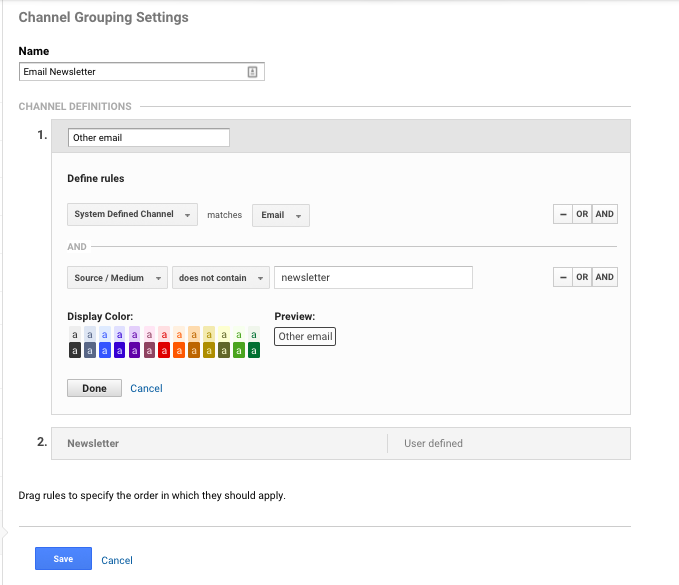
One more feature in this section you should know is custom channel groupings. Channel groupings are rule-based groupings of your traffic sources.
Custom channel groupings is another area where you’d want to know Regex to do things right. It’s all about setting up rules to determine how your reports would read.
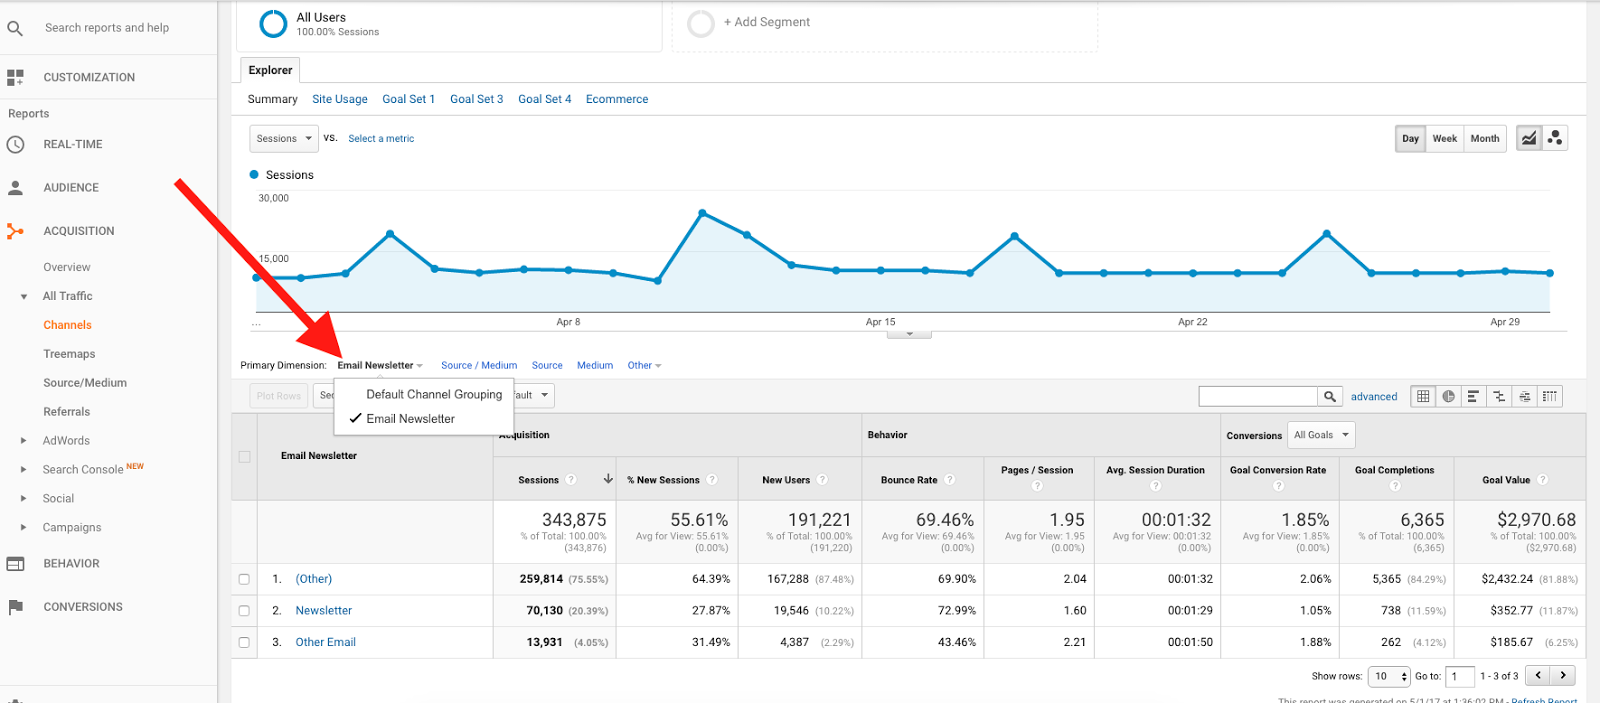
So, if you go to Custom Channel Groupings in the view panel and click “new channel grouping,” that’s where you can set up your custom groupings. If we wanted to set one up for our email newsletter traffic, it may look something like this…
Then, when you’re in your Channel report in the GA interface (Acquisition > All Traffic > Channels), you can sort by custom groupings...
Google Analytics Attribution Models
The last feature here I’ll mention is attribution models.
I don’t think you should worry about attribution modeling if you’re just setting up Google Analytics. Unless you have a complex mix of online channels as well as offline sales, and probably a lot of paid acquisition, you probably don’t need to waste much time thinking about attribution.
If you’d like to learn more about eCommerce attribution, however, this post has lots of information.
The main limit to views is that they don’t collect data retroactively, only from the time they’re created and moving forward. So, if you created View #1 six months ago but View #2 today, View #2 wouldn’t have the last six months of data but View #1 would.
A quick point about setting up your Google Analytics accounts: When you create an account in Analytics, the account gets a unique ID. This ID is part of the tracking code.
For example, if the tracking code for your site uses the property ID UA-10876-1, the account ID is the central number 10876. This comes in handy when you’re auditing your analytics to see if you have double tracking or cross-domain tracking problems.
Beyond your basic account level setup and Admin options, there are two big things that matter in setting up Google Analytics: goals and events. I’ll briefly cover each of these (though the topics are quite large and could fill up a book).
Setting Up Google Analytics Goals
When it comes to setting up Google Analytics, you need to think about goals. You can’t use Google Analytics if you don’t use goals.
You might think you’re getting the most out of Google Analytics, but if you’re not using goals, you’re barely scraping the surface. Even if you look at traffic numbers, check out your bounce rate, see what devices your audience is using -- all of that, in isolation, doesn’t mean much without measure against business goals.
You might even look at their demographics and interests (if you’ve set that up right). But if you haven’t set up goals, you’re missing out almost all the benefits Google Analytics offers.
Setting up Google Analytics goals forces you to take a strategic approach to your measurement. It makes you proactively ask what’s important to measure and then set up your site and Analytics to do so.
Without goals, you can’t start thinking about the really critical eCommerce growth levers like purchase frequency, retention, or average order value. (By the way, retention is particularly a struggle for eCommerce as well as SaaS.)
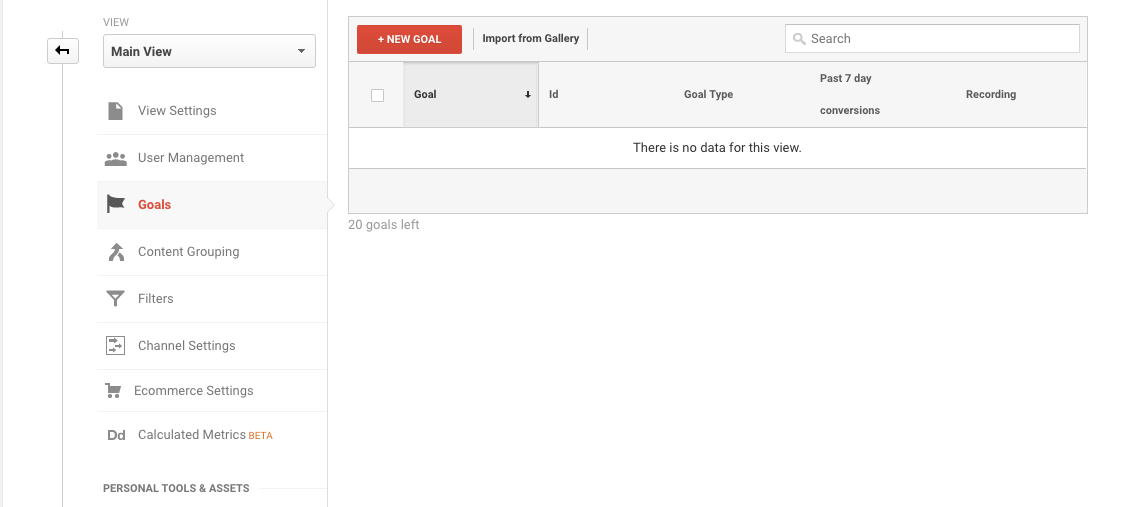
For the most part, it’s easy to set up goals in Google Analytics. Just log into your Google Analytics account and then:
- Click Admin, and navigate to the desired view.
- In the View column, click Goals.
- Click +NEW GOAL or Import from Gallery to create a new goal.
You have three basic options for creating goals:
- Using a goal template
- Creating custom goals
- Creating Smart Goals
I won’t go too deep into the different types of goals. (Here’s a great guide for that if you want to read more.) When you’re starting out, however, goal templates will usually do the trick.
Goal Templates
With goal templates, you can easily set up goals around standard processes, like visits to your Thank You Page (which would naturally follow a conversion).
Let’s pretend we’re doing that for an eCommerce site here:

You’ll notice in the image above that I also added steps under “Funnel.” This allows you to track users step-by-step as they go through your funnel (be it a checkout or otherwise), so you can get more insight on which points cause the biggest drop-off.
This allows you to find conversion optimization opportunities.
Some things to know about Google Analytics goals:
- A goal in GA is a set of criteria defined by you to measure if visitors are performing certain actions on your site.
- A conversion is complete when a visitor performs a goal-defined action.
- Goal completions count once per session.
- Visitors can complete more than one goal per session.
- You can have up to 20 goals per view.
- Once it’s created, you can’t delete a goal.
- You can pause data collection and hide goals from your reports.
Think about what matters to your business and set up goals in Google Analytics to track for it.
Setting Up Google Analytics Events
Events in Google Analytics get kind of tricky, but this is what separates the good from the great.
Events are where you can get granular on user behavior and track meaningful micro-interactions to more deeply understand the user experience.
Here’s Google Analytics’ official definition:
“Events are user interactions with content that can be tracked independently from a web page or a screen load. Downloads, mobile ad clicks, gadgets, Flash elements, AJAX embedded elements, and video plays are all examples of actions you might want to track as Events.”
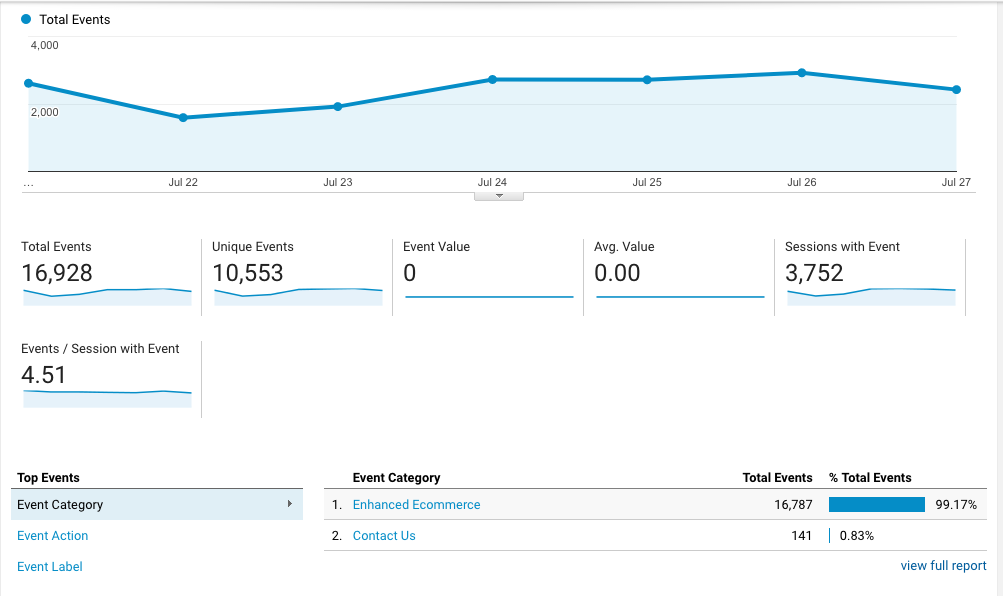
Once you’ve set up events, here’s what a report should look like from the GA interface (accessible via Behavior > Events > Overview):
There are three components that make up Google Analytics events:
- Category
- Action
- Label (optional, but recommended)
For example, if you have a video on your homepage and want to track interactions with it, the following values could be in play:
- Category: "Videos"
- Action: "Play"
- Label: "Home Page"
You can track tons of interaction with events:
- Outbound links to other sites
- Click-to-call or email links
- Clicks to PDFs
- Interactions with a slider
- Video plays
….and on and on.
Just like setting up Google Analytics in general, there are two ways you can start setting up event tracking: manually or with Google Tag Manager. Again, I prefer Google Tag Manager.
To do so manually, you’ll need to do a bit of coding. (Or, more likely, work with some technical talent at your company.) Read more on event tracking setup here.
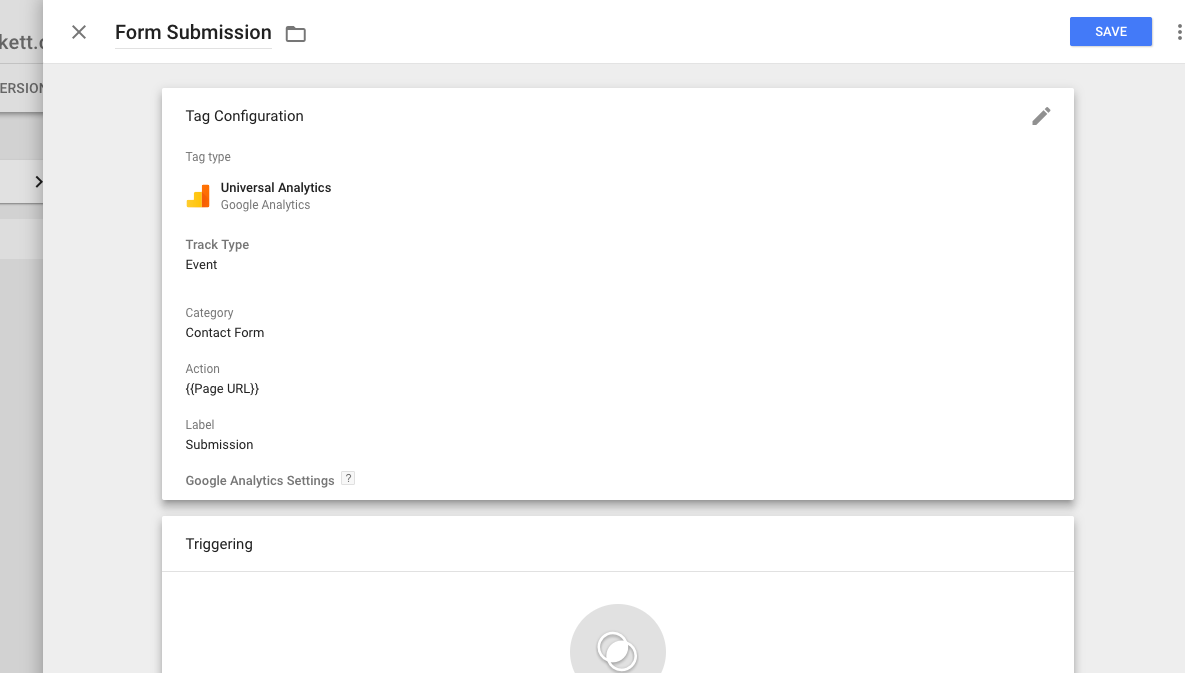
6 Steps To Set Up An Event In Google Tag Manager
- Log into Google Tag Manager.
- Click “Add a New Tag”.
- Create a new tag and select Universal Analytics as the Tag Type.
- Choose “Event” for the track type.
- Set your Event Category, Action, Label and Values.
- Set your trigger (when it will fire).
Some tips for event tracking:
- Before you start writing any code or setting up any events, make sure you’ve strategically outline what you want to track and set up coherent naming conventions.
- Think about who on your team should have access to setting up events. In general, the fewer people who have this authority, the better (without creating a resource bottleneck of course).
- Events can be nonInteraction, which means it doesn’t affect your bounce rate. If an event is not nonInteraction, it affects your bounce rate. Think about that when setting things up (and read more on bounce rates here).
Beyond the Basics: Where to Go Next
As I mentioned, setting up Google Analytics is a big topic. It’s also context-dependent. If you’re a public company with a bunch of properties and subdomains, your implementation process is going to look a lot different than a company with an eCommerce shop and possibly a blog.
In addition, there are many more advanced features you can explore with Google Analytics, but also with how you integrate your data and blend it with other tools.
For instance, it’s important to link your pre- and post-purchase data for a complete picture of your customer's journey. To do that, you may add your Google Analytics data to BigQuery so you can work with it there.
Or maybe you’d like to track offline conversions like phone sales. Well, there are ways to do that too (read about that here).
Maybe you want to set up user tracking in Google Analytics with User IDs. That’s possible, too.
The point is, Google Analytics is endlessly customizable. Even the stuff we covered in this article (like goals and events) can be further customized. It’s all about your business goals and your technical prowess and resources.
If you’ve got the time, creativity, and the potential ROI, there are many ways to go beyond the basics in setting up Google Analytics.
Wrap Up on Setting Up Google Analytics
Setting up Google Analytics isn’t necessarily a hard thing to do, but there are a lot of things to remember. This guide will hopefully serve as a sort of checklist to get you started and set up.
While this article certainly isn’t a super advanced guide, it will help you avoid many mistakes that even large companies make when setting up Google Analytics.

Using Google Analytics the right way can help pave the way for better business decisions. Hopefully, this guide helps you on your way. As always, if you have any questions regarding setup, please leave them in the comments below.