


This article is a companion piece to Technical SEO for Beginners. If you haven’t read that article yet, read it first before proceeding.
A technical SEO audit is like one of those diagnostic machines an auto mechanic uses to discover that an oil leak was caused by a broken engine gasket.

Just like an auto mechanic can’t fix an engine without first diagnosing the problem, or a doctor can’t prescribe a medicine without first diagnosing the sickness, a technical SEO specialist can’t fix your website without first diagnosing its technical issues.
Can you imagine if a doctor misdiagnosed a broken leg with the stomach flu? Or a mechanic misdiagnosed a blown engine with a loose screw (this actually happened to me)?
It would be just as bad as an SEO specialist who misdiagnosed a site structure issue with a ranking penalty (ok, maybe not as bad).
In all cases, you’d waste a lot of time and money without ever fixing the problem.
Diagnosis is the first stage of strategy. Without it, you’re just guessing (and failing a lot).
In this article, we’re going to explore the step-by-step process included in a technical SEO audit, along with the different audit tools you can use to uncover and fix any issues.
No more guessing. No more wasted time. And no more technical SEO issues.
- What’s included in a technical SEO audit?
- How to run a technical SEO audit
- 1. Site architecture audit
- 2. Crawl and index audit
- 3. Site speed audit
- 4. Security audit
- 5. Mobile friendliness audit
- 6. Structured data (schema) audit
- 7. Duplicate content audit
- 8. International/multilingual audit
- Other technical SEO audit tools
- Completing your audit
Get brand new SEO strategies straight to your inbox every week. 23,739 people already are!Sign Me Up
Before we can define a technical SEO audit, first we need to define technical SEO.
Technical SEO refers to optimizing the technical foundation of your website to ensure it’s structured, crawlable, indexable, fast, and user-friendly.
A technical SEO audit is a step-by-step examination of the different technical elements of your website that exposes any issues that could be hurting your search engine rankings.
Using various SEO tools, a technical SEO audit diagnoses the health of your technical SEO and pinpoints problem areas so you can fix them.
What’s included in a technical SEO audit?
Technical SEO audits can get uber complex.
But in general, every technical SEO audit should include an 8-point diagnostic:
- Site structure audit
- Crawl and index audit
- Site speed audit
- Security audit
- Duplicate content audit
- Structured data audit
- Mobile-friendliness audit
- Multilingual audit
Within each of those categories includes a host of different tasks a technical SEO audit should entail (all of which we’ll explore in a minute).
Note: Some people include on-page optimization elements like meta tags, meta descriptions, title tags, image optimization and keywords. We don’t. Why? Because that’s on-page SEO, not technical SEO, even if there’s some technical overlap. If you’re looking for a broader SEO audit that includes on-page elements, we’ve got tips for that too.
How to run a technical SEO audit
Running a successful technical SEO audit requires a combination of research, tools, patience, and grit.
Lucky for you, we’re going to show you which technical SEO elements to examine during each of the eight audits mentioned above, and we’ll also show you which tools to use to examine them.
Whether you're an ecommerce site, WordPress site, Wix site, or something in between, this technical SEO audit can serve as a template for diagnosing the technical health of your website.
1. Site architecture audit
Poor site architecture makes it difficult for visitors to navigate your website and find all of its pages. And it makes it difficult for search engines to crawl your site, understand its meaning, and pass link authority from one page to the next.
To ensure your site architecture is up to snuff, audit the following:
- Broken internal links (ScreamingFrog)
- Flat hierarchy (Octopus.do)
- URL structure (manual check)
Broken internal linking
A broken link is a link that leads to a 404 page.
Google uses internal links within your website to crawl and locate pages. Broken links can keep search engine spiders from finding your most relevant pages.
Also, internal links pass link juice (or page authority) from one page to another. When links break, certain pages may not receive the page authority they need from other pages, which can cost you rankings.
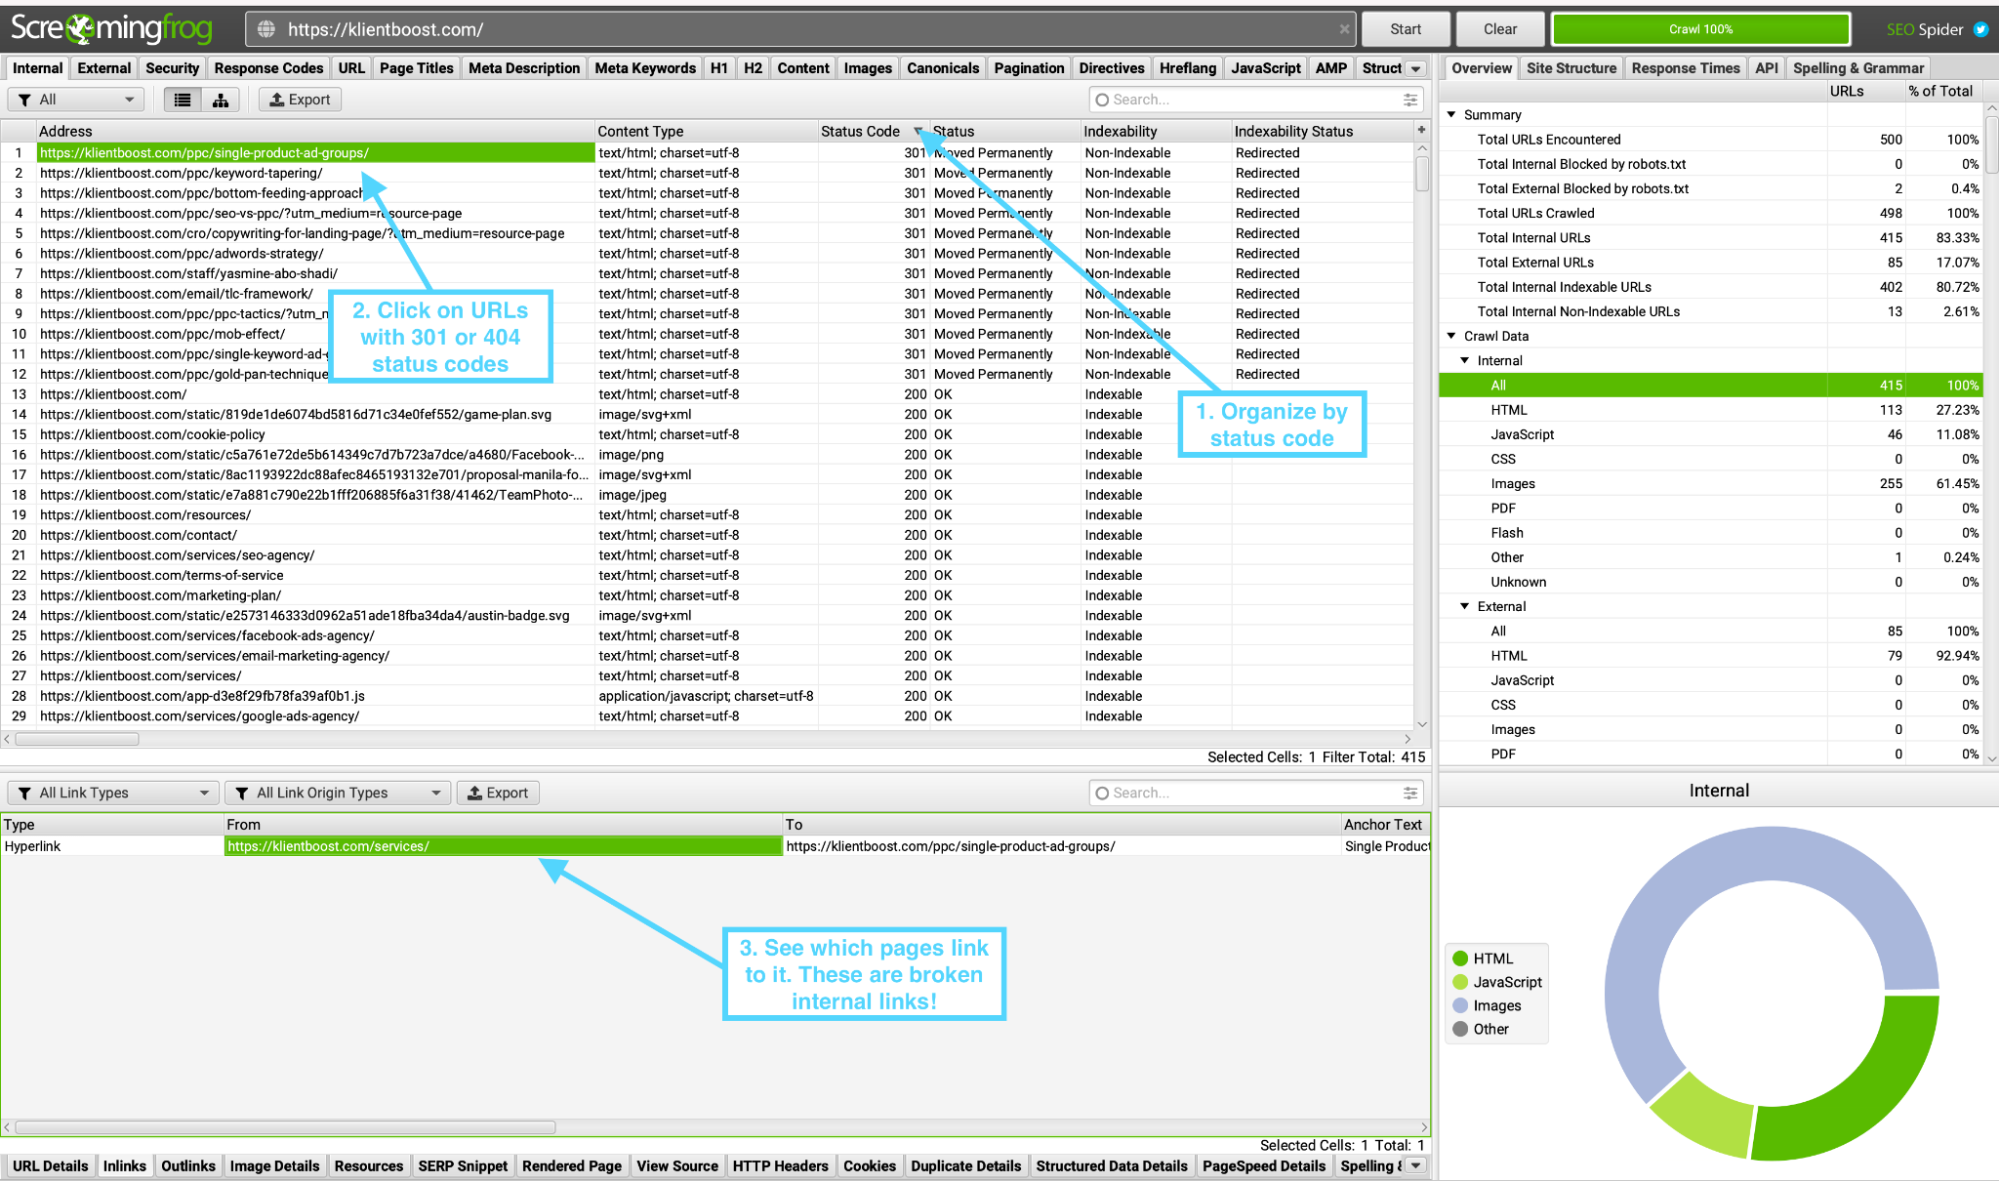
To uncover broken internal links during a technical SEO audit, we like to use ScreamingFrog (free up to 500 URLs).
Enter the root domain name of your website (home page URL), hit search, then wait until all of your pages are crawled and surfaced within Screaming Frog.
Next, filter results by response code, namely 404 codes. A 404 status code means the page could not be found.
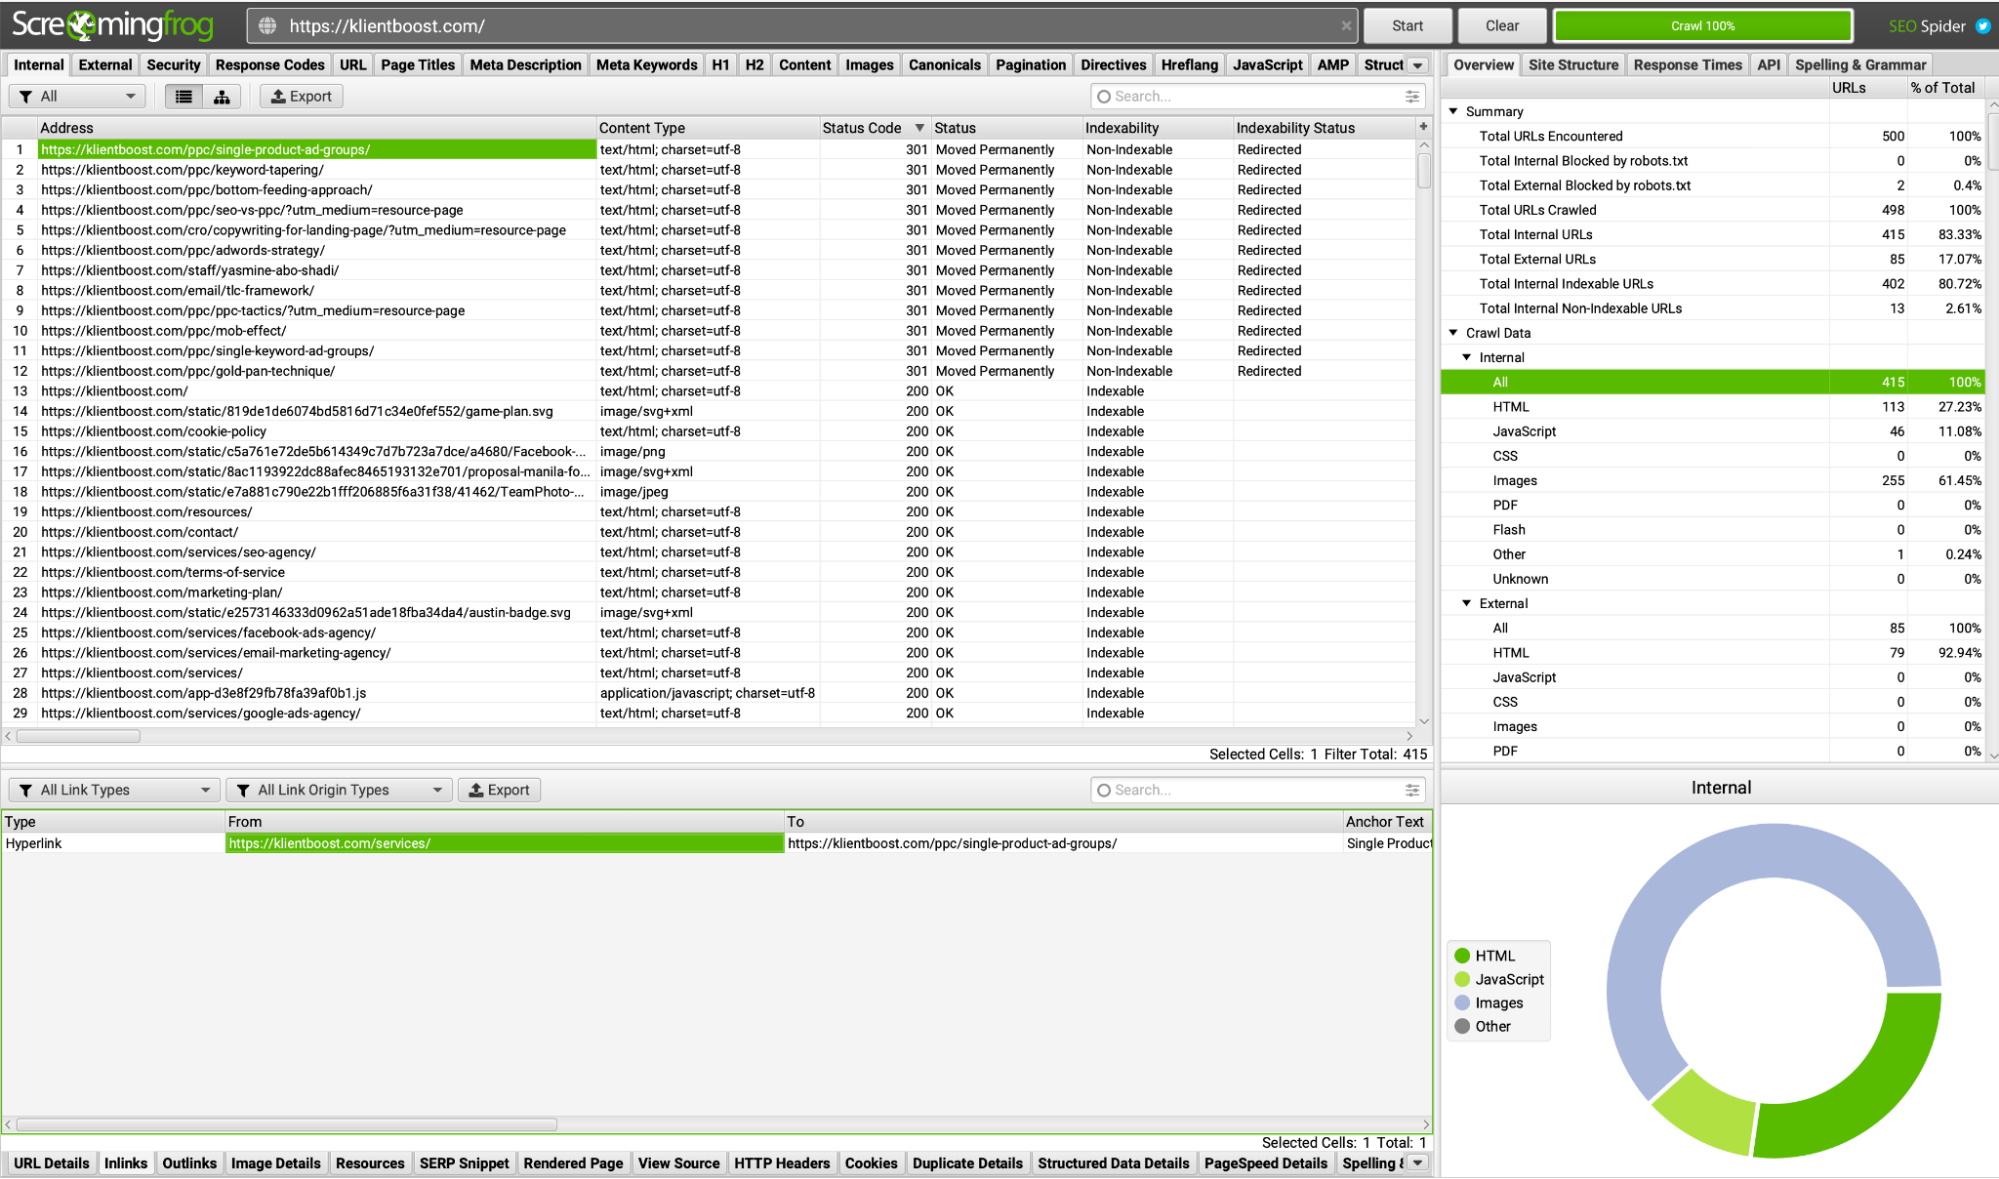
Once you have your list of URLs with 404 codes, you can now click on each 404 page to see who links to it. Those links are your internal broken links (since they point to pages that don’t exist anymore).
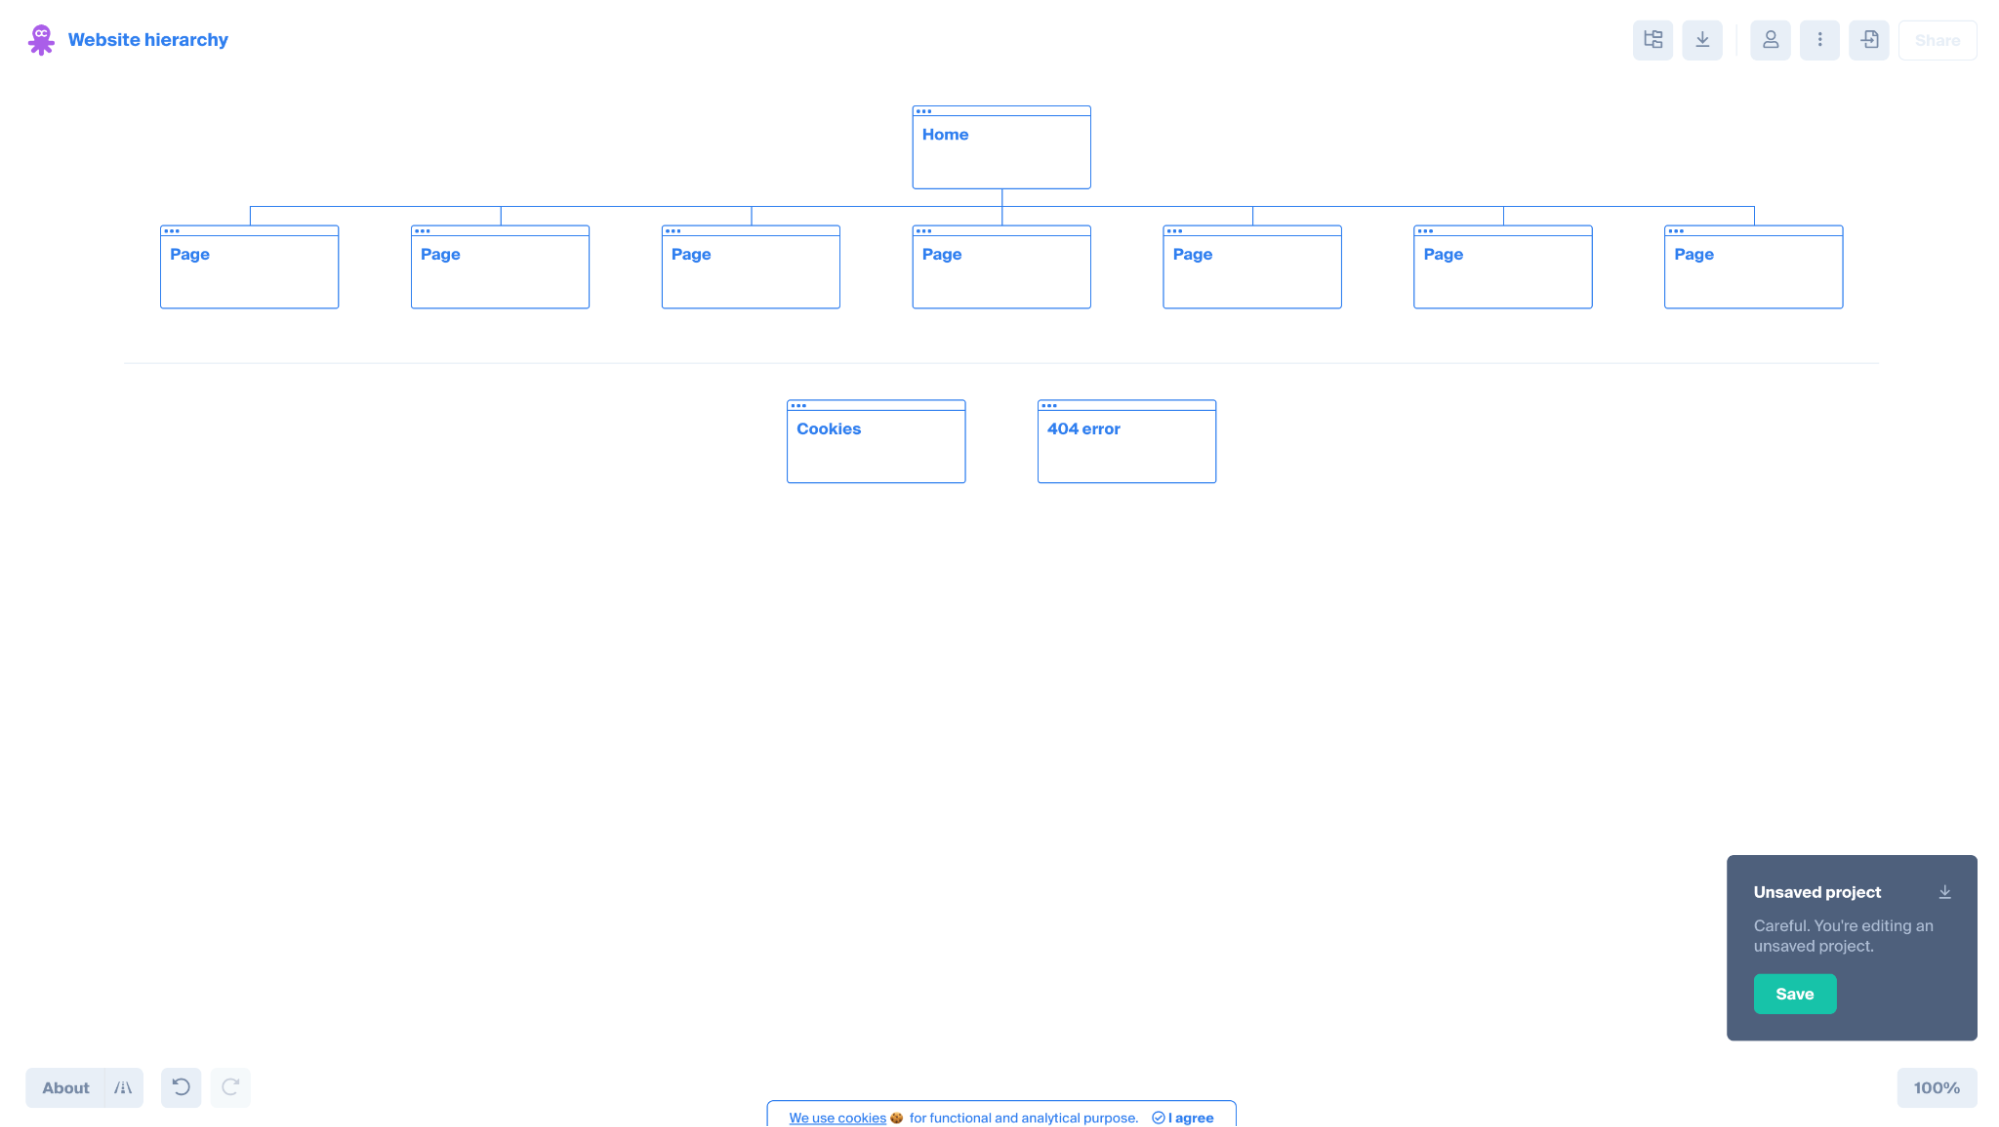
Flat hierarchy
Flat hierarchy means that all of the pages on your website are within three clicks from the homepage. That’s it.
Most importantly, a flat structure means that you’ve organized your content into categories (aka content pyramids or hubs and spokes), which makes it easier for visitors and search engines to find and understand your website.
The best way to audit your site structure to determine if it’s flat enough is to map your hierarchy using a data visualization tool.
We love Octopus.do. It’s free and it’s incredibly easy (and fast) to map your website’s architecture.
URL structure
Last, ensure that your website uses a friendly URL structure.
Clean URLs that use short, descriptive subfolder names and page names make it easier for visitors and Google to understand where they are on your website.
All it takes is a simple manual check.
Clean URLs should adhere to the following:
- Short
- Descriptive
- Consistent
- Unique, not duplicate pages between mobile (m.example.com) and desktop (example.com)
- No unnecessary IDs, filters, parameters or numbers (that may cause duplicate content issues)
- No publish dates in blog article URLs (unnecessary)
- 301 redirect all versions of your URL to the canonical
The last one is key for crawling and indexing.
For example, these are all different versions of the same page:
- example.com/
- example.com (no trailing slash)
- www.example.com
- example.com
- https://example.com
- http://example.com
- m.example.com
There should only be one version of your URL structure. Every other version should 301 redirect back to the canonical (original).
For example, www.klientboost.com is technically a different URL than klientboost.com (no www). It doesn't matter which version you use, the www or non-www (though we prefer the shorter non-www), just as long as the one you don’t use 301 redirects to the one you do use.
Now, no matter what someone types in, they’ll always go to our non-www version, and Google won’t think two versions of our site exist. Plus, by 301 redirecting different versions to the canonical, we consolidate link signals to one page (as opposed to links diluting between different versions).
To check your own domain, just type in the possible versions of your root domain (non-www vs. www, trailing slash vs. no trailing slash, https vs. http) and make sure only one version exists.
2. Crawl and index audit
If Google can’t crawl and index your website, nothing else matters.
Not speed, not backlinks, not on-page optimization… nothing.
So the first step of your technical SEO audit should entail a crawl and index diagnostic.
When auditing your website’s crawl health, analyze five key areas:
- Crawl report (Google Search Console)
- 200 status codes (Screaming Frog; Google Search Console)
- XML Sitemap (Google Search Console)
- Robots.txt (Merkle’s robots.txt validator)
Crawl report
The crawl report inside Google Search Console shows you historical stats about how Google crawls and indexes your site. It’s chock-full of useful diagnostic information.
If there’s a problem with how Google can crawl and index your site, they’ll tell you here.
Log in to Search Console, navigate to settings (bottom left), click on “open crawl stats.”
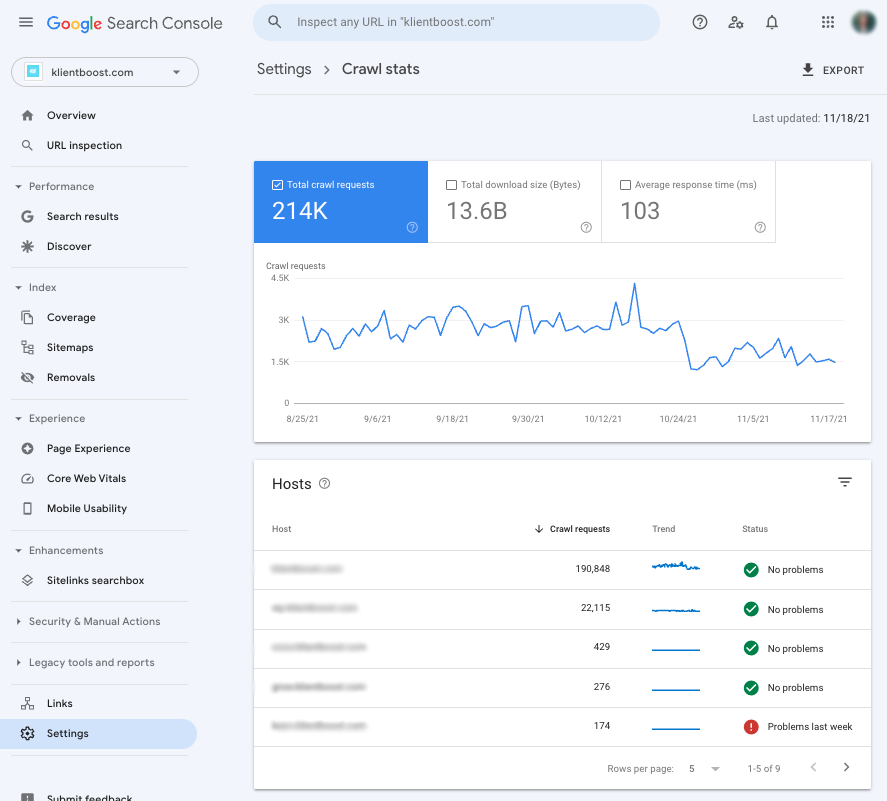
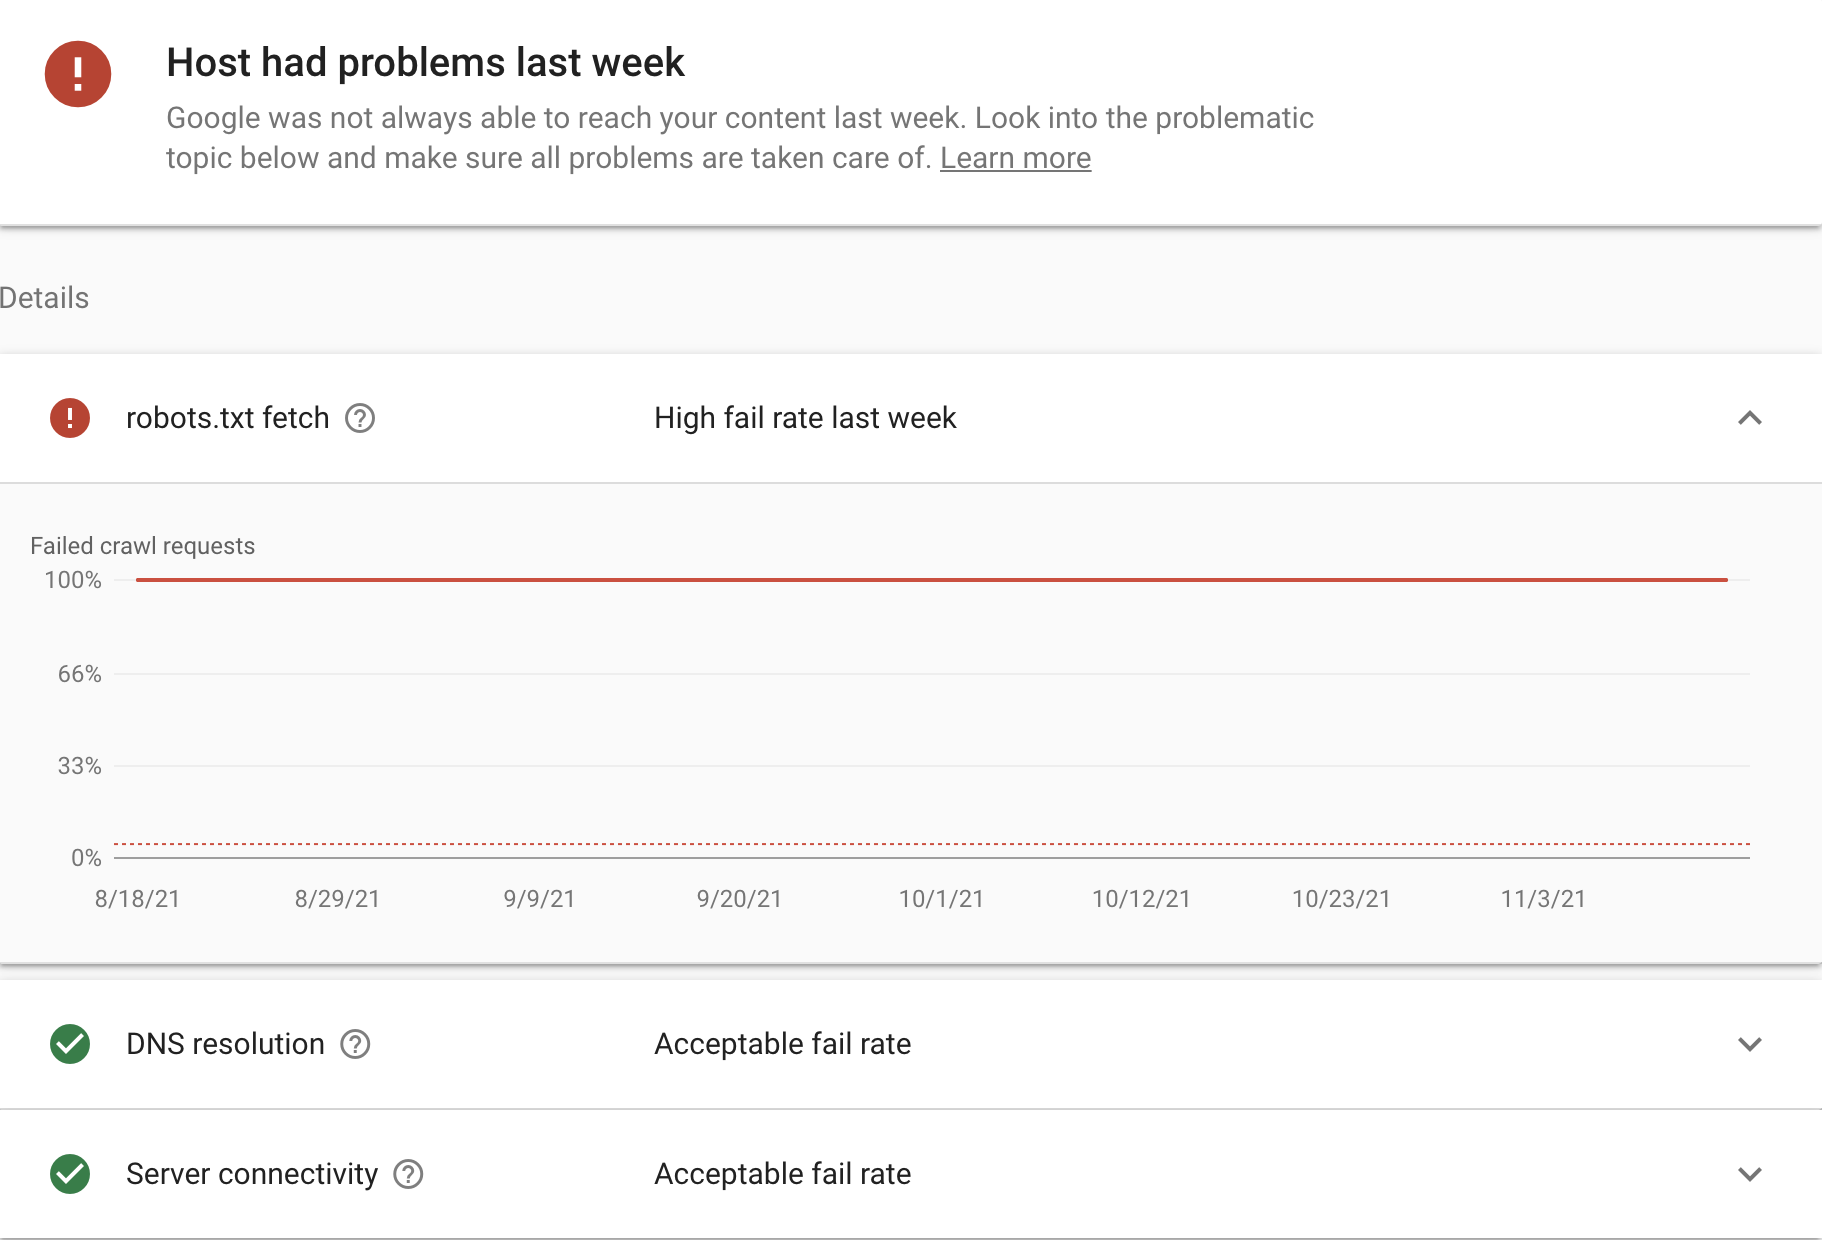
Inside your crawl stats report, you want to make sure every host (i.e. your domain and all of its subdomains) has a “No problems” status.
If there’s a problem with the way Google can crawl and index your site, it will say “Problems last week” in red (or whenever the time was).
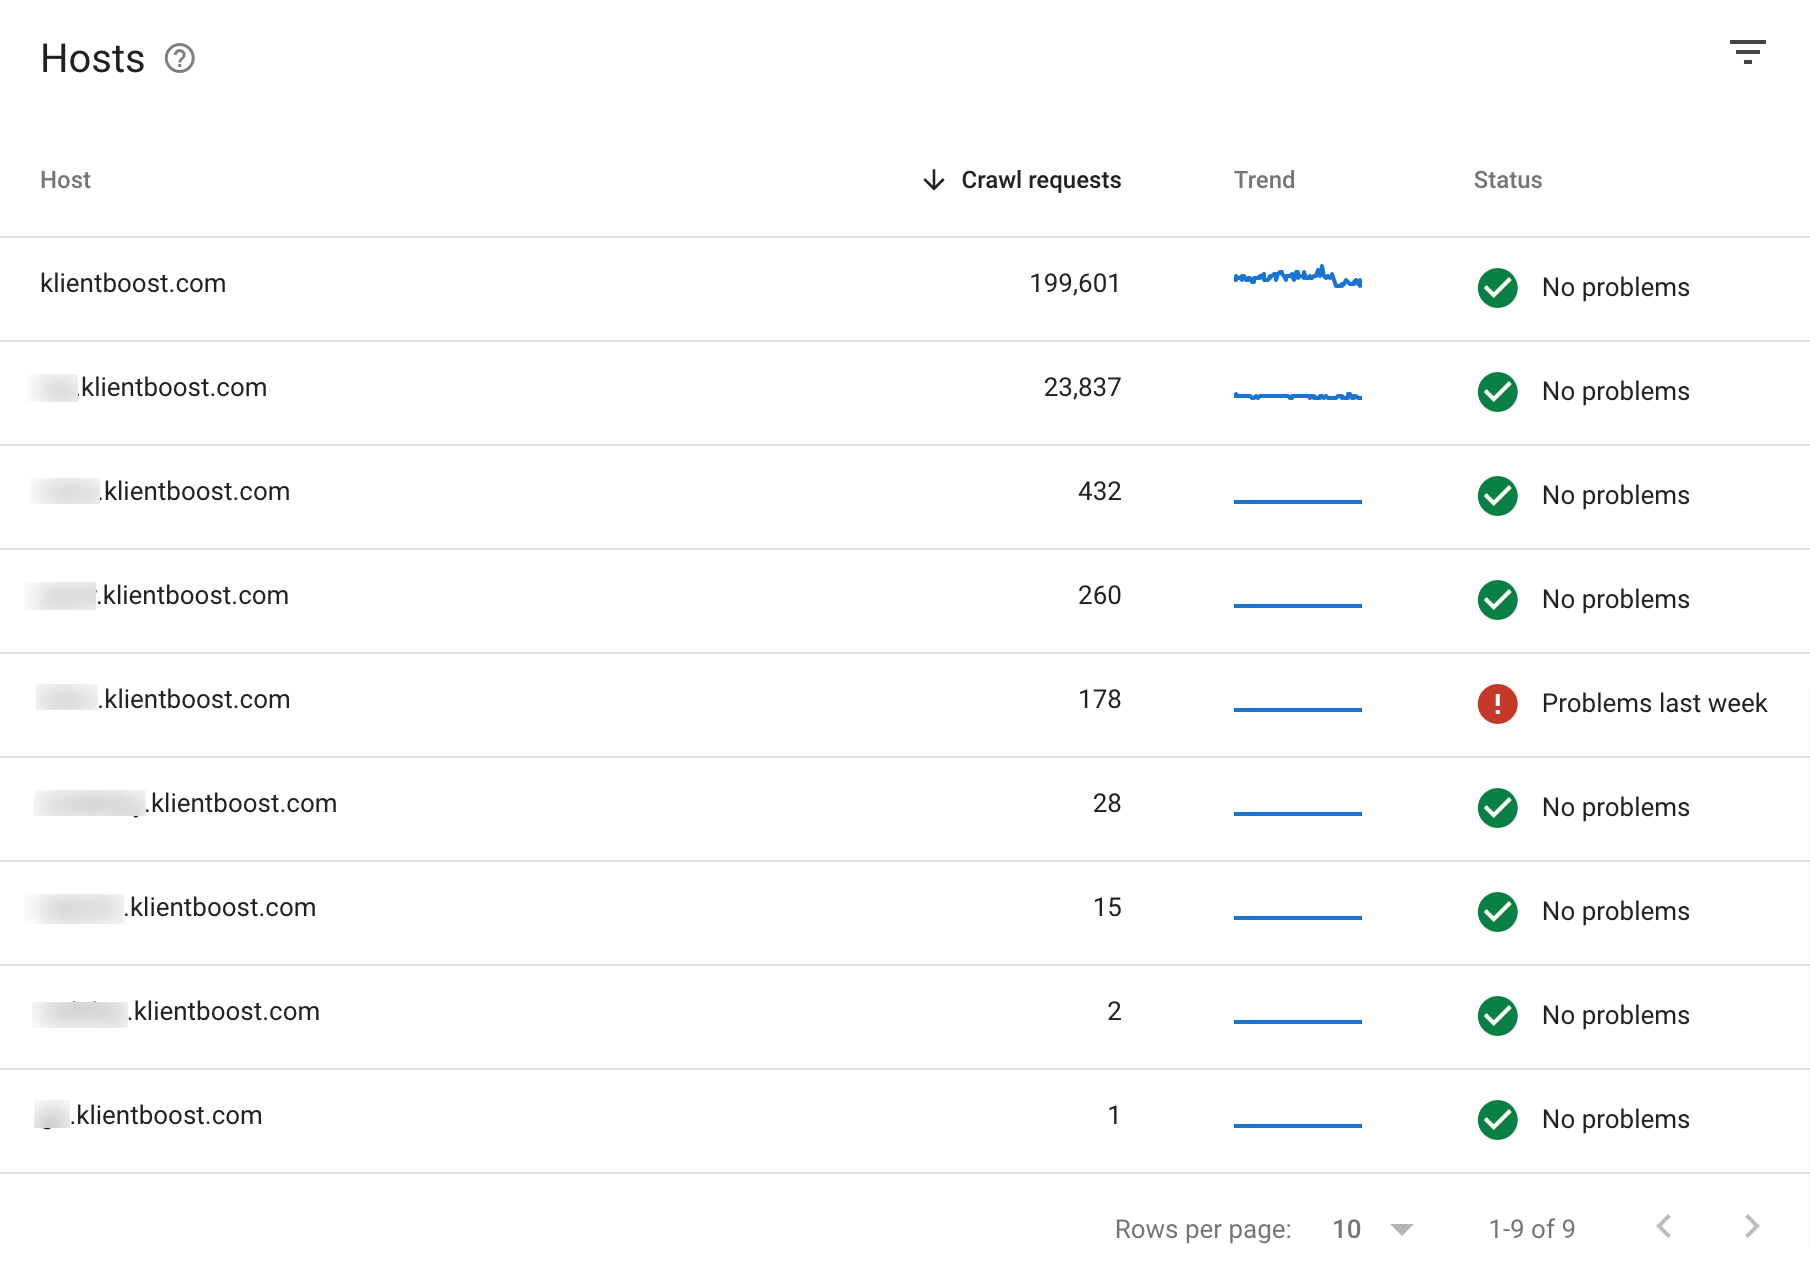
From there, Google will provide instructions to fix any problems.
200 status code
A 200 status code is an HTTP response code that means the website has been fetched and rendered successfully.
Other common codes include:
- 301 (moved permanently): this and future requests should be directed toward another URL
- 404 (not found): the requested resource can’t be found
- 500 (internal server error): generic error message
A website that search engine spiders have crawled and indexed with ease will include mostly 200 status codes.
301 redirects are fine as long as you don’t have a million of them (and avoid redirect chains). A 301 just means you’ve moved a web page permanently to a new page.
Too many 404s or 500s likely mean your website isn’t getting crawled and indexed the way it should. If this is the case, examine each URL to see if something has gone wrong.
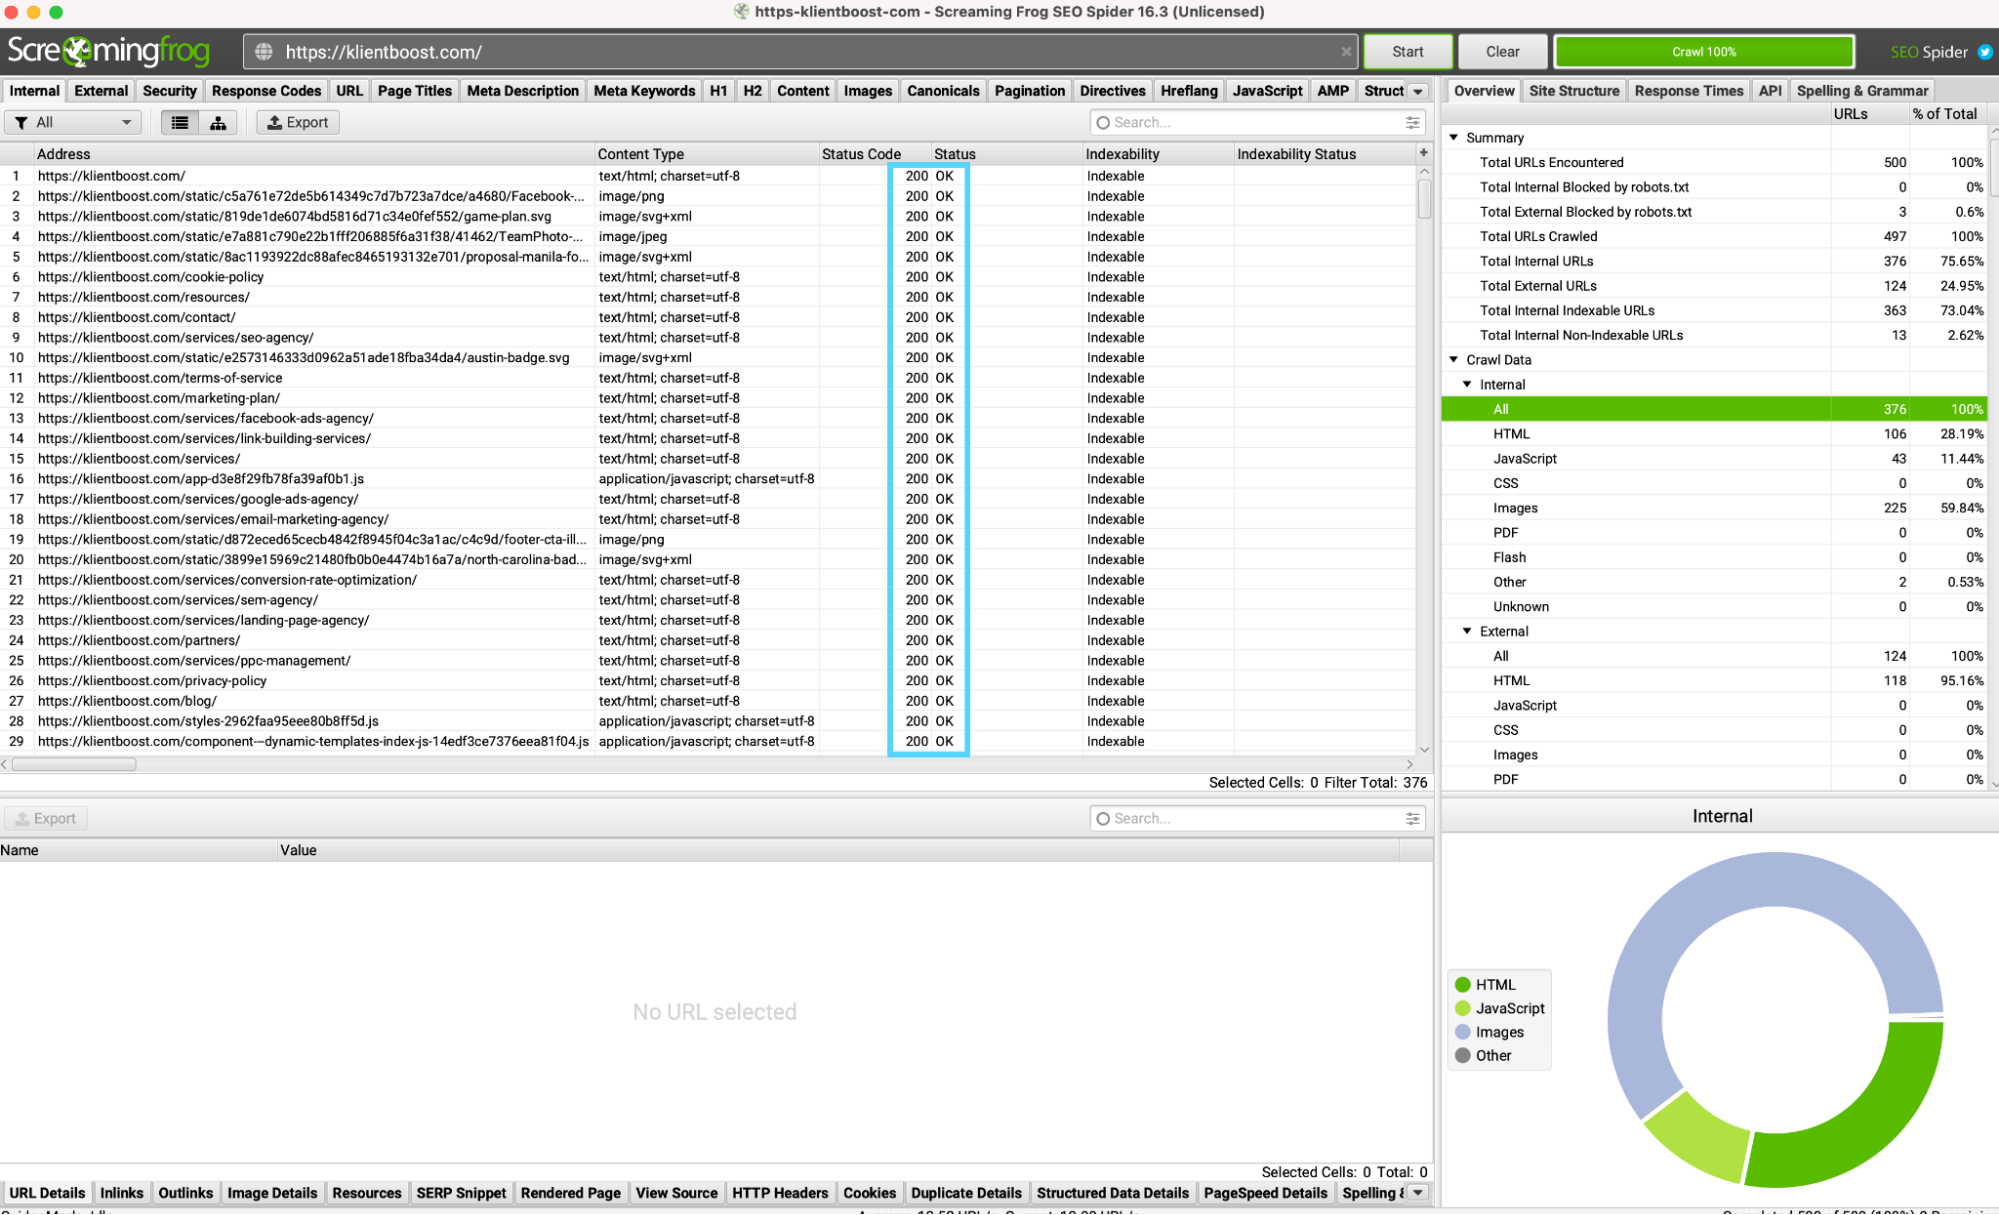
To check your website’s status codes, I like to use ScreamingFrog. You can do it in Search Console (settings > crawl stats > crawl requests), but ScreamingFrog will show you status codes for every page on your website in a few seconds (up to 500 URLs).
Download ScreamingFrog, input your URL in the search bar, and viola! Wait a few minutes and you’ll have all your status codes listed by each URL on your website.
Here’s the same information within Search Console:

Sitemap
Within Google Search Console, you can upload and monitor the health of your sitemap (and make sure all your pages, videos, and images are included).
If there’s an issue with it, Google will tell you.
You won’t need to do this often, but when you do upload your sitemap, ensure Google can read it without problems.
Log in, and navigate to the sitemap tab (left):
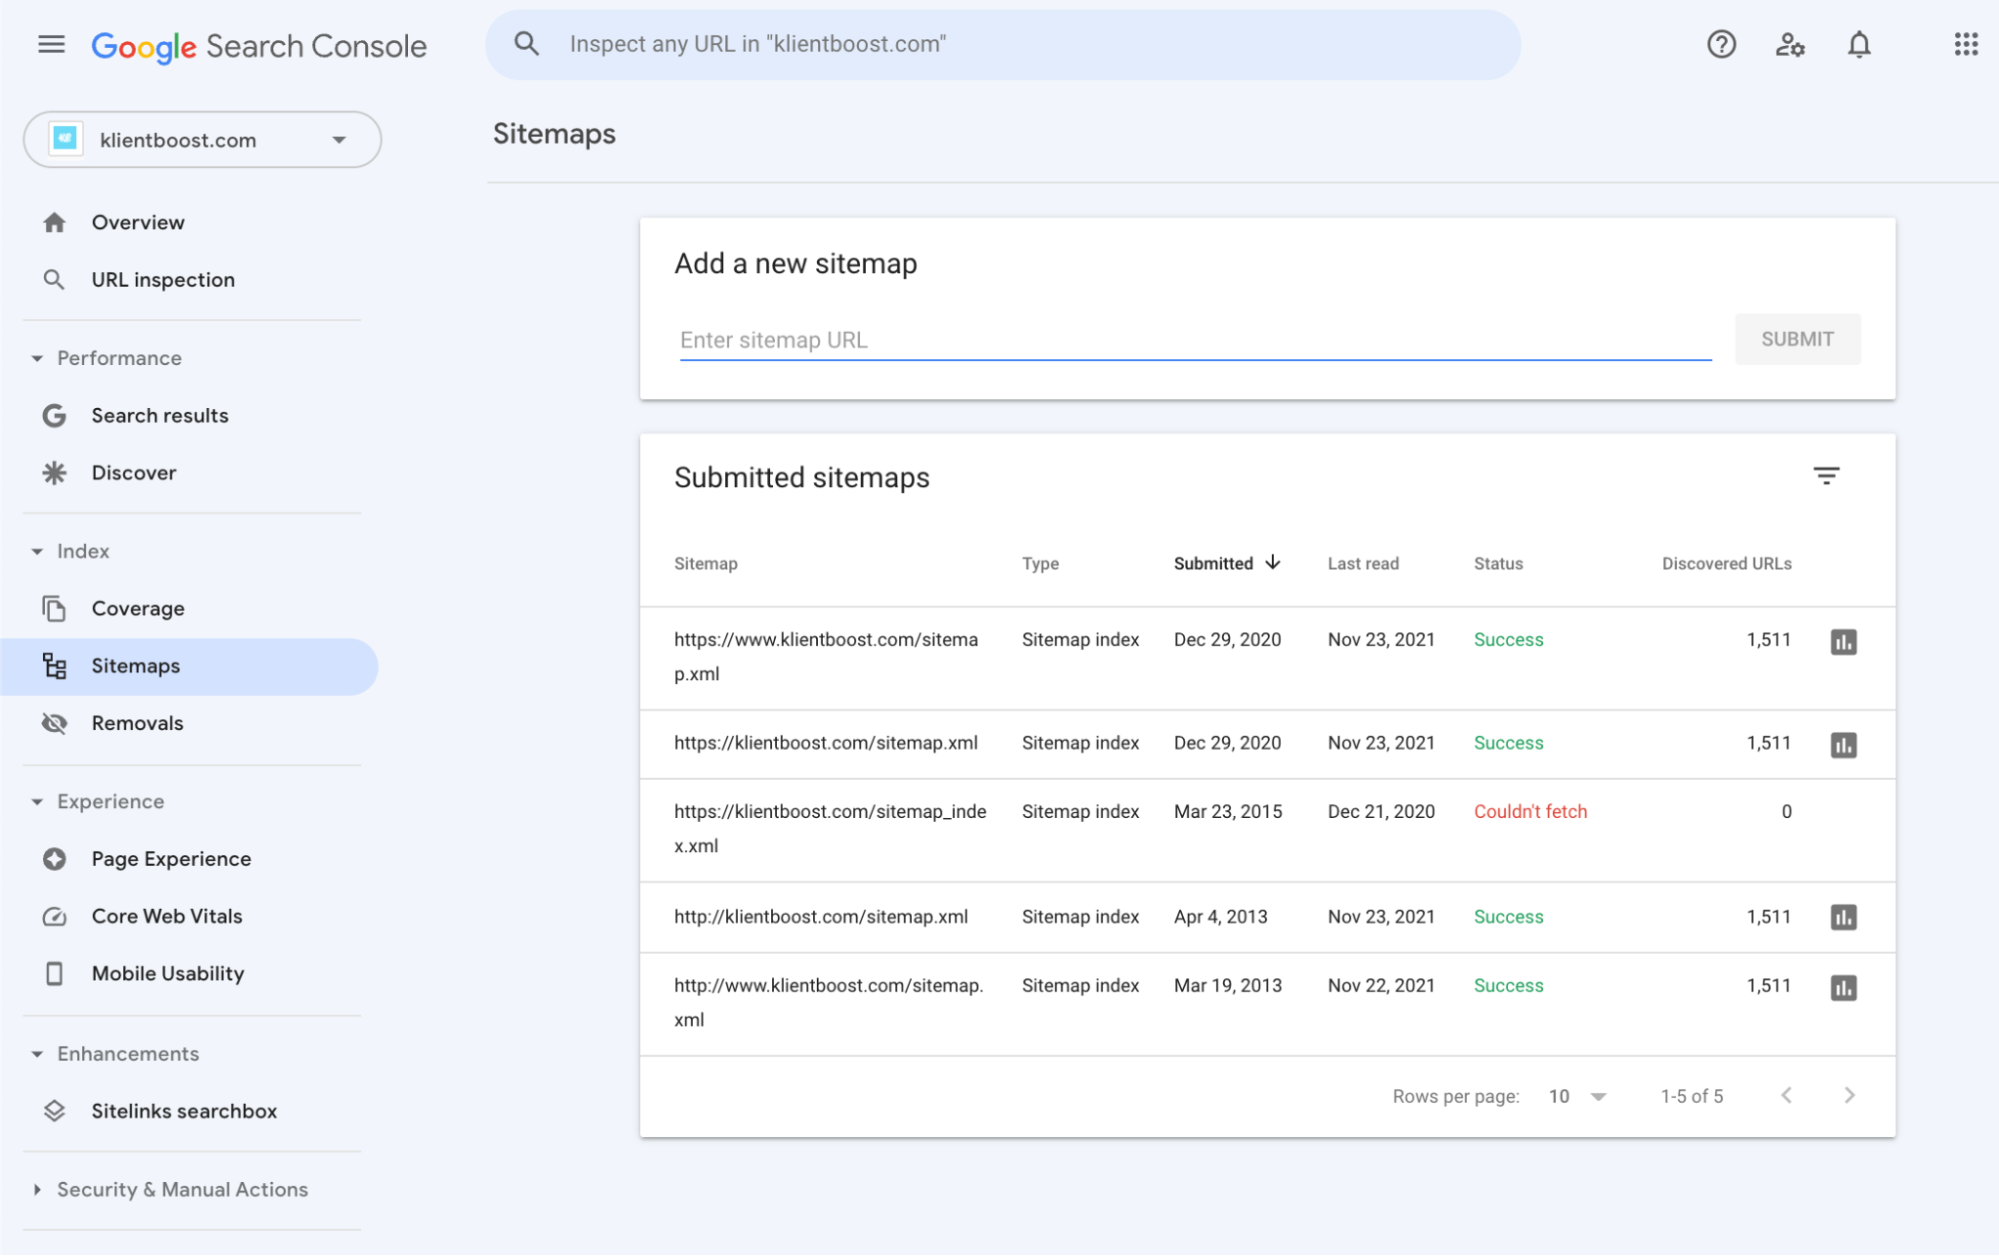
Your most recent sitemap submission should have a “Success” status in green.
If it doesn’t, like with the crawl report, click on the sitemap and see why.

Also, though not required, Google recommends that you create a separate sitemap for your videos, images, pages, and news articles (if you have any).
Splitting up our sitemap makes it easier to check the health of different sections of your website. If your page, image and news article sitemaps look ok in Search Console, but your video sitemap doesn’t, then you know exactly where the issue lies.
To learn more about sitemaps, check out our article here: How to Create and Optimize an SEO Sitemap.
Robots.txt
Your robots.txt file tells web crawlers how to crawl your website.
What your technical SEO audit should reveal during this step is whether or not search engines can crawl your website based on the permissions you’ve allowed. And if they can’t, did you discourage search engines on purpose?
In most cases, you can check your robots.txt file manually and get all the information you need.
Just visit your URL + /robots.txt. For example, our robots.txt is at klientboost.com/robots.txt.
For basic robots.txt files, your file should look like one of the three below:
- Prevent all web crawlers from crawling your site (“noindex:): User-agent: * Disallow: /
- Allow all web crawlers to crawl your site (“index”): User-agent: * Allow: /
- Block specific crawlers from specific pages: User-agent: Googlebot Disallow: /seo/keywords/.
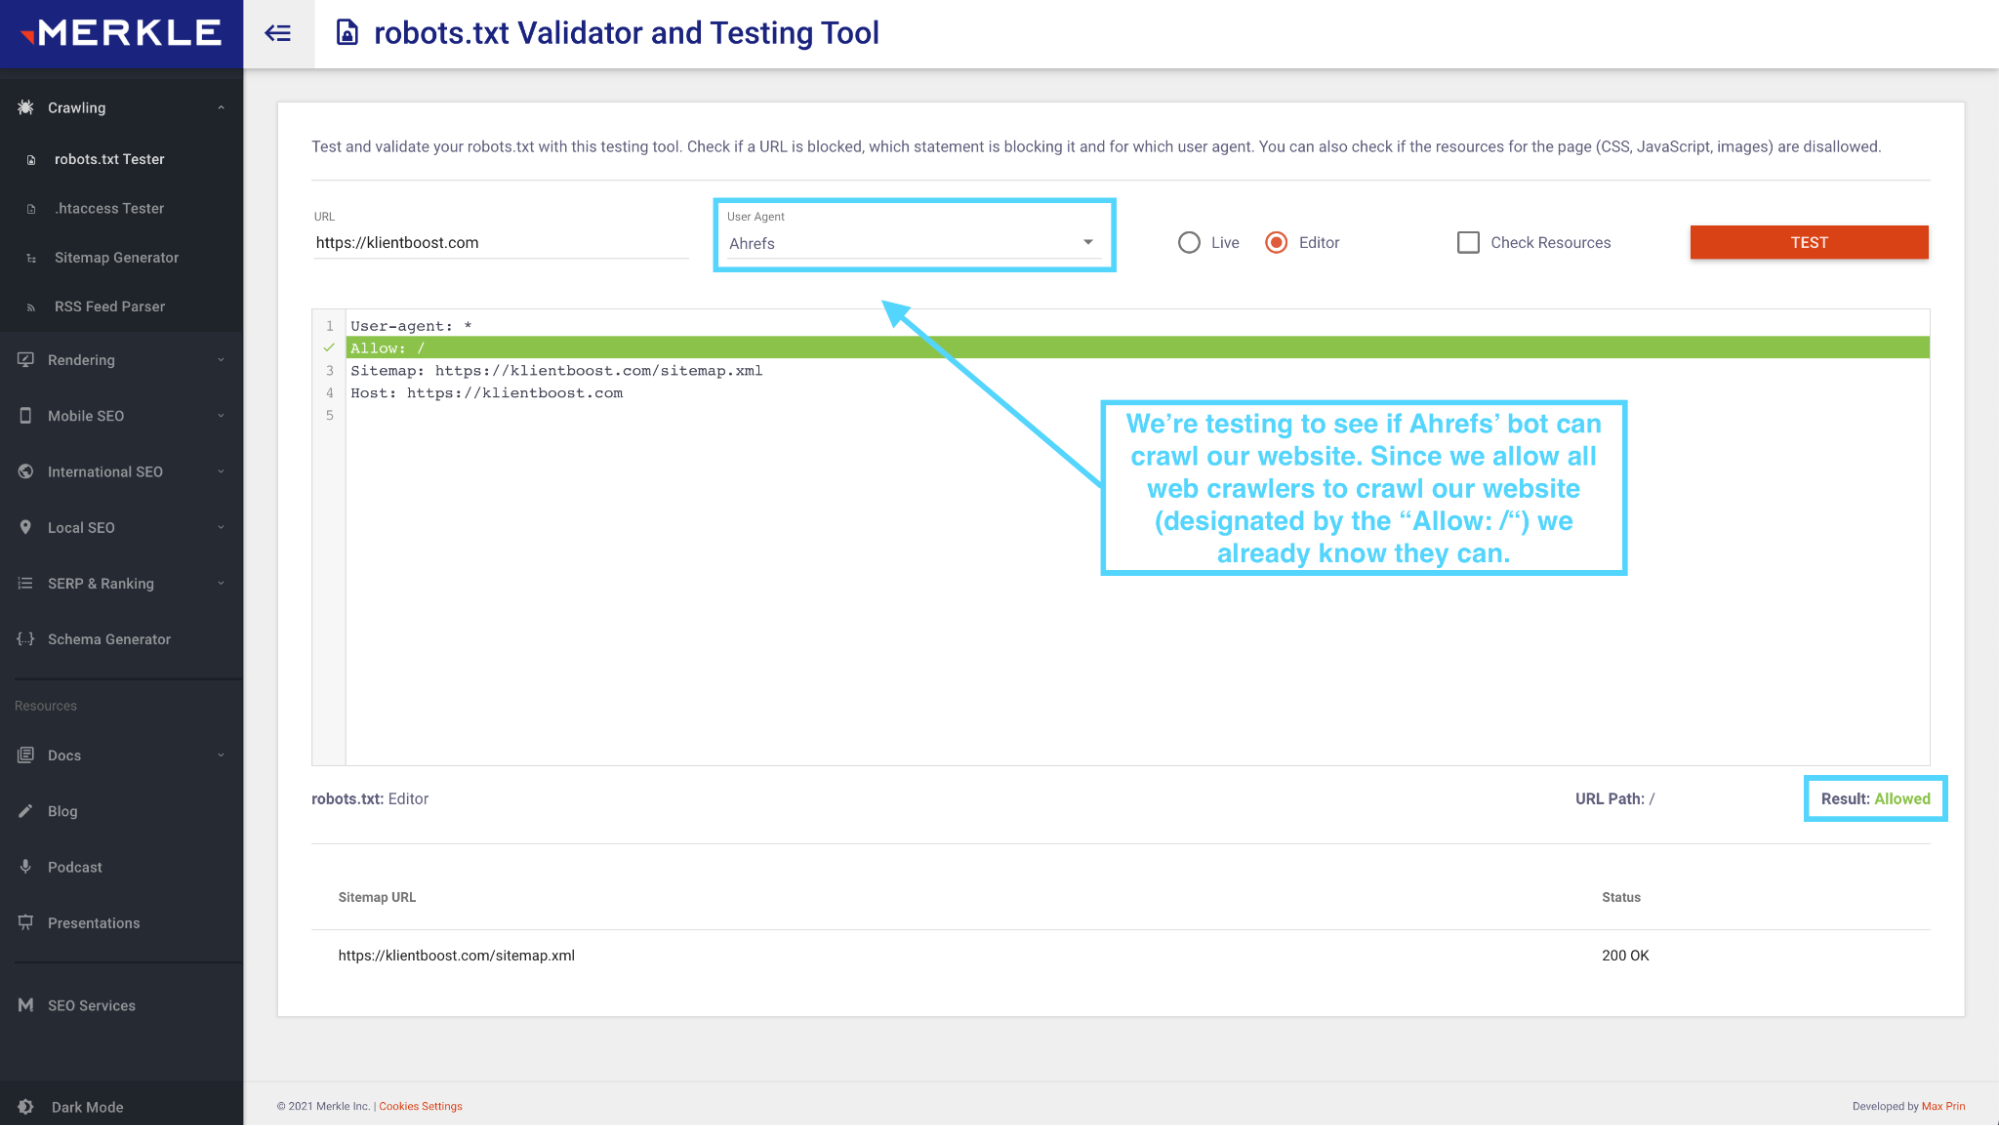
You can also use Merkle’s free robots.txt test tool. It lets you toggle between different web crawlers, like LinkedIn’s web crawler, Screaming Frog’s web crawler, or Googlebot, to see if they can crawl your website based on your robots.txt permissions.
Just input your URL, select which web crawler you want to check, and it will tell you:
Note: Your robots.txt isn’t the only place you can noindex a website. You can noindex on a page-by-page basis too.
3. Site speed audit
Not only is page speed one of Google’s algorithms ranking factors, but when page load speed goes from 1s to 3s, it increases bounce rate by 32%.
To audit your website’s speed performance, you can run two different tests:
- Site speed report (Google Analytics)
- PageSpeed Insights
Together, you can identify which pages need work.
Site speed report (Google Analytics)
Google’s PageSpeed Insights tool works great on a page-by-page basis, but it doesn’t tell you average site speed (as in all your pages), nor does it let you drill down easily to see which pages perform the best or worst.
The site speed report within Google Analytics, however, gives you a birds-eye view of your site’s total performance, and it even lets you investigate which pages load the slowest (not just one, but all of them).
First, login to Google Analytics and navigate to behavior > site speed > overview (like in the image below).
From the overview, you can see:
- Average page load time (sec)
- Average redirection time (sec)
- Average domain lookup time (sec)
- Average server connection time (sec)
- Average server response time (sec)
- Average page download time (sec)

Then, if you navigate to site speed > speed suggestions (one tab down) you can see an expanded view of each page’s individual performance.
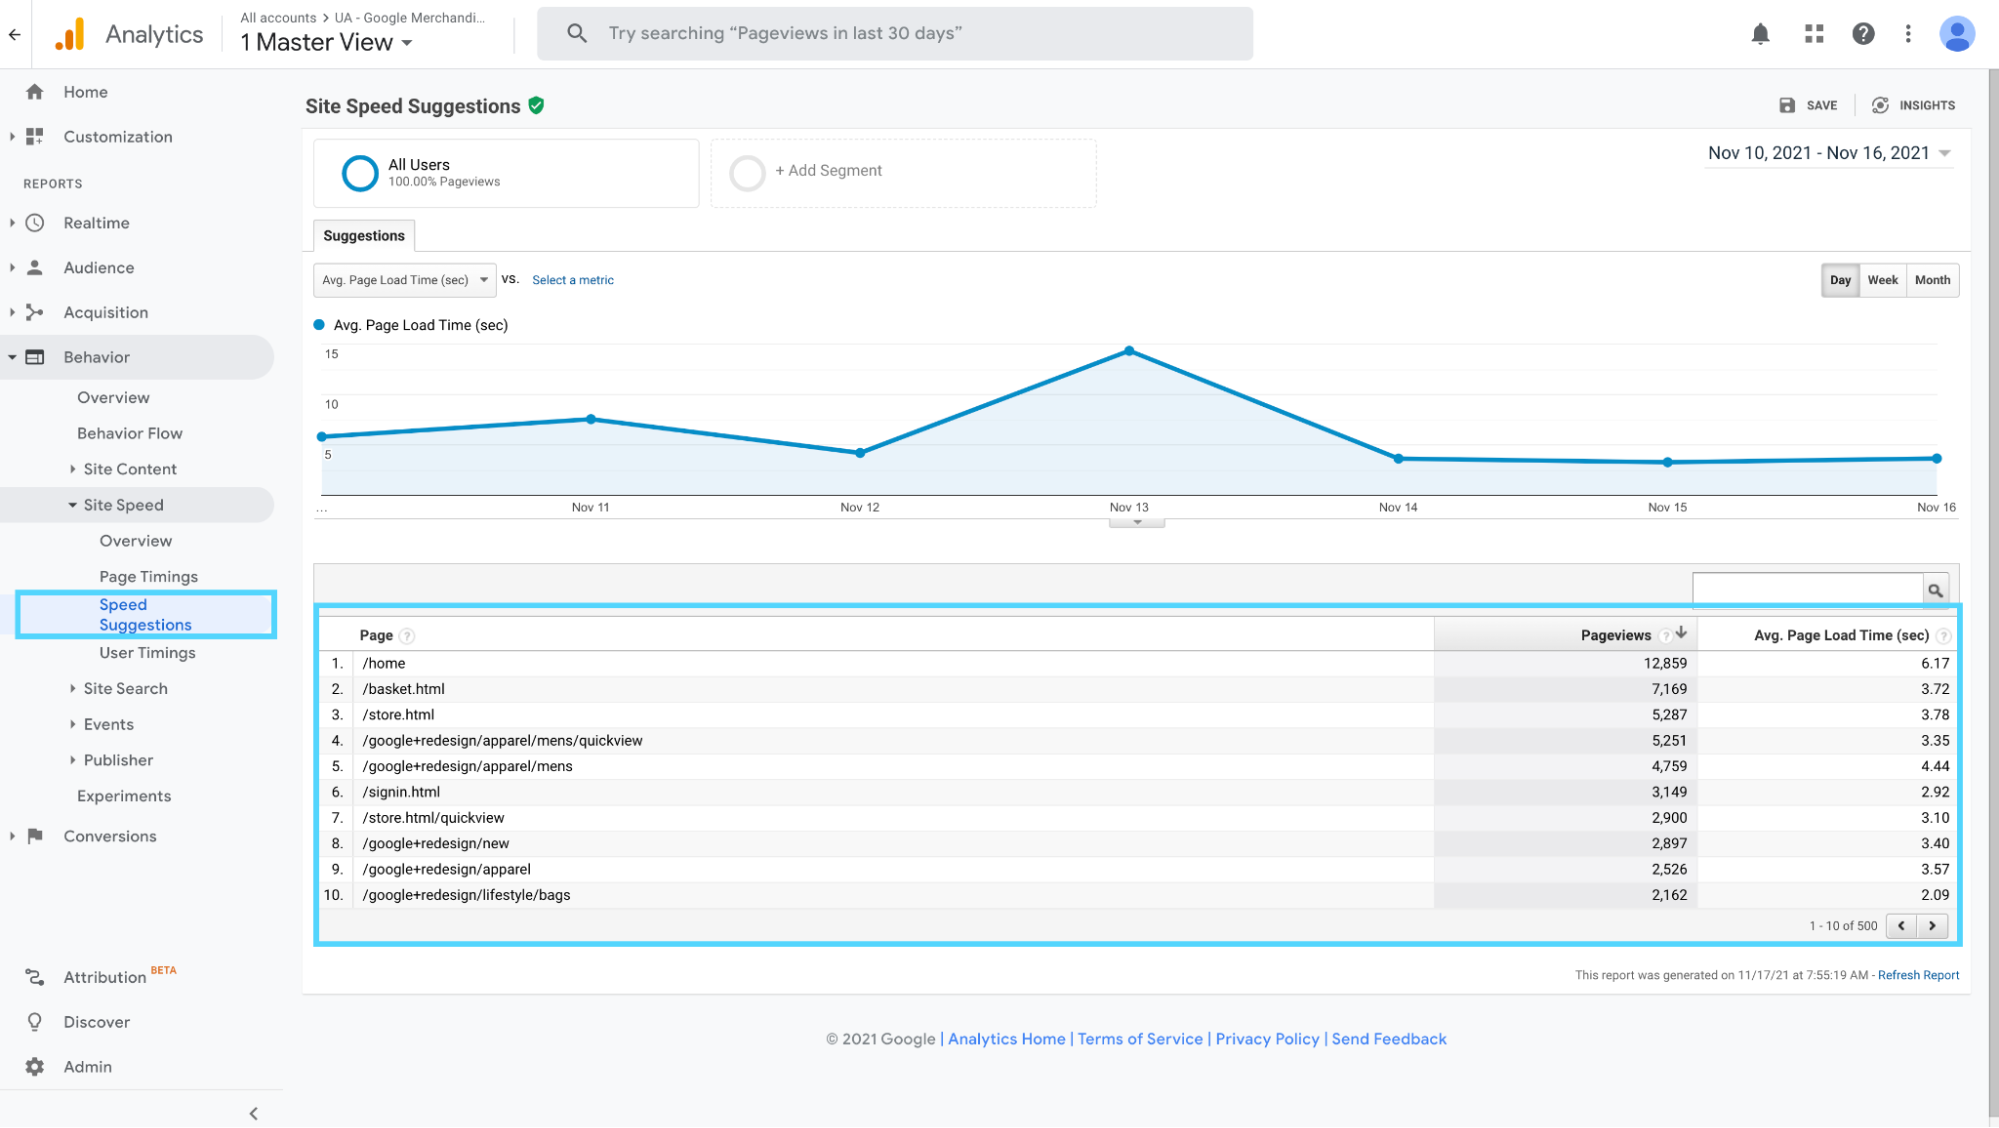
This is gold: now that you can see every single page’s load time, you can investigate each one individually using Google’s PageSpeed Insights tool (below).
Let’s explore.
Core Vitals (PageSpeed Insights)
Google’s PageSpeed Insights tool unlocks a world of opportunity when it comes to improving page speed.
Simply input the URL of a slow page (that you found within the site speed report above) and the report will show you diagnostic issues, opportunities to fix, as well as every audit they ran:
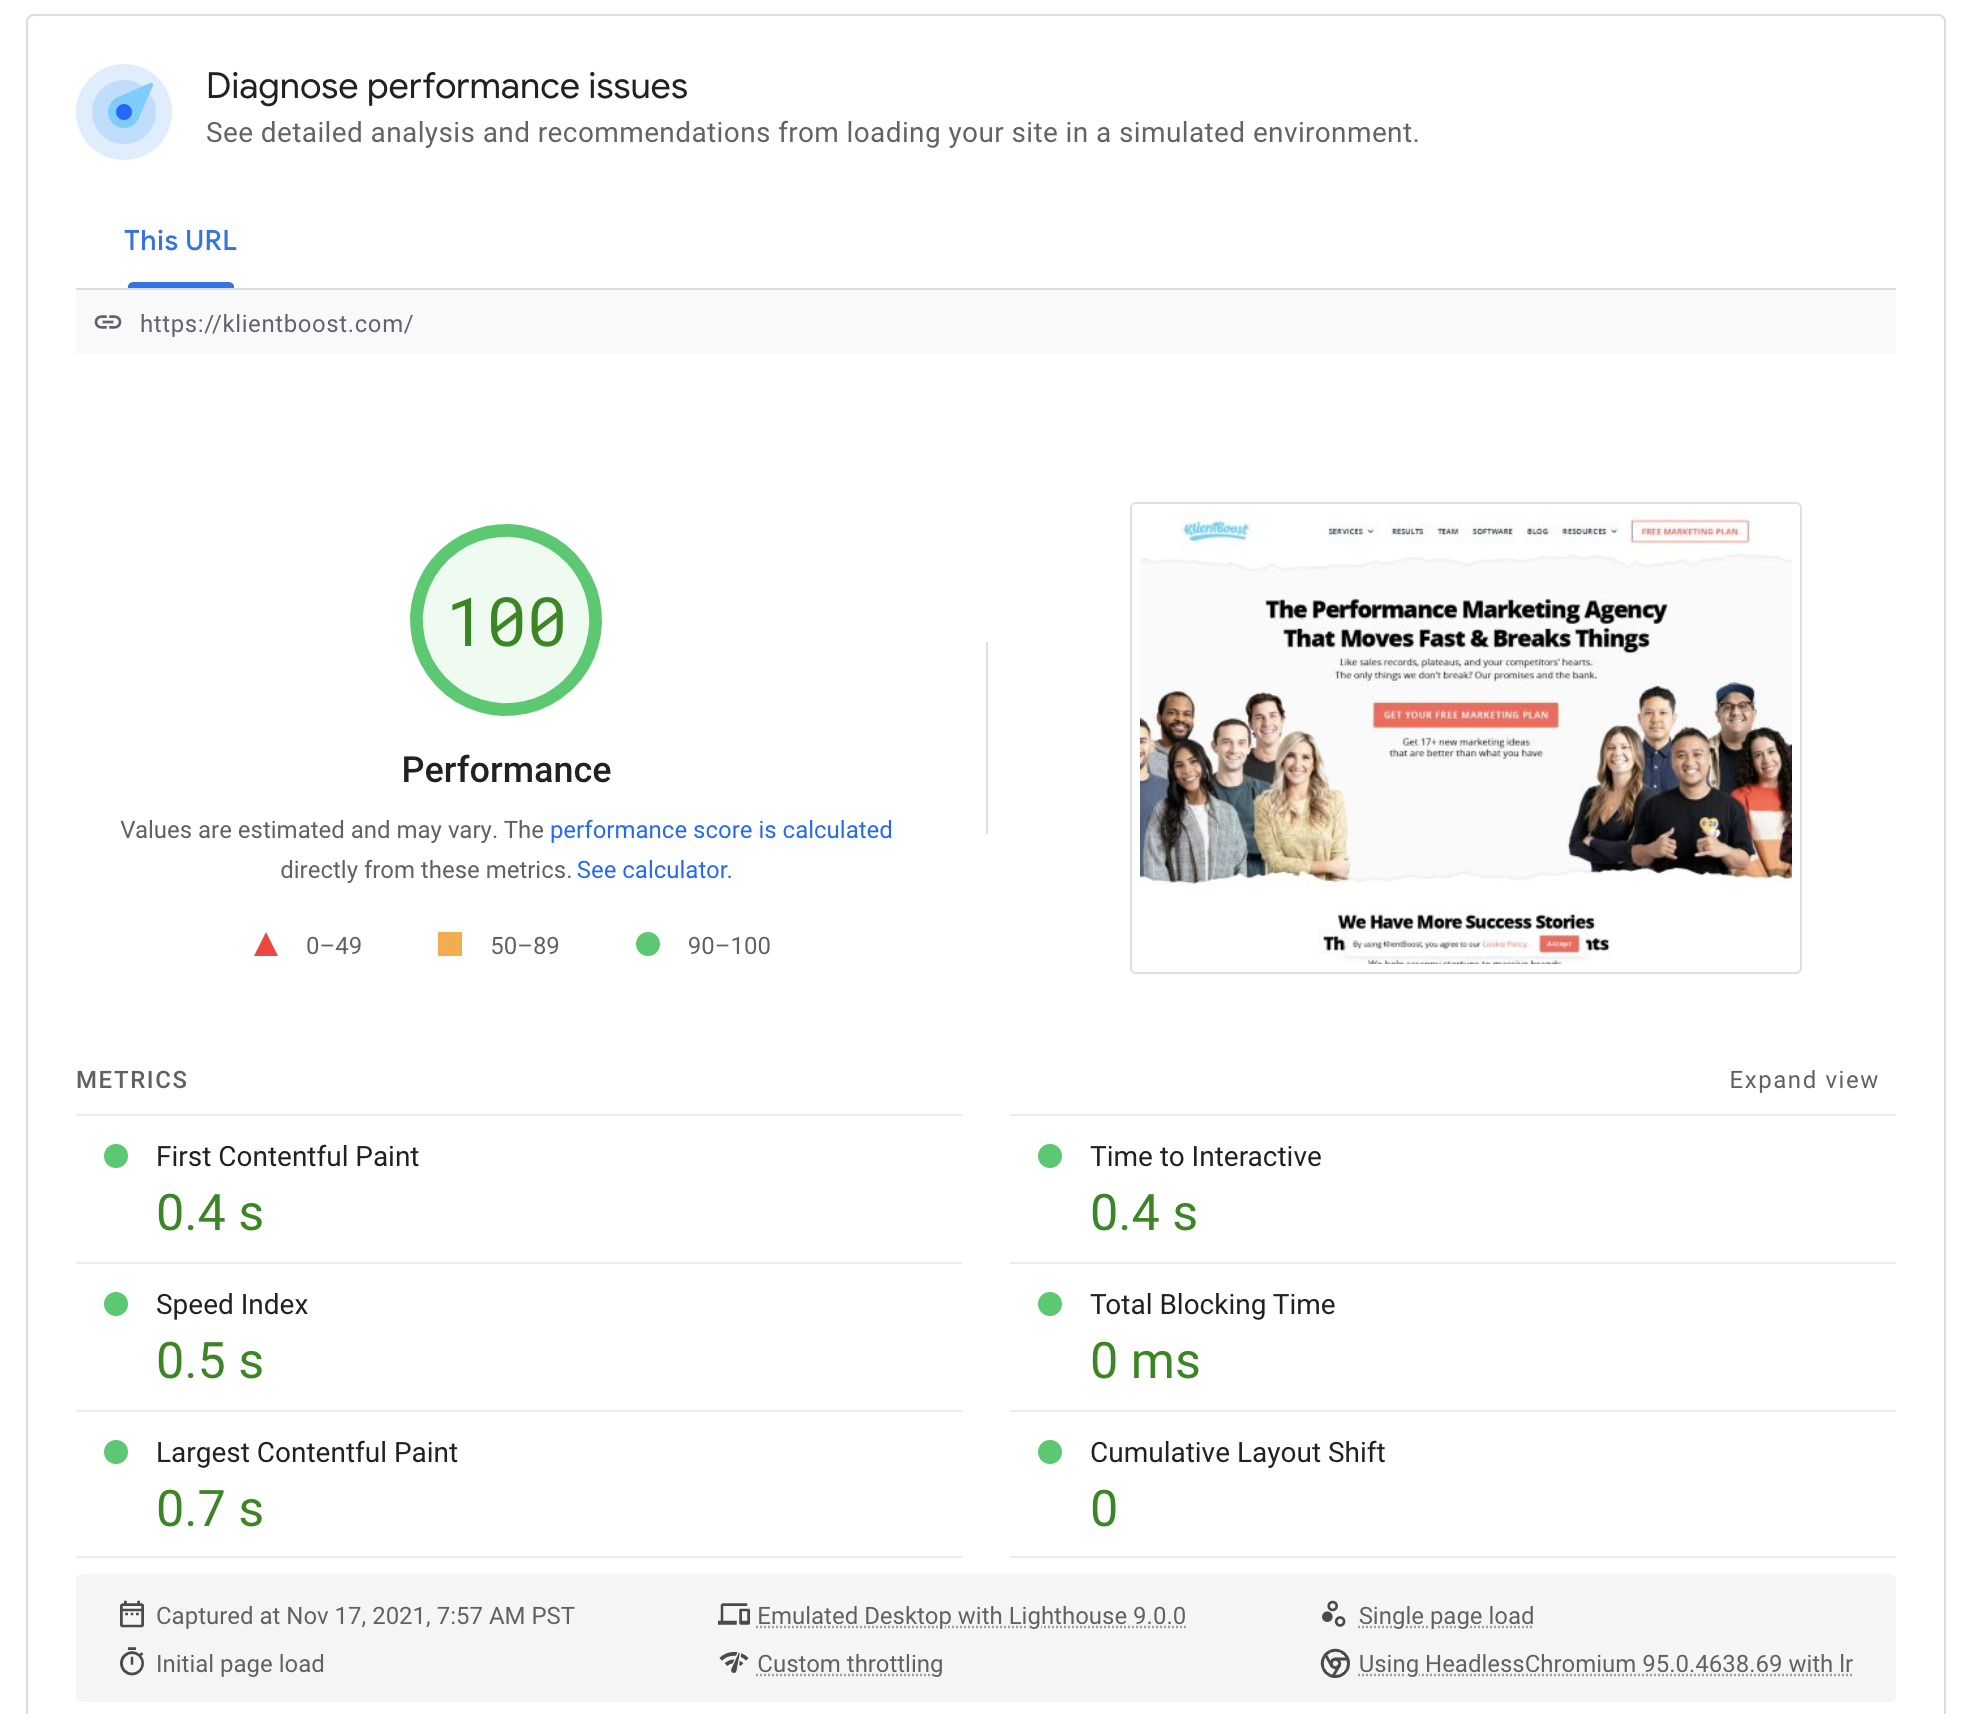
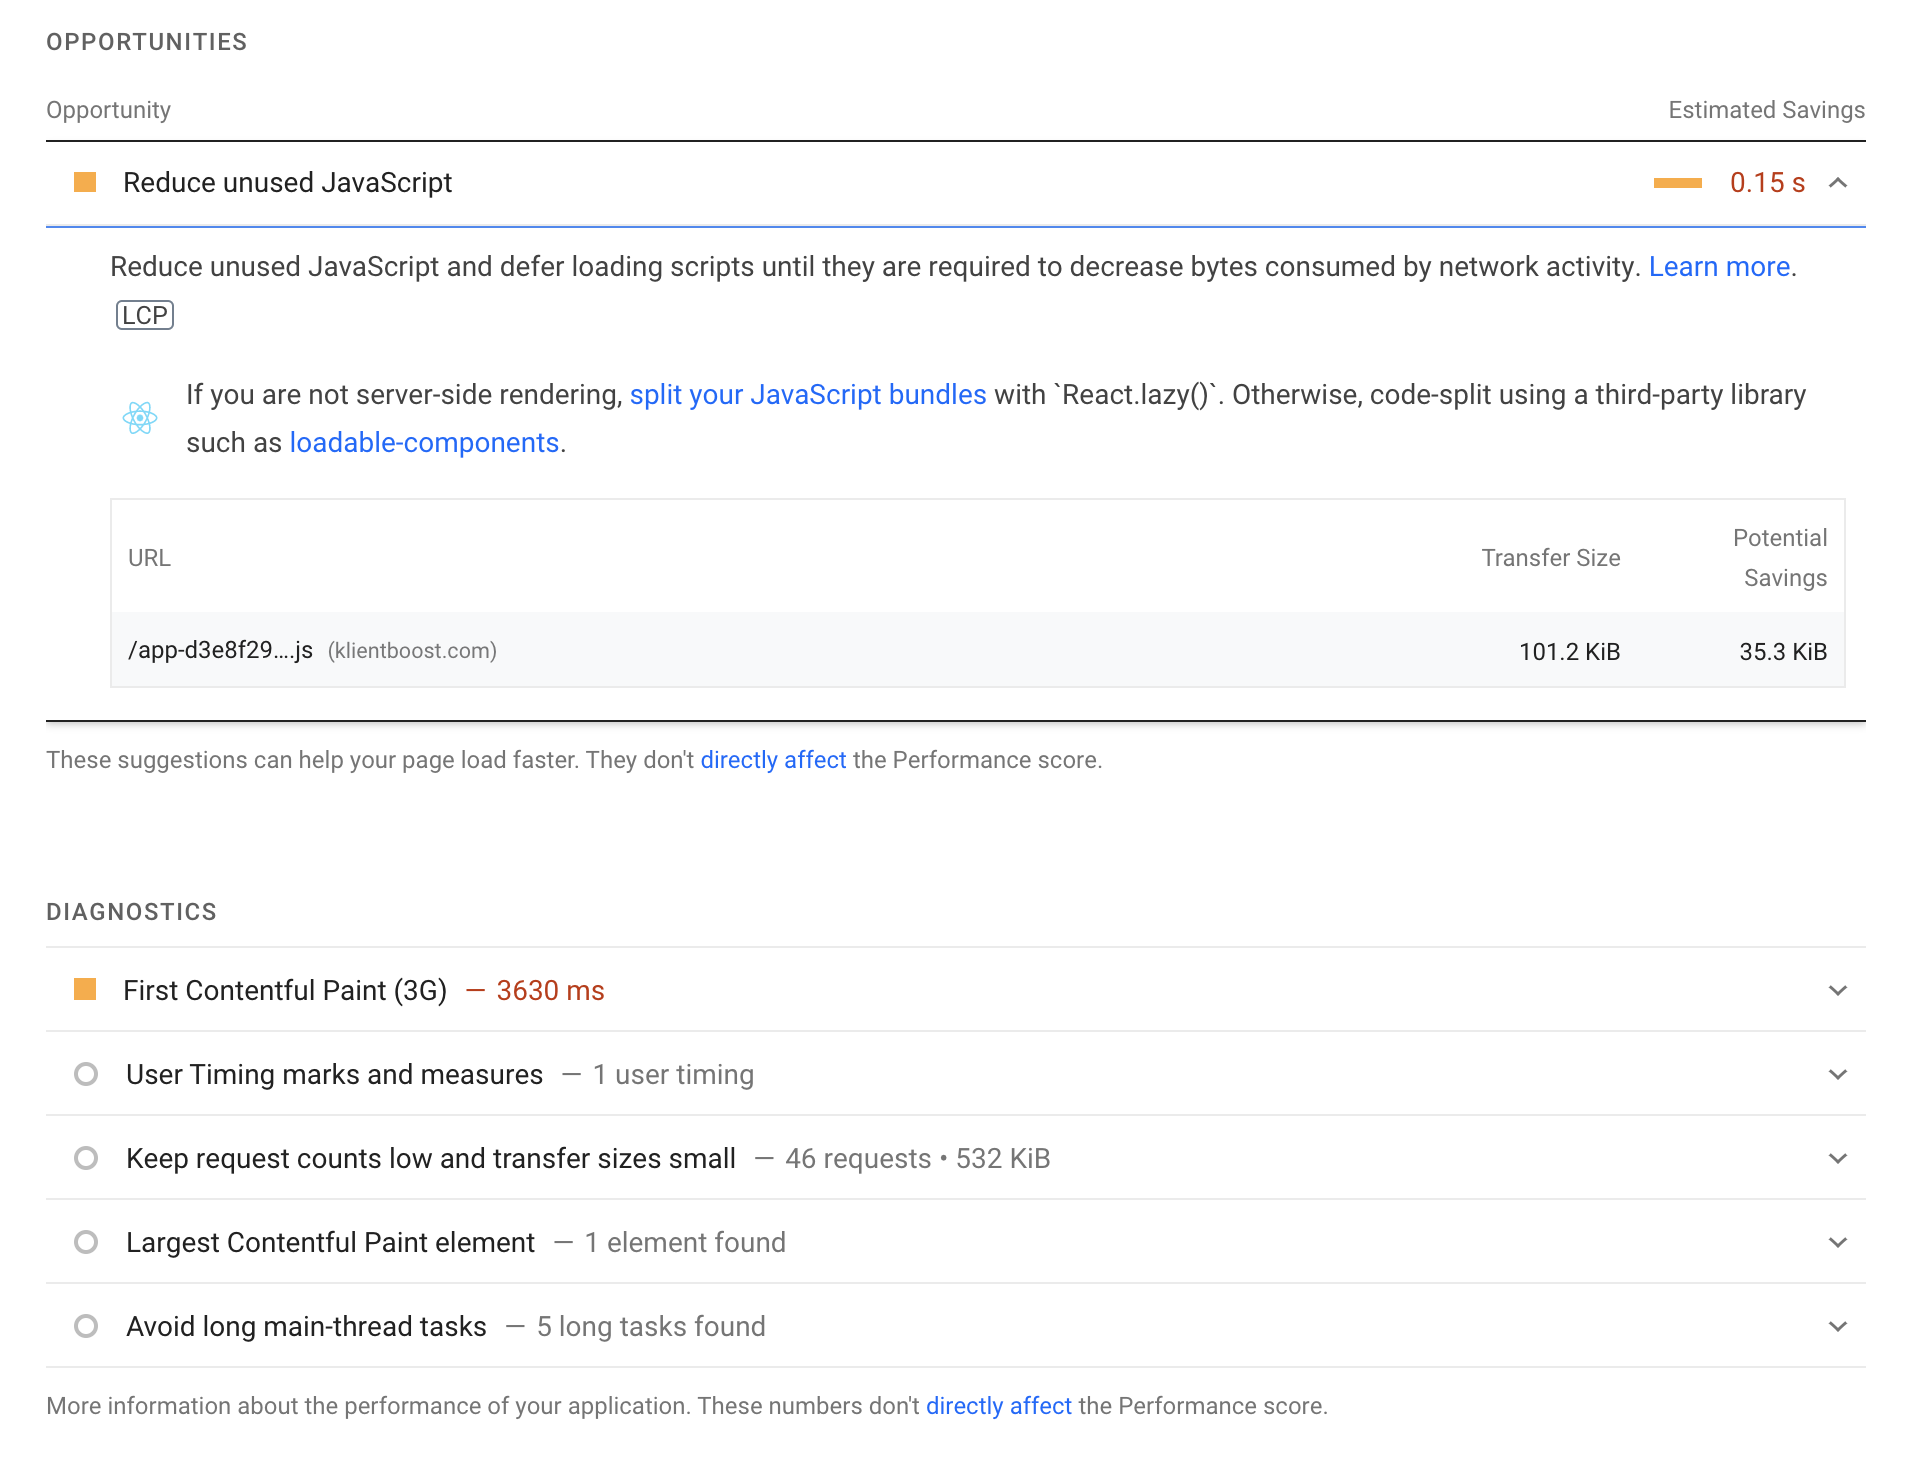
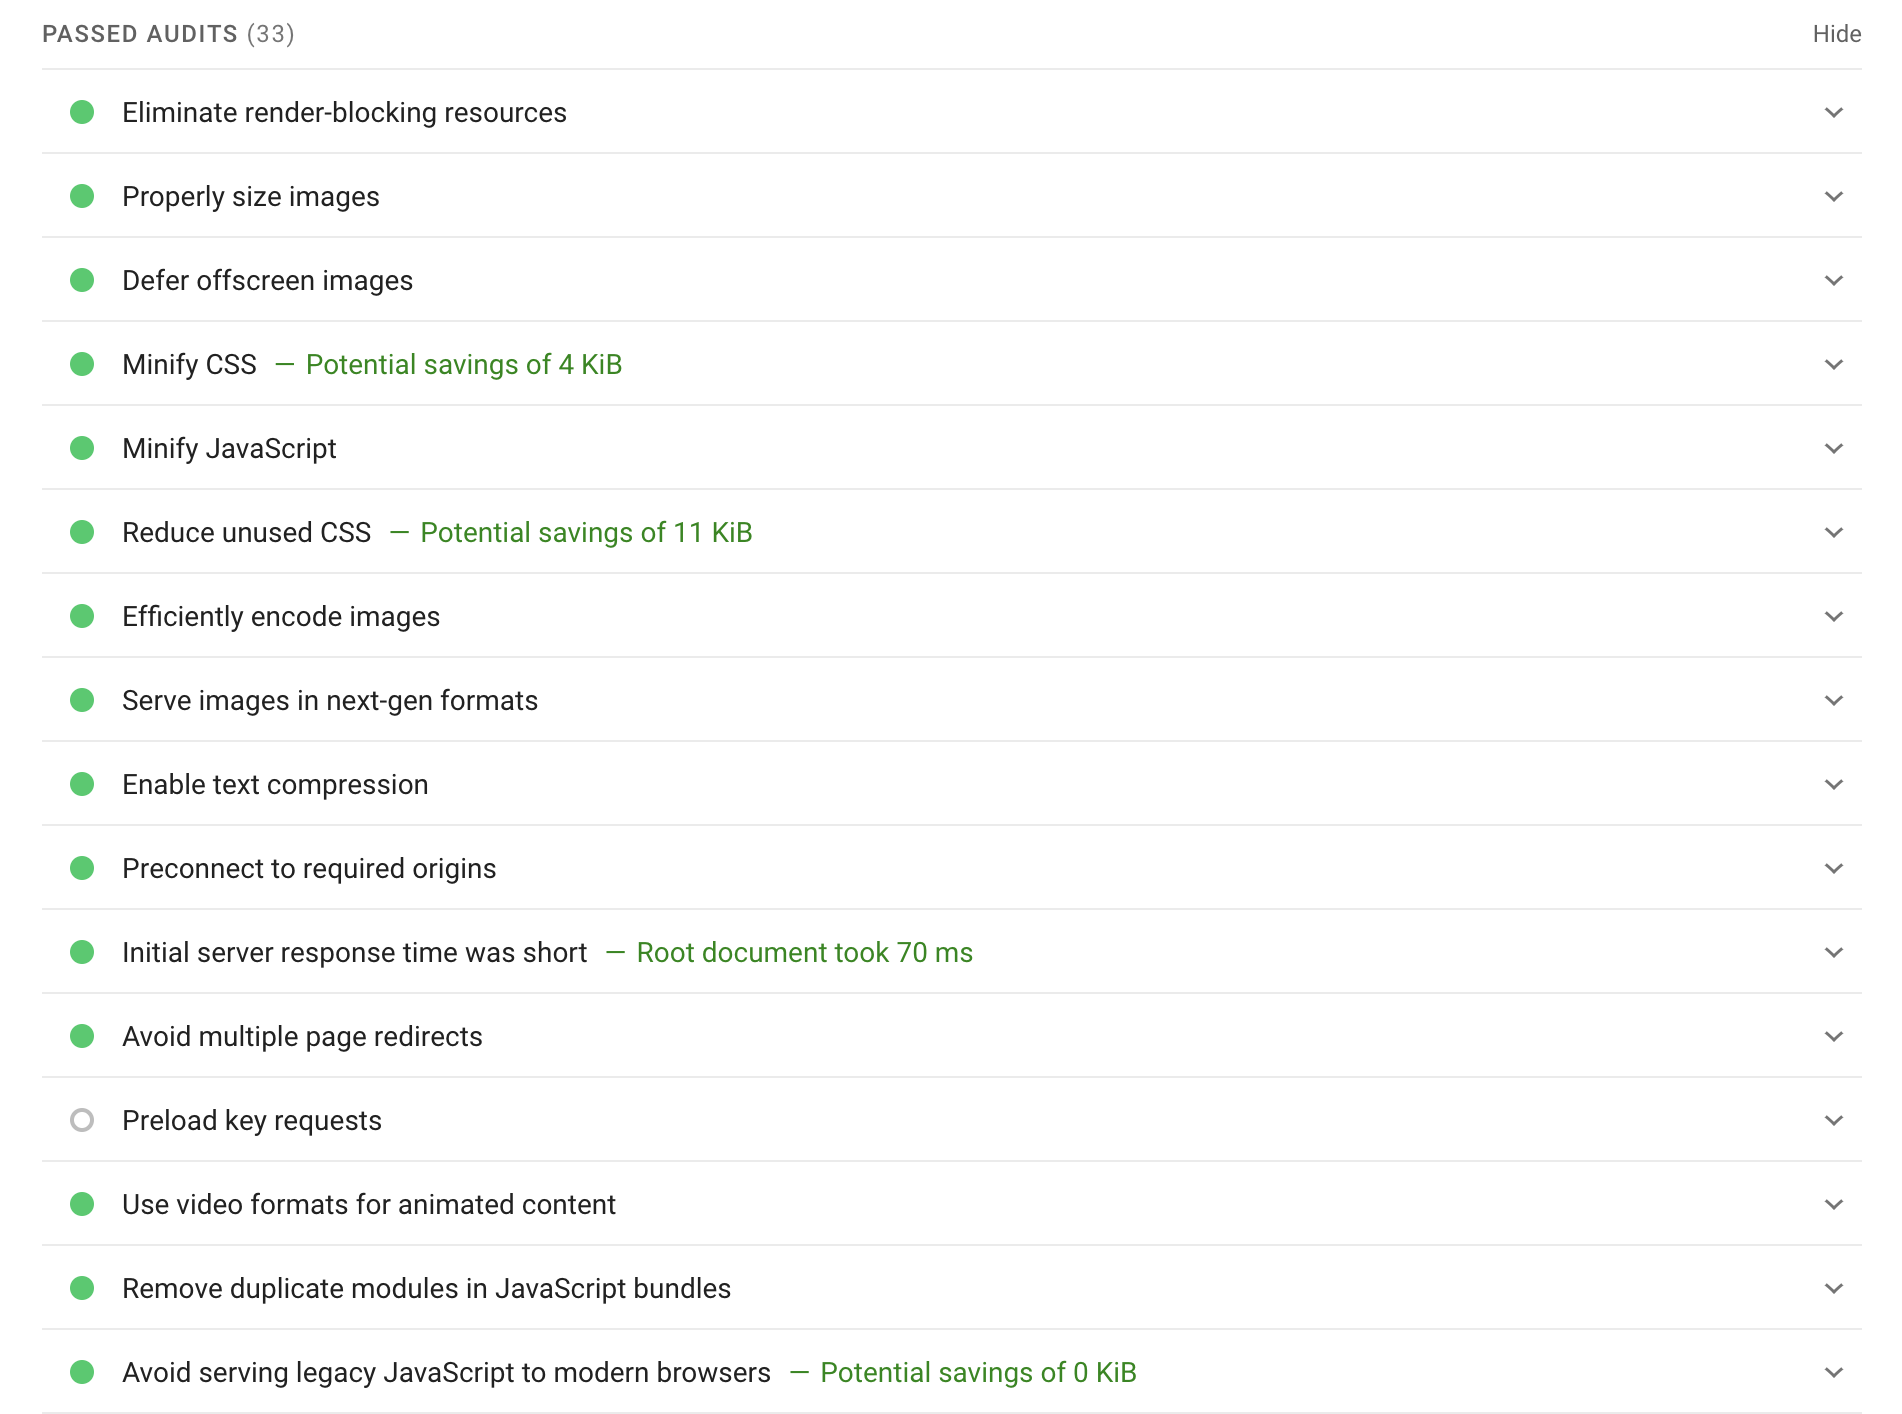
This alone is gold. You can use the recommendations in the dropdowns to create an action list to improve page speed.
You can also toggle between mobile and desktop, which is critical considering that Google uses mobile-friendliness as a ranking factor.

That’s not all…
Within the PageSpeed Insights report, Google also provides a Core Web Vitals Assessment.
The Core Web Vitals Assessment measures three distinct areas of user experience as it relates to page speed: loading performance, interactivity, and visual stability.
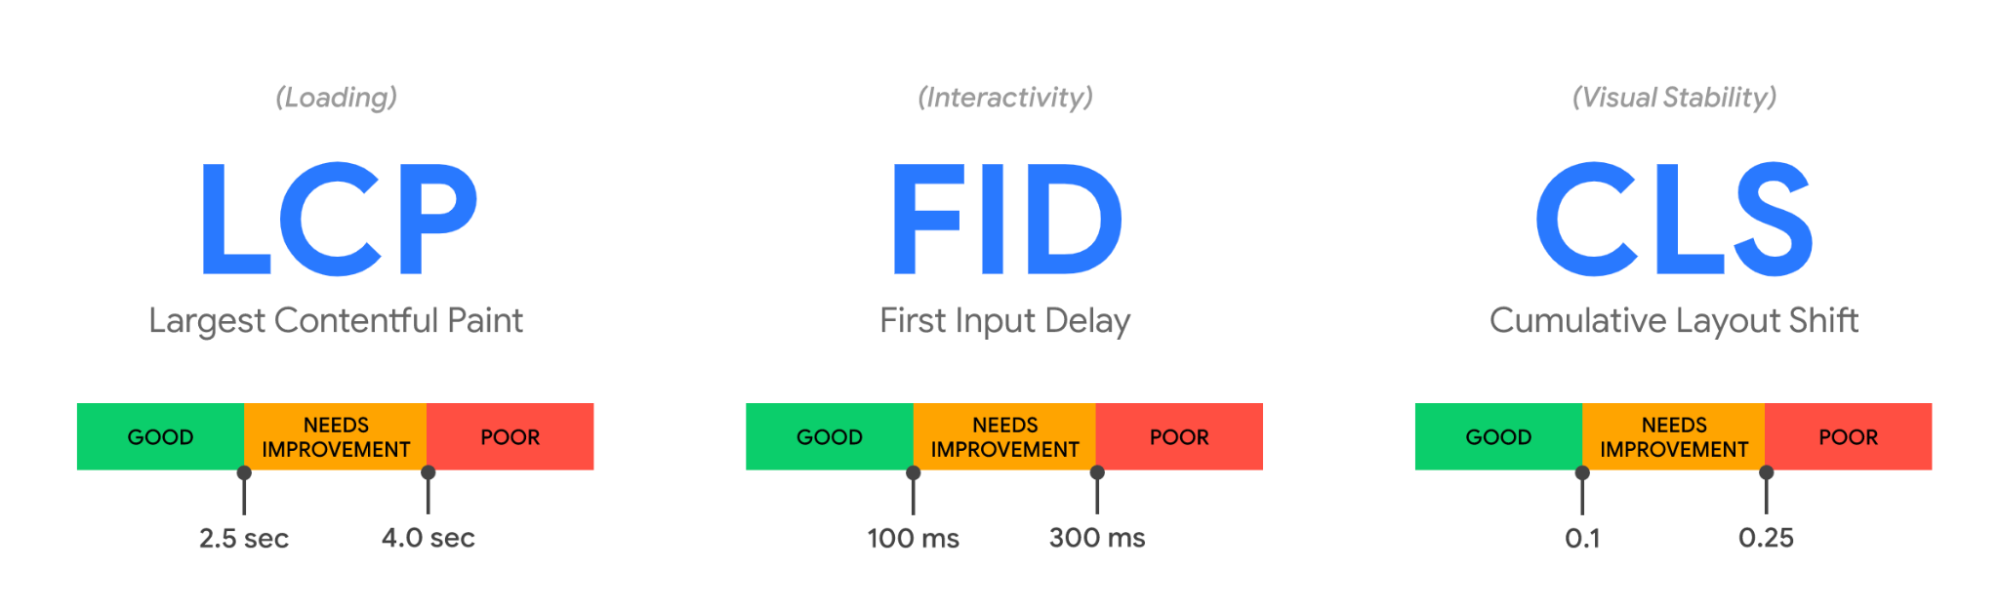
- Largest Contentful Paint (LCP) (loading performance): should occur within 2.5 seconds of when the page first starts loading
- First Input Delay (FID) (measures interactivity): should have a FID of 100 milliseconds or less
- Cumulative Layout Shift (CLS) (visual stability): should maintain a CLS of 0.1. or less
At the top of the PageSpeed Insights report (after submitting your URL), the first section will tell you whether or not you passed Google’s Core Web Vitals Assessment, along with your load times for all three criteria.
You’ll want to score “Good” for all three.
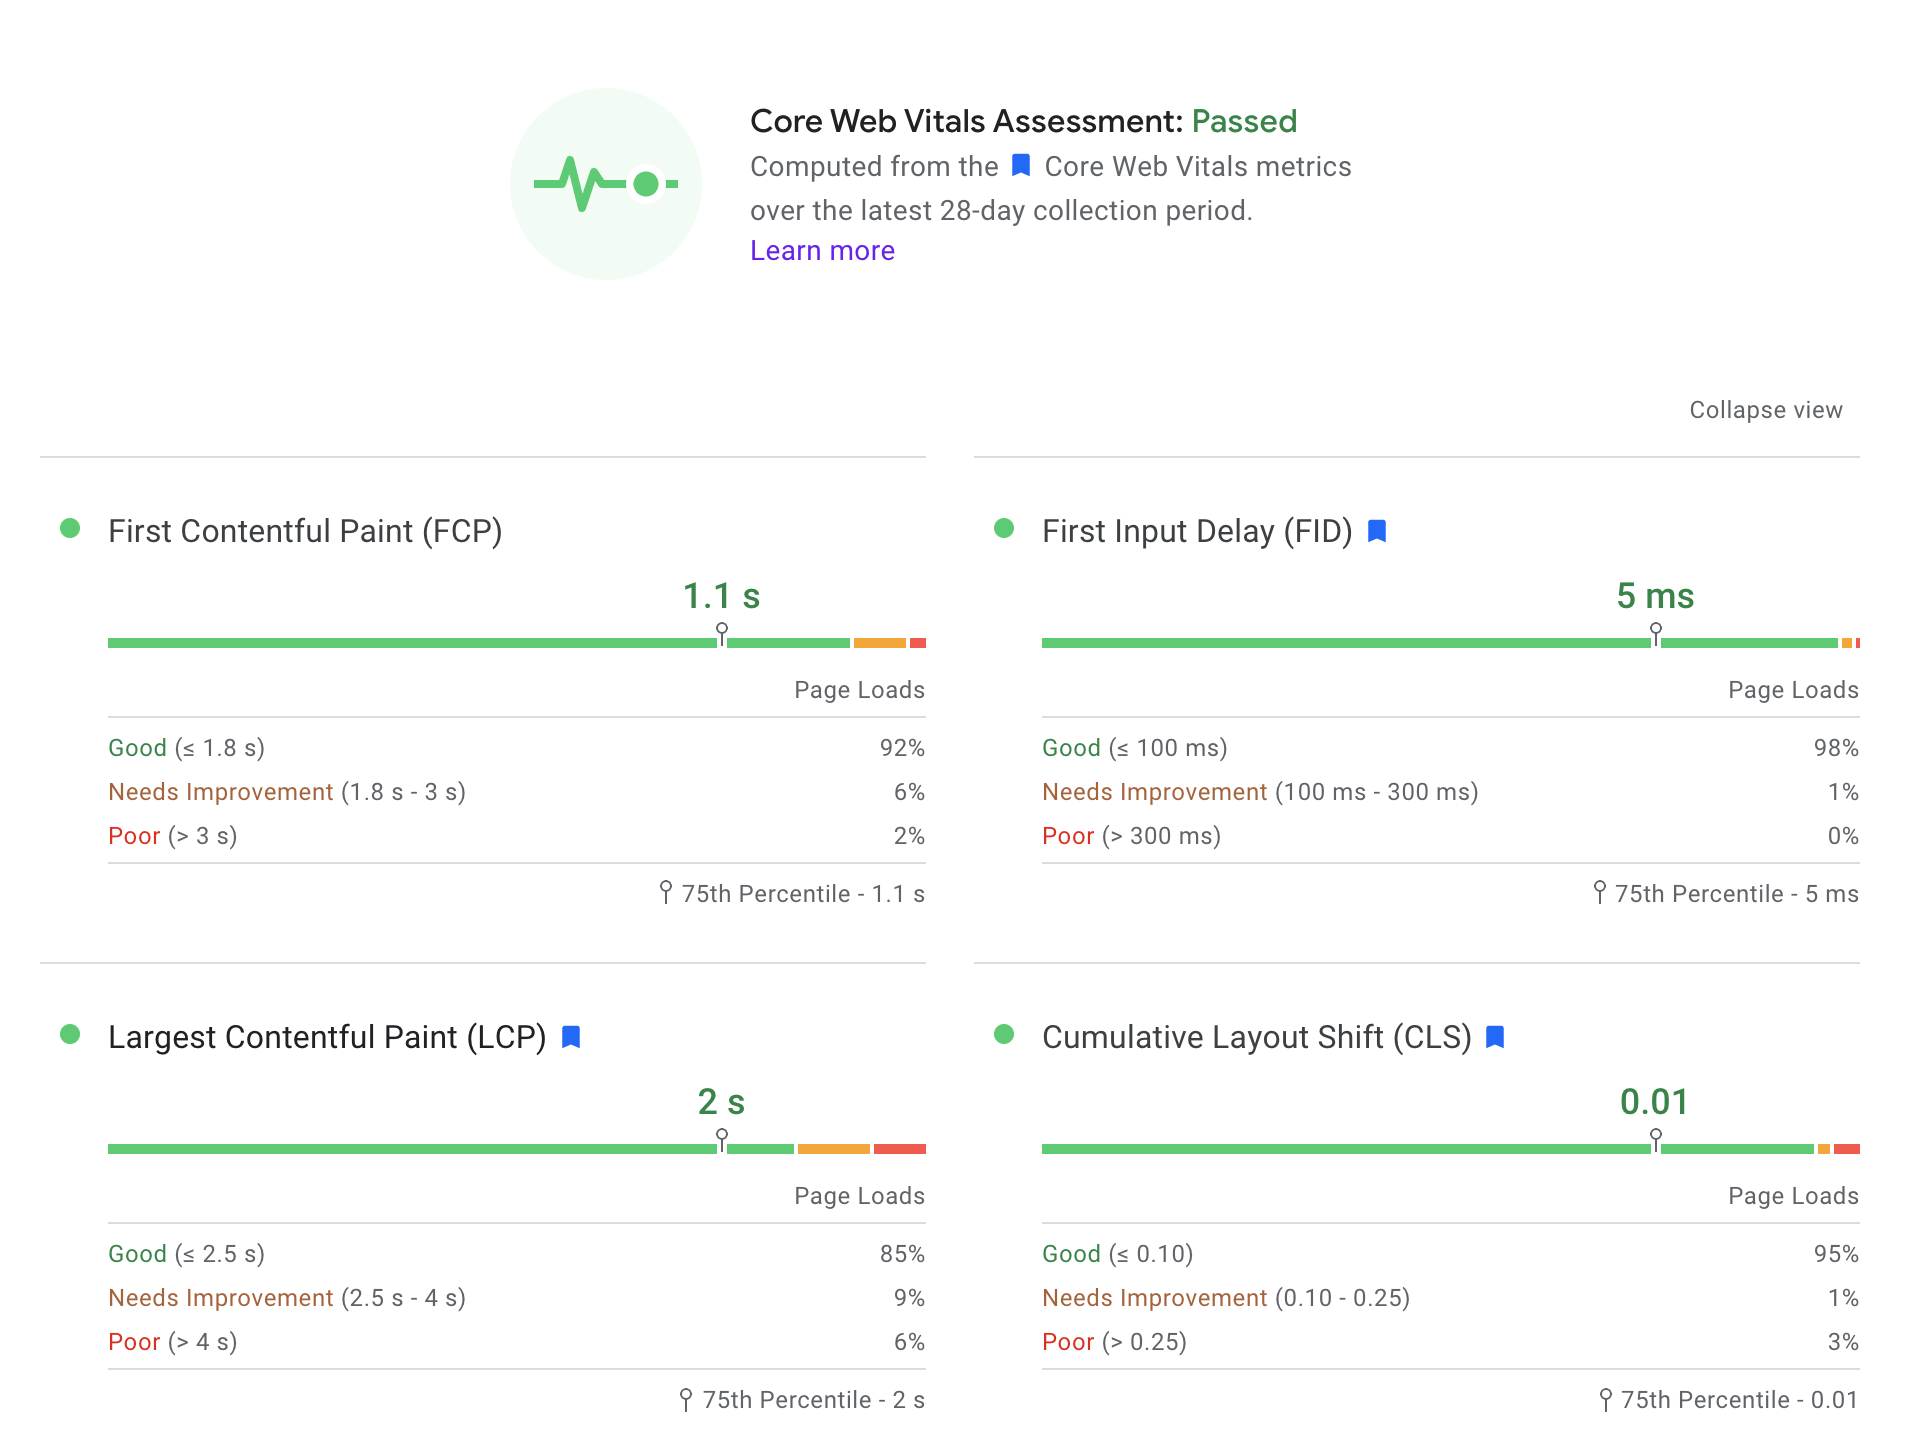
You can also run a Core Web Vitals Assessment within Google's Search Console as well (though with not as much detail):
Armed with both your site speed report within Google Analytics and your PageSpeed Insights report (both free), you’ll have all the data you need to start making improvements on page speed. Build an action list and take it to your webmaster.
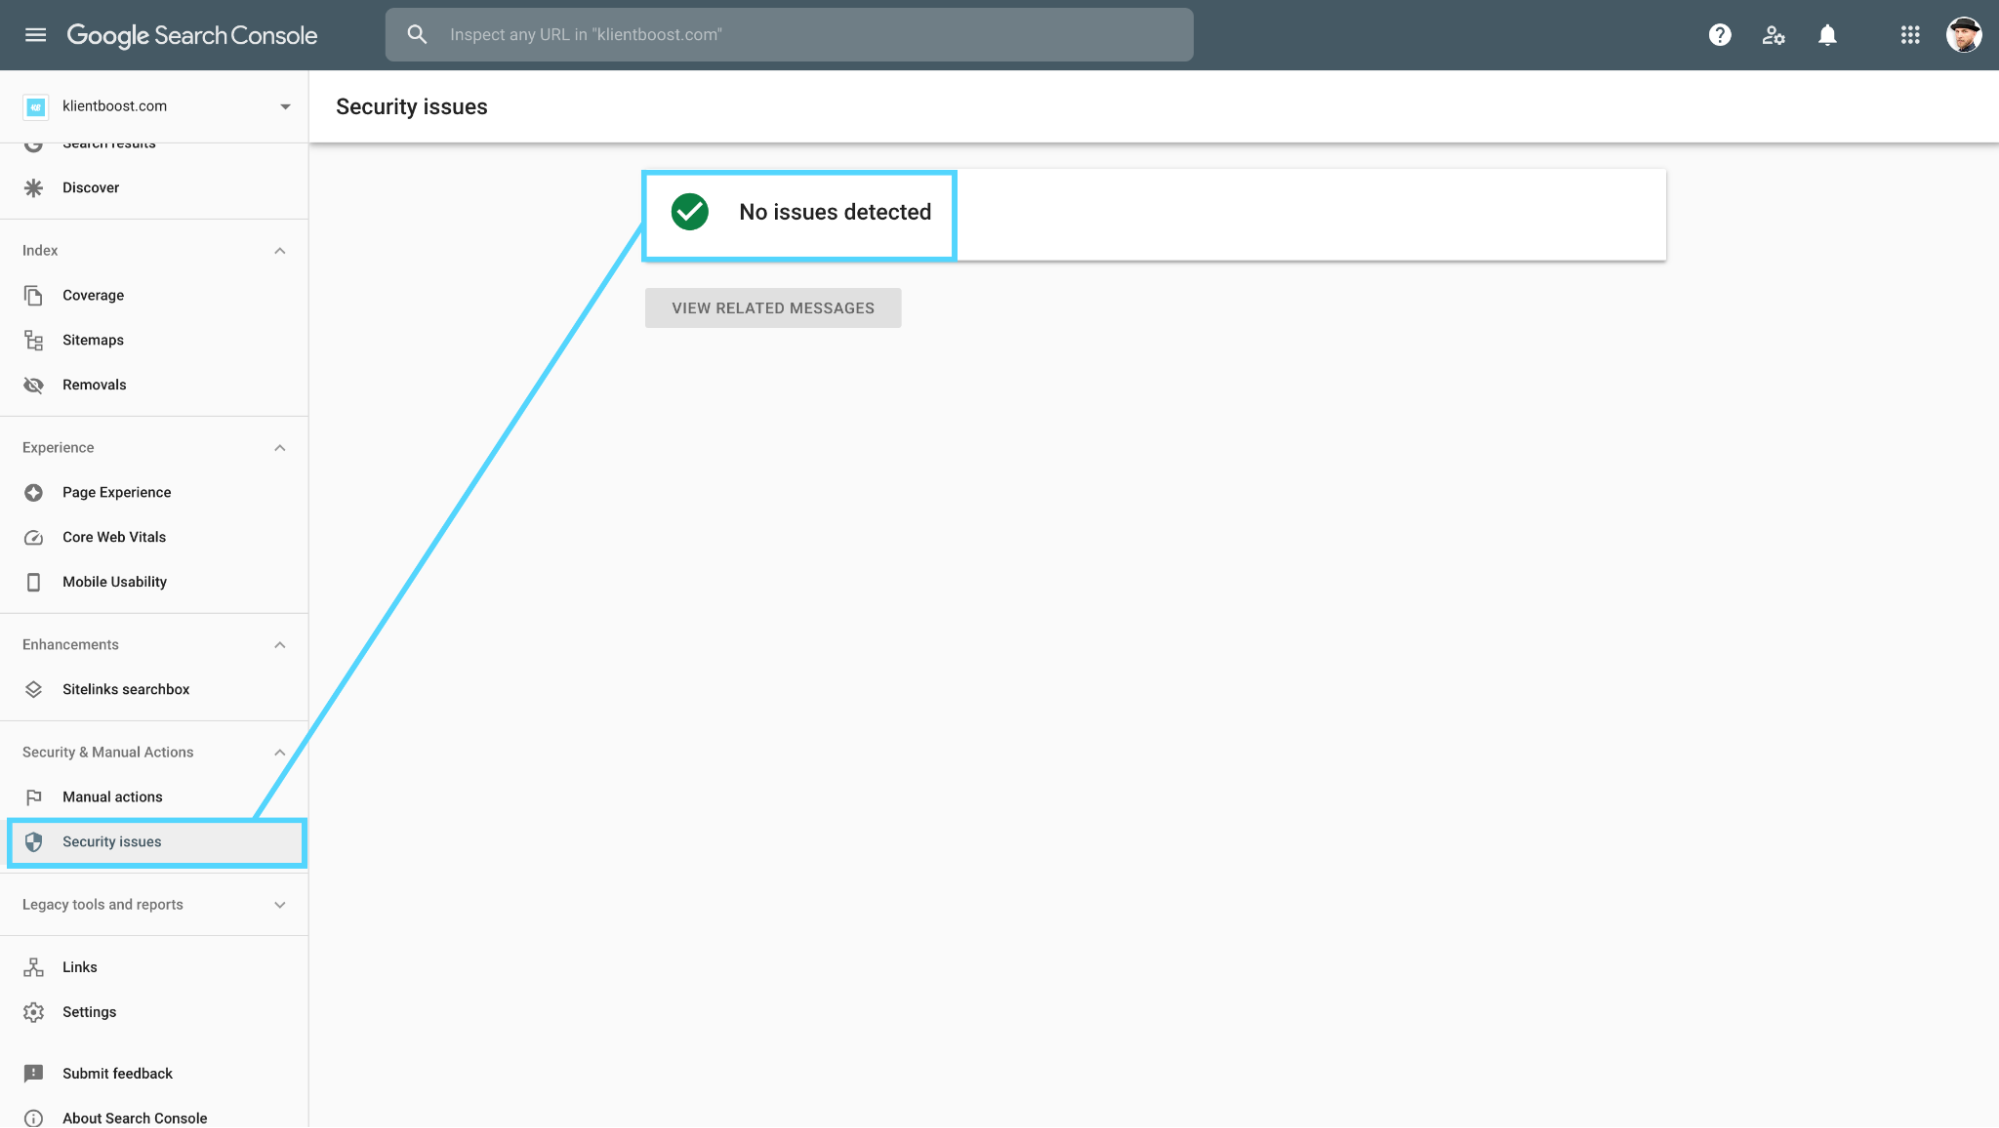
4. Security audit
You can figure out whether or not your website has an SSL certificate simply by typing in the URL in a browser, then clicking within the search bar (or copy and pasting the URL to a blank page).
If your URL has an https:// and a closed lock, then the site is secured with an SSL certificate. If it has an http:// (no s) and a “Not Secure” warning, then it’s not.


You can also check for an security issues within Google Search Console:
5. Mobile friendliness audit
We live in a mobile-first world (over 50% of searches come from mobile devices), and Google considers mobile friendliness a ranking factor.
To ensure your website is mobile friendly, you can run two different test:
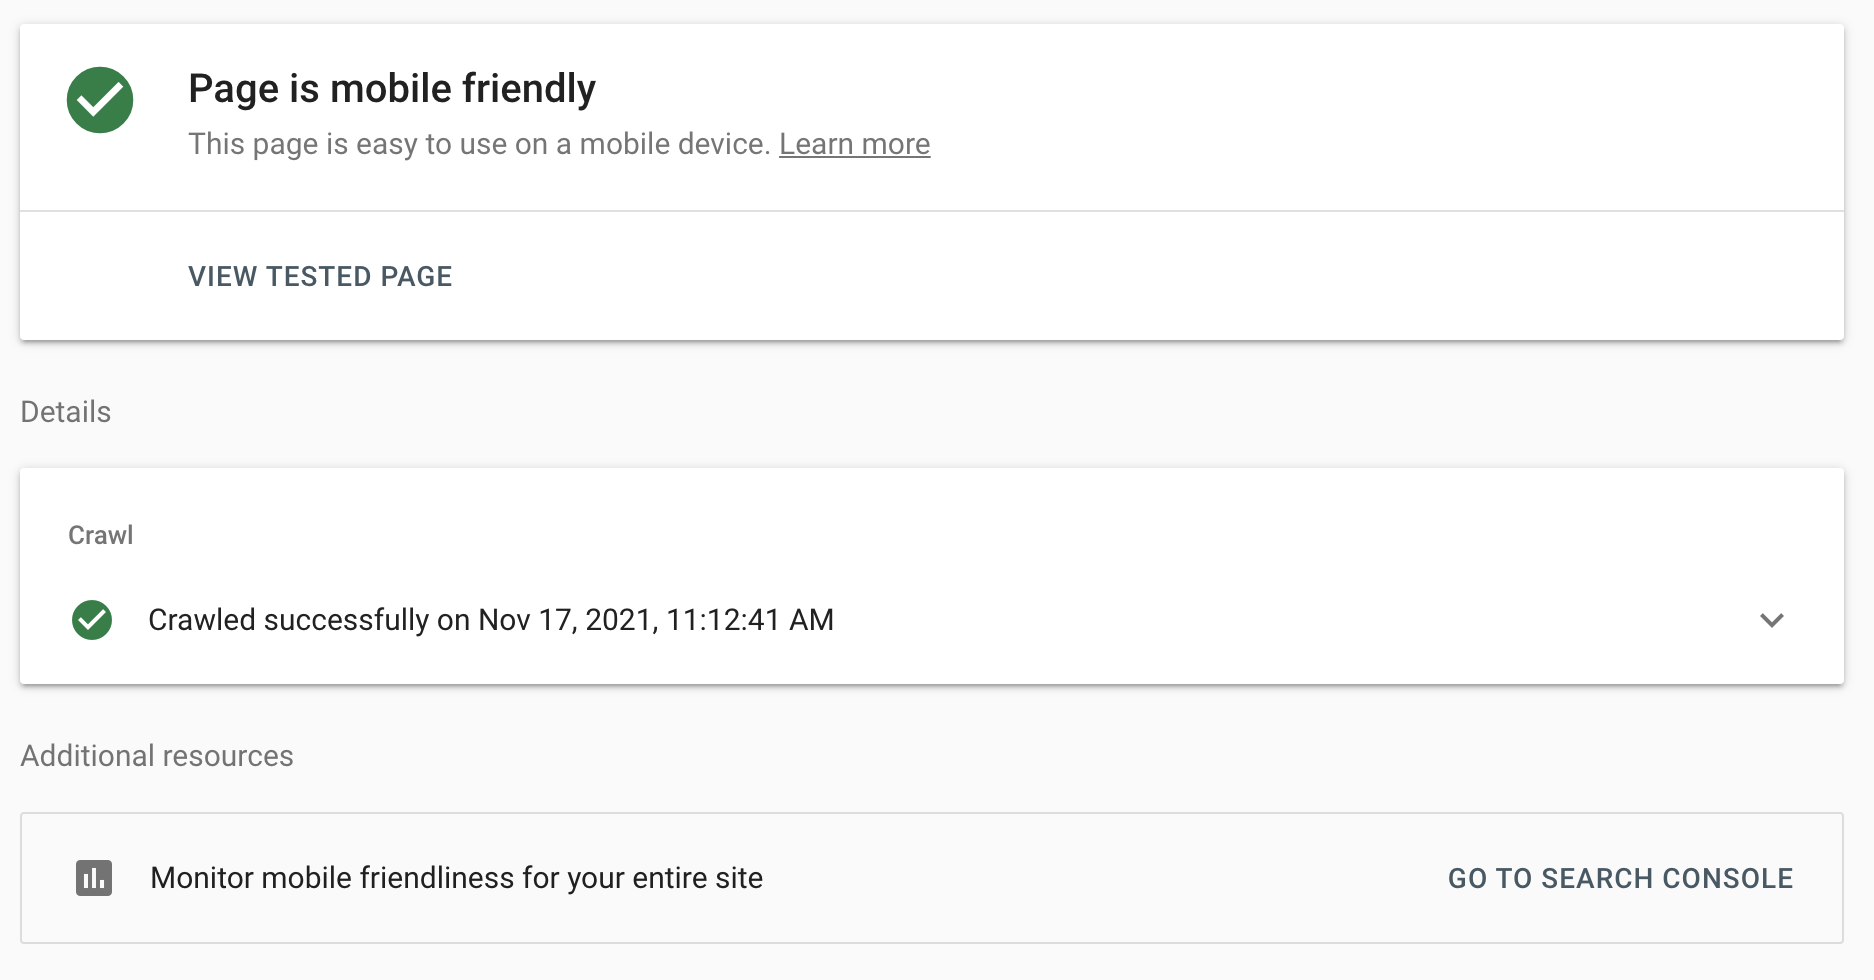
Google’s Mobile-Friendly Test
Like their PageSpeed Insights tool, Google’s Mobile-Friendly Test also only analyzes one page at a time.
Input your web address, hit ��“test URL,” and wait for your results.
If your page passes, you’ll get this notice:
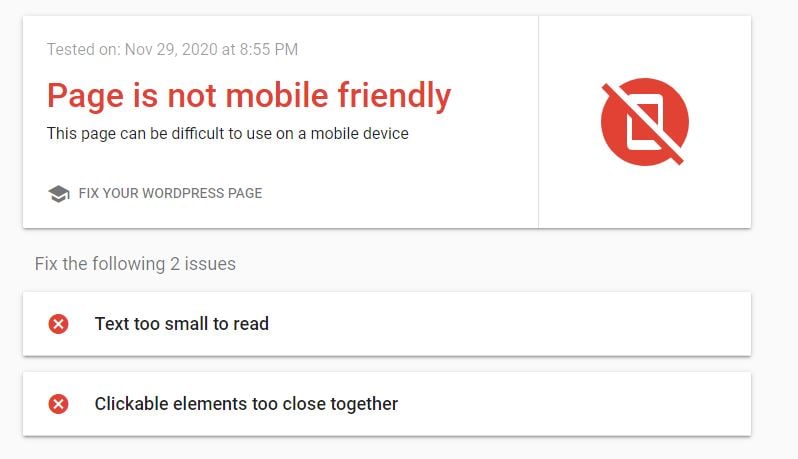
If your page is not mobile friendly, you’ll get this notice (along with instruction):
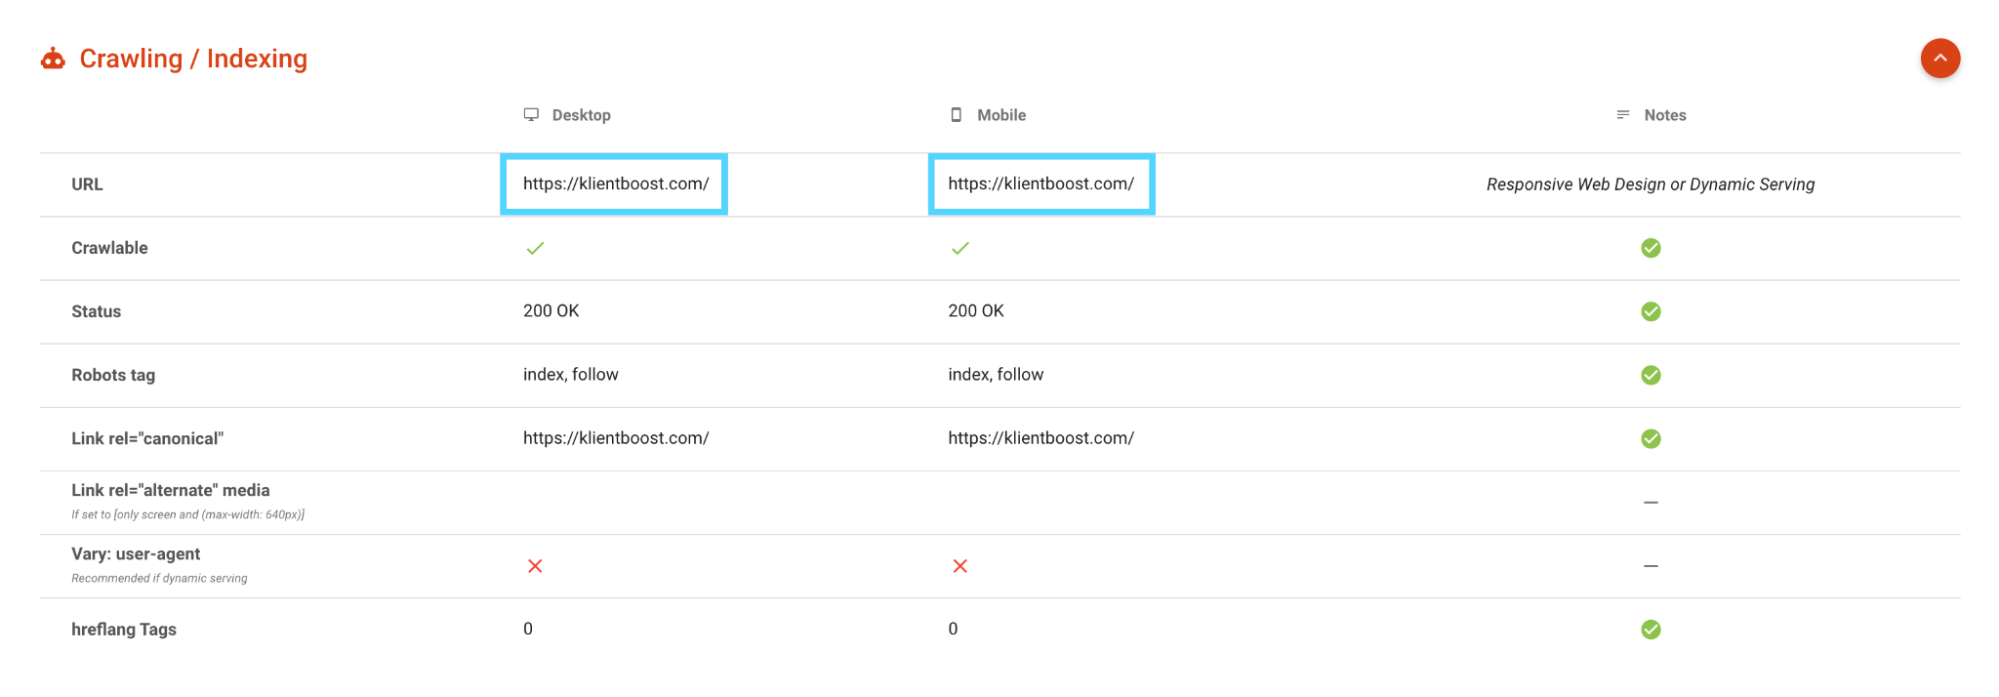
Merkle’s Mobile-First Index Tool
Merkle has a suite of amazing technical SEO tools you should check out. But for this one, what you want to discover is whether or not your mobile URLs match your desktop URLs.
If you designed your website responsively, then you shouldn’t have mismatching URLs.
In fact, Google recommends that you keep your mobile and desktop URLs the same instead of developing a mobile version (e.g. m.example.com) so they don’t need to crawl more pages unnecessarily.
However, in some cases, it makes perfect sense to have a separate mobile experience on a mobile URL (e.g. for international language variants).
Either way, use Merkle’s Mobile-First Index Tool to ensure your the right URLs show up on both mobile and desktop.
6. Structured data (schema) audit
Schema markup is the microdata that fuels the semantic web.
In layman’s terms, think of schema like a vocabulary built specifically for search engines: they can read and understand schema like you or I can read and understand words.
To learn more about structured data, check out our article: Schema Markup for SEO: What it is and How to Use It.
But for now, let’s review the three tools you can use to audit your website’s structured data:
- Google’s Rich Results Test Tool (free)
- Schema.org Validator (free)
- OpenGraph.xyz OG checker (free)
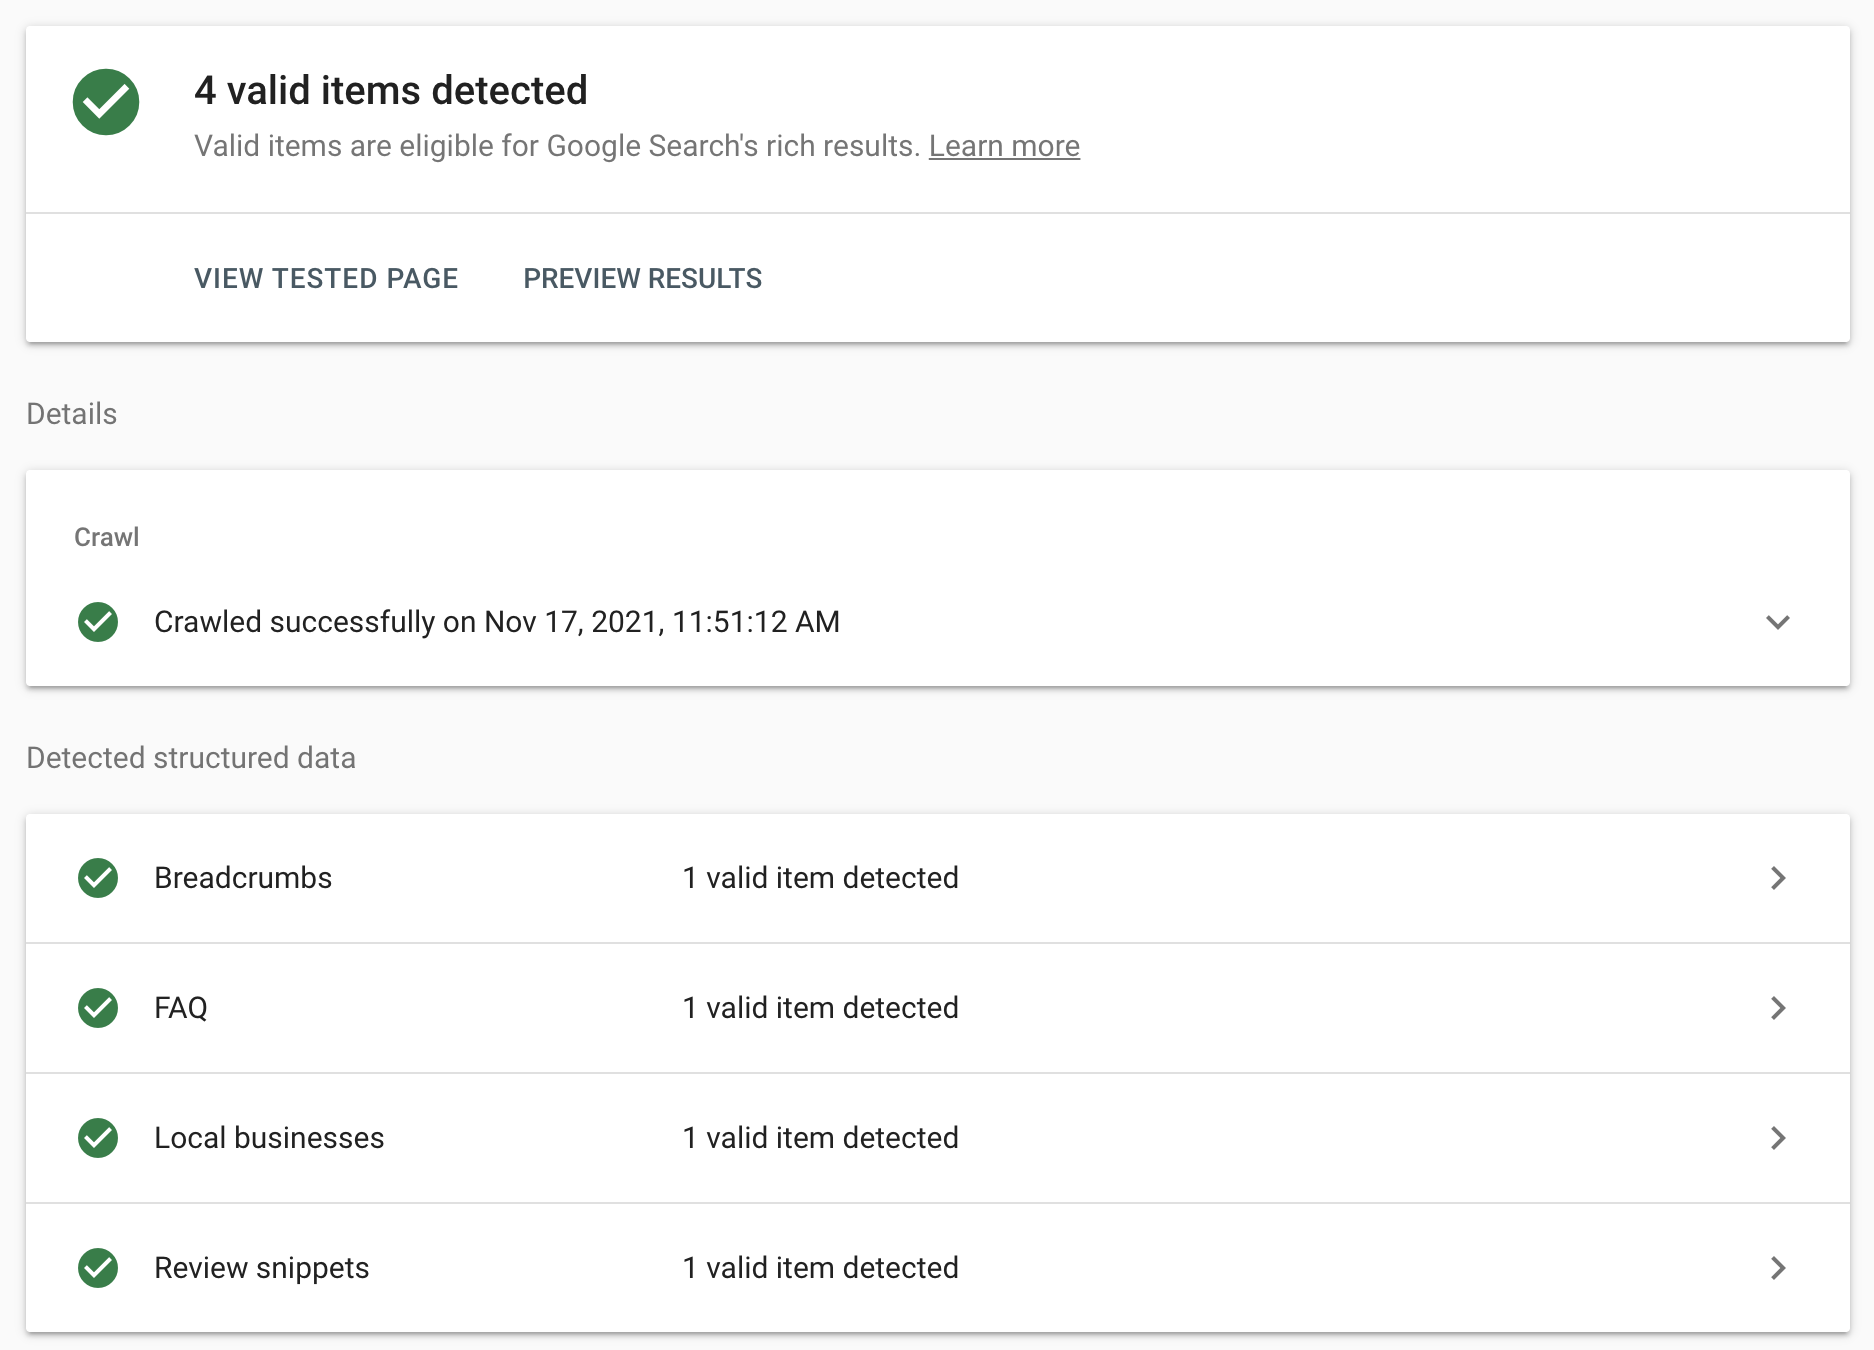
Google’s Rich Results Tool
Google’s Rich Results Test only analyzes structured data that produces rich results (aka “rich snippets”). A rich result is a search engine results page (SERP) snippet that has additional information added to it other than the standard blue title, URL, and description.
For example, this is a rich snippet for a review (notice the star rating):

Aside from reviews, Google’s Rich Test Tool also audits the following schema:
- Breadcrumb
- Dataset
- Event
- FAQ
- Fact check
- Guided recipe
- How-to
- Image License
- Job posting
- Logo
- Product
- Q&A page
- Recipe
- Sitelinks search box
- Special Announcement
- Video
To test if your schema is valid, input the URL of the page you want to analyze into the Rich Test Tool, hit “test URL,” and Google will tell you whether or not your schema markup is valid.
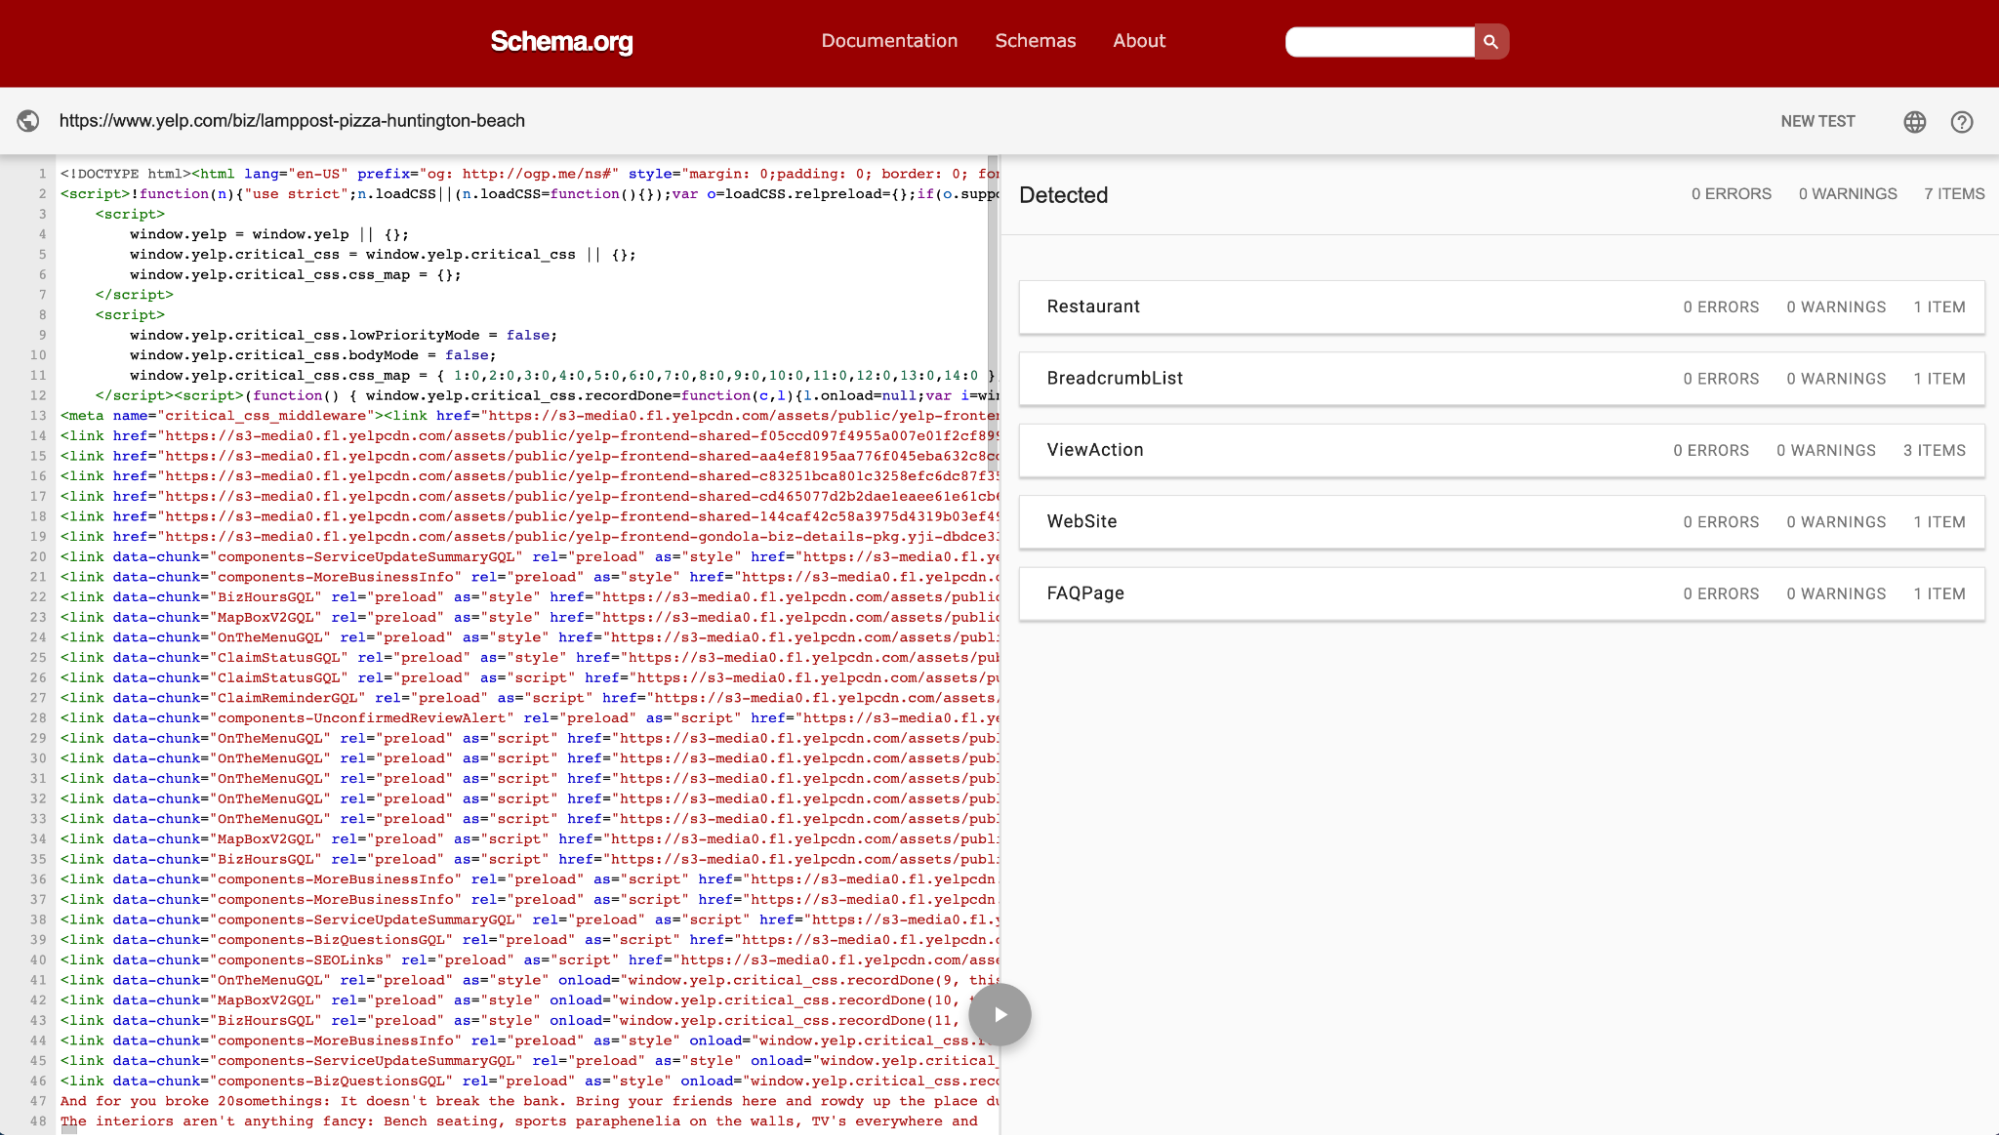
Schema.org Validator
Schema.org is the collaborative community created by Google, Microsoft (Bing), Yandex and Yahoo that invented the schema markup vocabulary.
On their website, they have a free structured data validator.
You can enter the URL of the page you want to validate, or you can paste your code directly into their tool:

Like the Rich Test Tool, Schema’s validator will tell you which schemas they detected and whether or not they’re valid (only this time you’ll see all schemas, not just rich snippets).
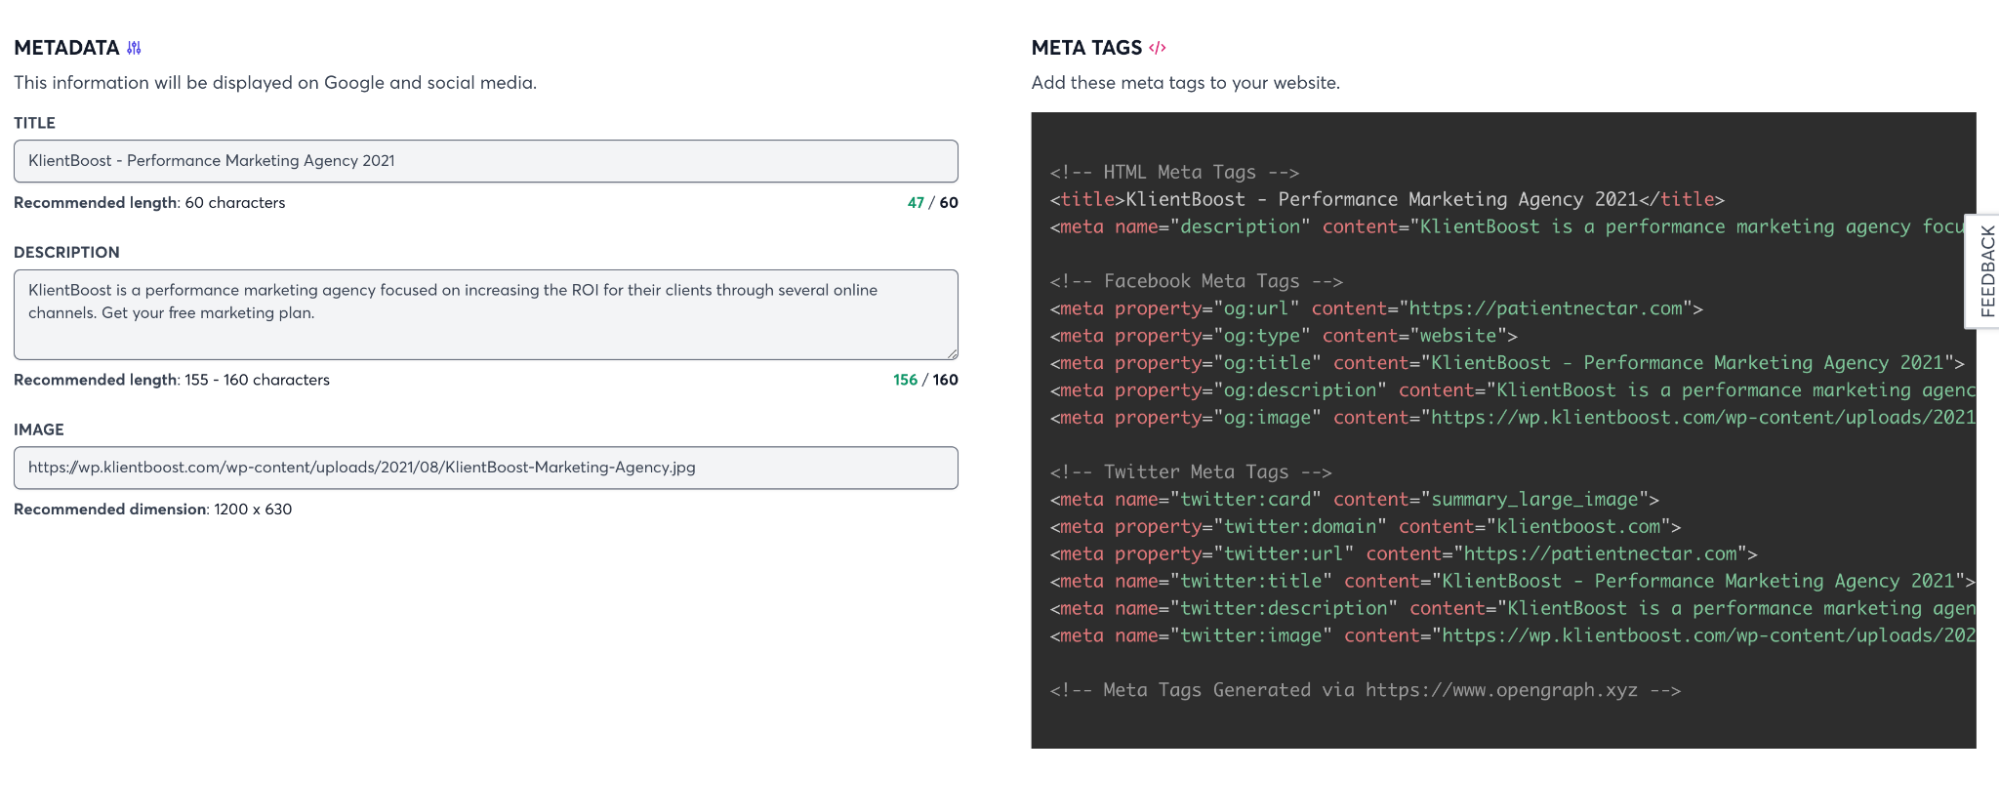
OpenGraph.xyz
OpenGraph.xyz is a free tool that will check (and generate) social media open graph tags.
Open graph tags are a type of structured data that platforms like Facebook and Twitter use to display images and text when pages of your website get shared.
You don’t need open graph tags, but they help to ensure the right thumbnails appear when people share your content.
To check the appearance of your thumbnails and your open graph tags, just input your URL into OpenGraph.xyz’s tool. They’ll even generate tags for you if you don’t have them.

7. Duplicate content audit
We wrote an entire article on duplicate content and how to find and fix it with canonical tags. So we won’t go too deep here, but let’s explore the two main sources of duplicate content and how to uncover them during your technical SEO audit.
If you don’t know, according to Google, duplicate content is any large block of content within your site or across domains that is identical.
Duplicate content won’t get you a penalty, but it can cause issues for your search engine optimization, like link dilution, rankings, and organic traffic.
To ensure no page within your own website is a duplicate, we like to use ScreamingFrog.
In just a few clicks, you can identify duplicates and near duplicates for free.
Good news: ScreamingFrog put together an entire video on how to find duplicates using their tool:
How To Check For Duplicate Content
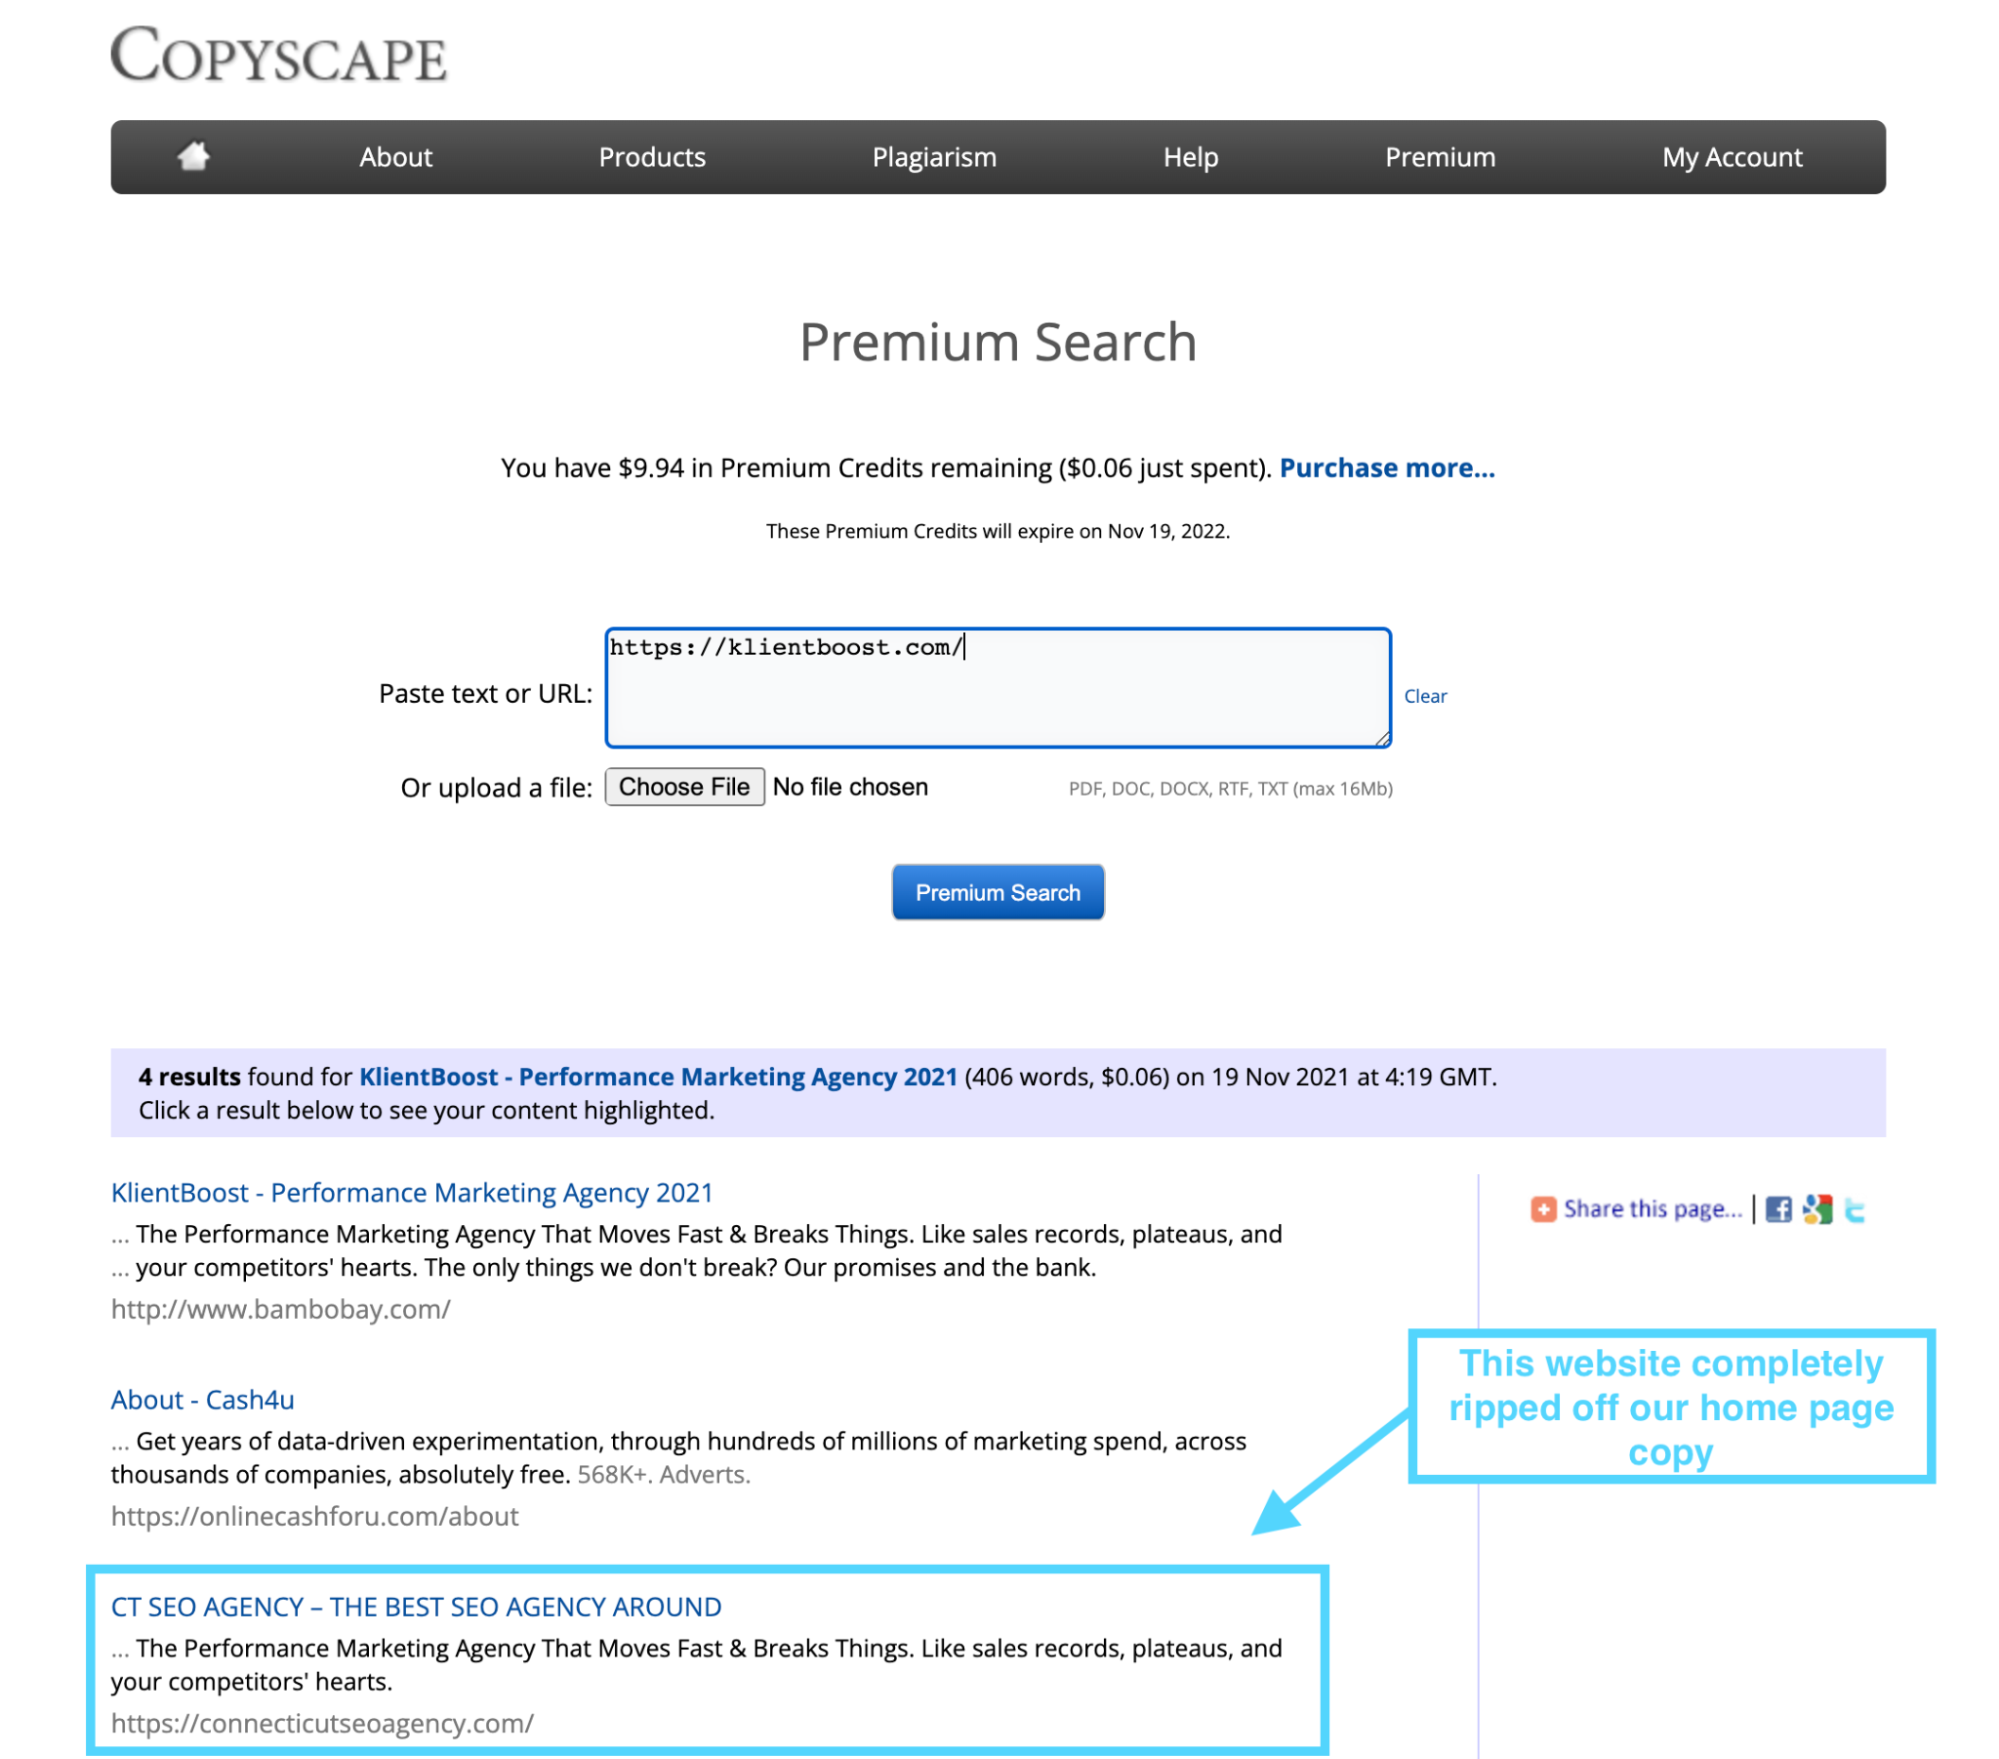
Second, to find duplicate content across your website and other websites, we like to use CopyScape Premium. You can use CopyScape’s free version too, with limitations.
CopyScape isn’t the most sophisticated (or beautiful) tool, but it gets the job done.
For just $0.06, you can test a single page for duplicate content across the entire internet. For about $10-20, the average business can test their entire website for duplicate content between different domains.
For example, when we tested our home page, we discovered that an SEO agency in Connecticut blatantly ripped off our entire home page copy.
8. International/multilingual audit
If your site has different versions for different languages, it’s critical that you properly signal different versions to search engines so they can show the right page in search results.
First, you should use one of the following URL structures to signal to Google the difference between language variants:
- CC-TLD: example.com.au, example.fr
- Subfolder: example.com/au, example.com/fr
- Subdomain: au.example.com, fr.example.com
Second, you should use the hreflang attribute within each page to designate its primary language and tell Google which version should appear in search results.
The hreflang attribute looks like this:
link rel="alternate" href="http://example.com" hreflang="fr" />
In this example, the hreflang attribute tells Google that the page is written in French.
According to Google, you can place the hreflang attribute in one of three locations:
- HTML: within the <head> of the page (instructions here)
- HTTP header: for non HTML files like PDFs (instructions here)
- Sitemap (instructions here)
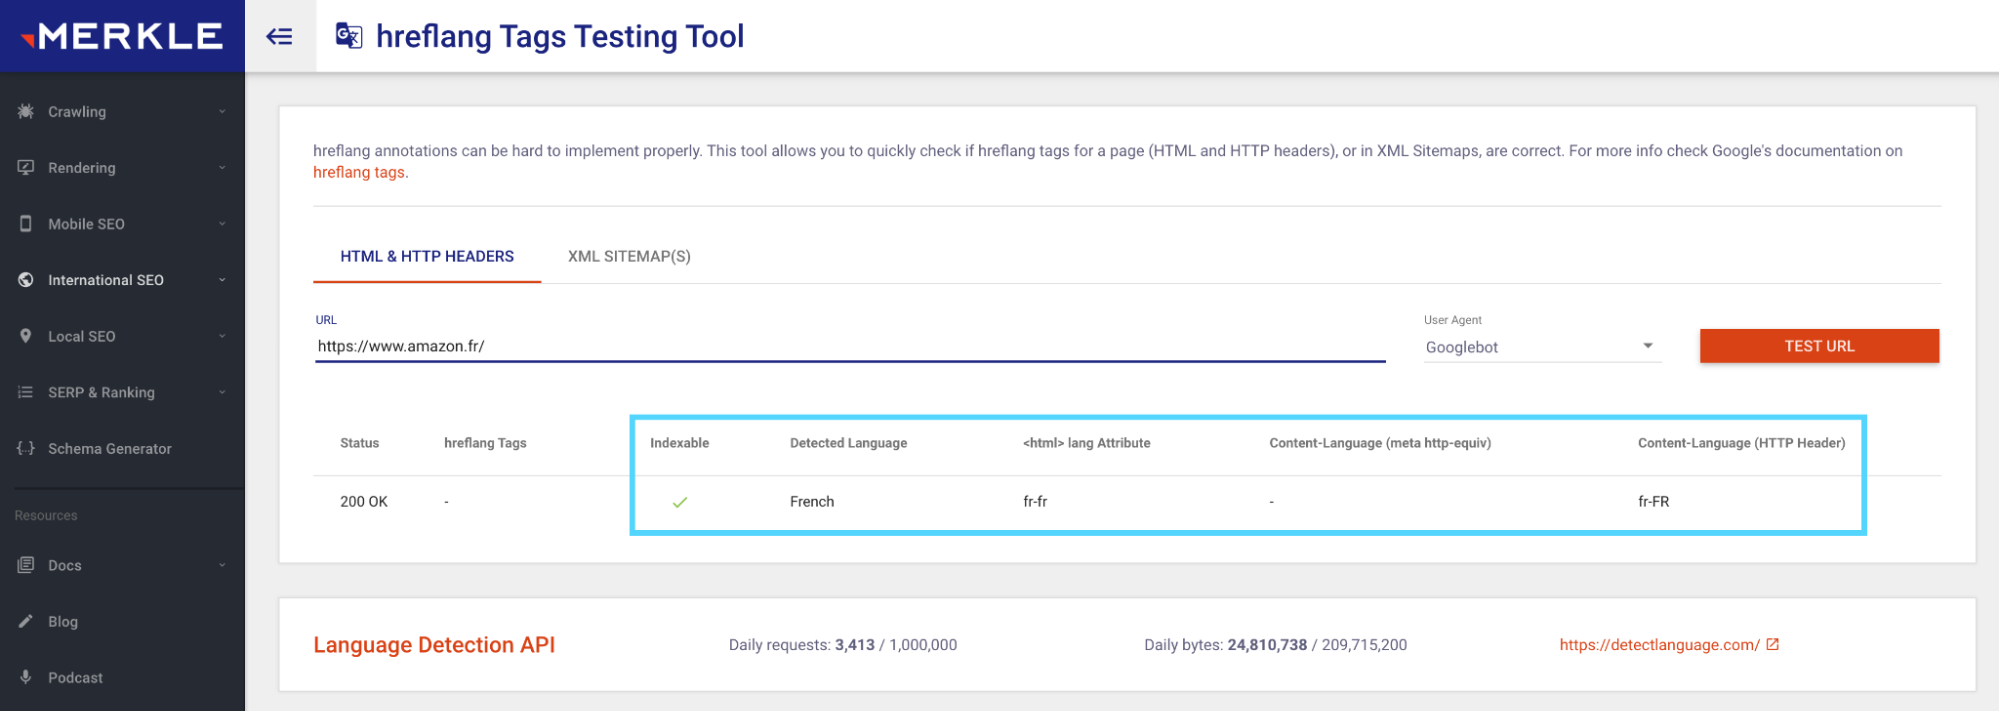
To monitor any hreflang errors, you can use Google’s International Targeting report here. Or you can use Merkle’s free hreflang tag testing tool:
Other technical SEO audit tools
The tools we suggested above are all free to use (for the most part), but an audit article wouldn’t be complete without at least mentioning some of our favorite paid tools.
Think of free tools like the baseline: you can find the answers you need and the direction you need to focus. Paid tools, however, may consolidate a lot of the above information into one tool (vs. dozens), and uncover a host of other useful technical data points and metrics.
Completing your audit
No SEO strategy is complete without accounting for the technical health of your website.
Though a technical SEO audit might be tedious (ok, it's definitely tedious), it’s absolutely necessary.
If you read our technical SEO beginner’s guide like you should have, then you already know where an SEO house with no technical foundation lives: on the second page of Google.
And nobody wants that.
Go forth, and audit!


