This blog post on AdWords account structure is part of the AdWords Tool Belt Course.
Congratulations! You have begun to journey down the most exceptionally challenging and intelligent marketing rabbit hole one could hope to find.
Well, perhaps I am biased since that is my chosen field (and love), but truthfully, it's an exciting venture you are about to embark upon.
Of course, it's at this point I need to shift away from stoking the fires of excitement, and shift to what more closely resembles pouring cold water upon those embers. PPC is an awesome field, but it requires a bit of work, discipline, and knowledge to get there and this series will be an excellent start for you.
In this section of the series, we will be focusing specifically on getting Search campaigns up and running. I have discovered that setting up your account well in Search really cannot be understated in importance.
Much like a great volleyball player, or the movie Batman Begins, building your account well will set you up for success in the future. Failing to build your account well on the other hand, can doom you to throwing your hands up after a few thousand (or hundred thousand) dollars in spend complaining about how Search Marketing “just doesn’t work” for you.
It’s not PPC’s fault when it is user error.
Get brand new Google ad strategies straight to your inbox every week. 23,739 people already are!
Part 1: Account setup - AdWords express or UI?
In terms of setting up an account and building it well, the first step is to actually open an account. This may seem like a step you would want to skip over, but you might be surprised at a few of these handy tips if you are new to AdWords.
One of the first crossroads you will hit on your new journey within Google Ads is the decision of whether to open an account with AdWords Express, or the traditional AdWords User Interface (UI, from here on out).
While the AdWords UI offers all of the campaign settings and optimization opportunities a marketer would need to manage their campaigns well, AdWords Express is built for the… err, shall we say, less-invested marketer. It is pitched to SMB owners and managers as a way to advertise on Google without interrupting “your full-time job.”
As with anything, “quick and easy” usually translates into loss of efficiency, and AdWords Express is no different.
AdWords themselves claim: “Just set up your account and we’ll manage where and when your ads appear on Google. No keywords to choose, no online marketing strategies needed, and no ongoing maintenance.”
The problem here, is that AdWords is an increasingly expensive route for SMBs and the very thing that can save the SMB advertiser against the deeper-pocketed competitor is an ultra-targeted strategy with specifically chosen keywords, smart ad tests, and… well, ongoing maintenance.
Like much in life, there are no short-cuts in AdWords ,and AdWords Express is simply a get-rich-quick ruse destined to lead to disappointment.
If you are going to do AdWords, you need to do it well and with access to all of the targeting-weapons in your arsenal, managed by a capable individual or team. Whether agency or in-house, my recommendation is to skip AdWords Express and go right to the more comprehensive (yet advanced) traditional AdWords UI.
Account setup: Manager account?
So you’ve decided on going the AdWords UI route, but there is one more question pre-setup to answer. Are you setting up multiple accounts for your business, or managing an agency? If it’s the latter, then you may want to consider a Manager Account (used to be the Multi-Client Center -MCC).
A Manager Account allows you to manage multiple clients in one dashboard, and it is super handy to the larger in-house business or agency.
You can even link Manager Accounts to other Manager Accounts. If you think you may need to go down the route of opening a Manager Account, go here: Opening an AdWords Manager Account.
Account setup: Getting started
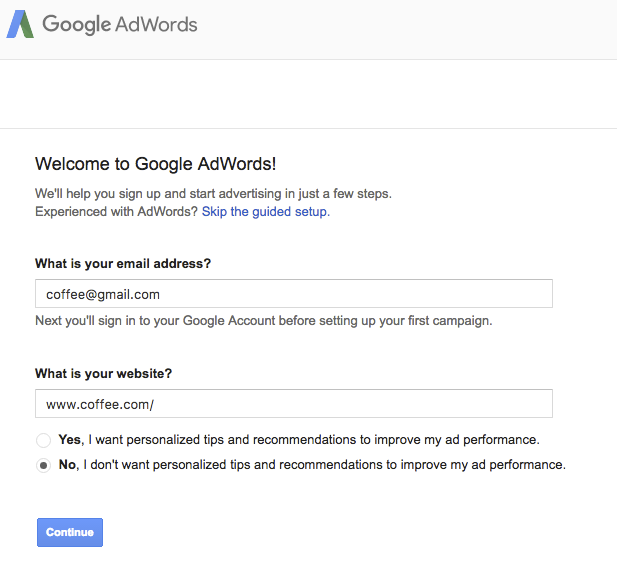
Now that you are ready to get rolling, go here and create an AdWords account with your gmail login.
Follow the on-screen prompts (not rocket science here), get your billing information in, remove whatever campaign AdWords wants you to start with, and we’re ready to get rolling.
Let’s begin by setting up your first Search campaign.
Part 2: Setting up Search campaigns, settings
Search campaigns are the staple of AdWords.
I’m obsessed with search marketing, and the reason is because there is an aspect that goes beyond any demographic or buying behavior data used in marketing before this point.
With search marketing, you are connecting with a single individual who is revealing their deepest, darkest secret.
That is, they are telling you their personal intention.
When an individual types (or speaks.) into a search engine, that phrase or word they say is labeled a “search query” or “search term”. You will then bid on these search terms by choosing keywords you want to target.
In this way, you can advertise only on the exact search terms you want to advertise on. Personal intent targeting at its finest.
While you are likely familiar with a lot of this already, how does one actually go about setting up an AdWords campaign to accurately bid on keywords?
Keep reading.
Search campaigns: Settings
As you begin your AdWords account, you now get to create your first campaign.
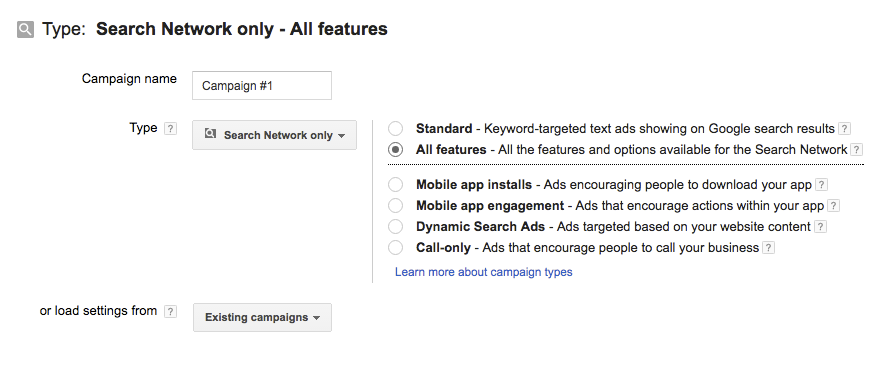
Naming
While this may seem an odd field to camp on, the first thing you will need to do is name your campaign… and I want to encourage you to name it well.
I wrote this post with far more detail on my blog, so use it for reference: Naming PPC Campaigns – It’s More Important Than You Think.
The basic thing to be aware about naming your campaigns, is that this sets the stage for account organization and filtering later. I prefer to include key segmentation aspects in the name, so things like campaign type, location, and device.
In this case, since we are discussing Search campaign builds, a name may look like this:
Search - Product Brand - US
or
Search - Remarketing - Widget Category - UK
In this way, you can then easily filter in your Analytics reports for all search campaigns for widget brand X, or whatever. It keeps things organized, and you’ll thank yourself over the course of the campaign’s life for having a structure naming system from the beginning.
Feature selection
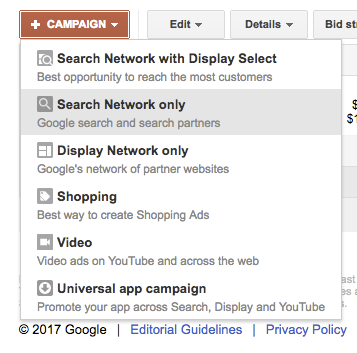
Make sure you select “Search Campaign” and then “All Features” in the options. This will ensure you get to make as many account decisions as you can to remain in control of as many account variables as possible.
The next thing you will see is the option to choose your Network.
Since you are creating a Search campaign, you are automatically opted into the Google Search Network to ensure you show on Google sites (Search, Shopping, Maps, etc), however you have the option of Including or Excluding Search Partner sites.
Search partners are non-Google websites that are eligible to show your ads, so it’s really up to you whether you want to show on just Google sites, or if you want to expand your reach.
There is minimal controversy in PPC-land as to whether you should automatically exclude or include Search Partners. Of all of the accounts I have helped with over the years, I have rarely seen Search Partners perform consistently poor enough to warrant excluding automatically, so I tend to leave Search Partners opted in.
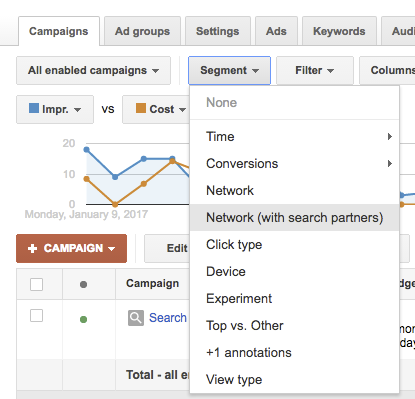
Pro Tip: If you choose to go down this route, just make sure to keep an eye on the Search Partners performance over time, as you may opt to exclude them from specific campaigns if they are under-performing. You can do that in your campaigns tab, by selecting the “Segment” button and then choosing “Network (with search partners).”
Location targeting
Location is the next settings element to consider, as with all AdWords campaigns, you have a bit of flexibility in where you can target your ads.
Obviously, you will want to select the geo-locations specifically related to the product or service you are selling.
You can take a few tacts here, depending on the size and specificity of your campaigns, you can start broadly (targeting all of the US for example), and then optimize for more specific location bidding later, or you can choose your top specific regions by city, state, country, zipcode, or radius targeting and set bids accordingly.
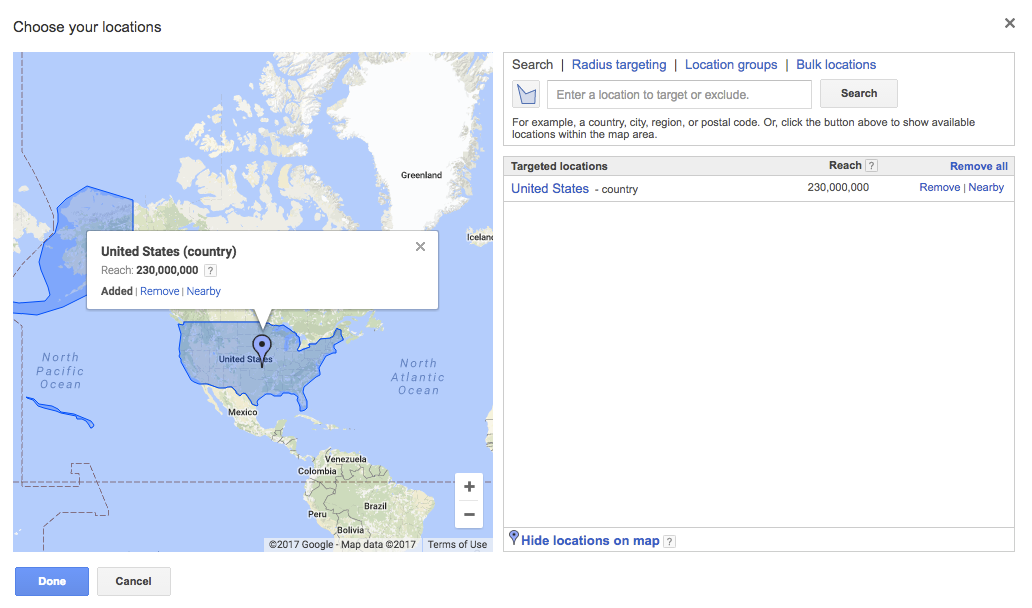
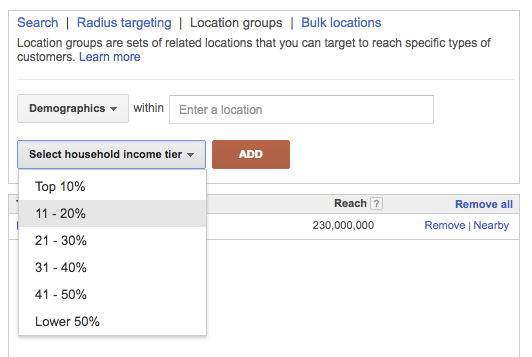
One of the favorite groups to segment out among more advanced PPCers, is demographic targeting based on income level. This can have interesting results in your campaigns, and allow you to set bids according to general income level zipcode data.
A final note on locations, is the targeting option AdWords allows you to set in your campaigns.
While default is to show ads to “People in, searching for, or who show interest in my targeted location (recommended)”, I generally prefer to change this to target only people physically located in my targeted location.
This is because I want to ensure only people I can ship my products to are actually costing me money with ad clicks, not curious users Google things are related to my clients across the world.
Generally, if you have more budget and are more interested in reach, then it’s probably worth keeping the default selected. If you have limited budget with tight geographical boundaries, then go with option 2. Option 3 could be one you experiment with if you show ads for something like a vacation rental house, in which you want to target people looking at a location they are not physically located in.
Initial Bidding Strategy
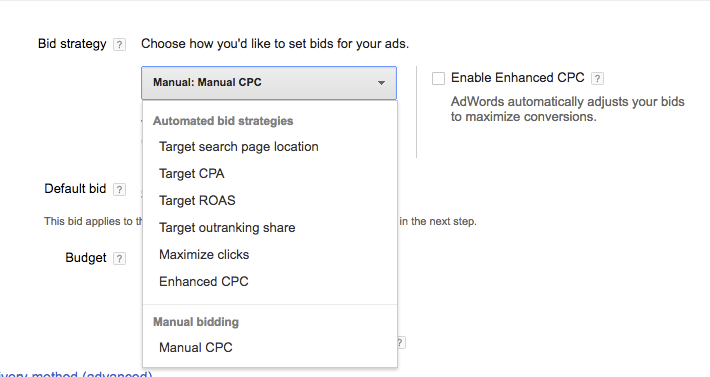
It is at this point in the journey when you will come to a crossroads, setting your bidding strategy.
More will likely be said in terms of optimization as it has to do with bidding, and we unfortunately do not have time to delve deeper into the various strategies at this point.
Thankfully, KlientBoost founder Johnathan Dane wrote an immensely helpful walk-through on the various bidding strategies that you can find here if you want to dig deeper: 21 AdWords Bidding Strategies Your Competitors Don’t Know
A quick takeaway for automated bidding is that the more conversion data you have for the AdWords robots to utilize for smart bidding, the better.
This means that if you are first starting a campaign, or managing a smaller account then it’s probably a better idea to begin with manual CPC bidding. This is my preferred initial bidding strategy, make sure to deselect the “Enable Enhanced CPC” option as that is selected by default.
The next trick to bidding correctly is to identify how you will first set your bids. This can be anywhere as simple as:
(1) identifying past account average bids and beginning there
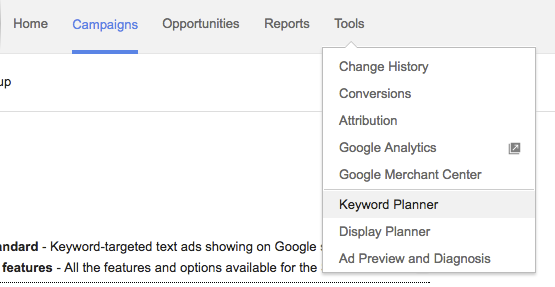
(2) utilizing Google provided tools like the Keyword Planner for estimates
(3) some awesome complicated math scenarios based upon your profit goals.
If you opt for the 3rd option, Erin Sagin (previously WordStream, now with Google) wrote a helpful article that discusses a few formulas to try: Easy AdWords Bidding Strategies for Newbies & Math Haters.
The most in-depth post probably ever written on AdWords bidding is by the brilliant Wijnand Meijer on Certified Knowledge: The Complete AdWords Audit Part 13: Bid Management.
Whatever your decision, based on your strategy (or lack thereof, and shot-in-the-dark guess), you will set a default bid at the campaign level.
It should be noted that targeting priority in default bids works in reverse order. That is, a keyword or audience bid will overrule the bid set at the Ad Group level, which will overrule the default bid set at the Campaign level.
Setting a Budget
Now that you have your bidding figured out, it’s time to set a budget.
In general, budgeting for a new account or campaign can be difficult to do since, well, Search marketing is an auction that changes every single time a query is run.
This means that setting a hard and fast budget is more difficult than setting general budget parameters. Because of the trackability of AdWords campaigns to conversions, it is also recommended to allow the budget to flex as profitability is determined.
Nothing worse than hitting campaign goals, yet still having to shut off campaigns because the monthly budget was hit.
How does one set a budget smartly? AdWords discusses this in it’s help section here. A generally good way analyzing this is by estimating the keyword avg CPC and traffic volume in the Keyword Planner.
You will get to the Keyword Planner in the Tools section of your AdWords account.
In the keyword planner, you can then get estimates (and ideas) for the keywords you are planning on bidding on, and can then set a general idea of a beginning budget for your campaign.
In this example, I selected a few words, gave a basic CPC I was willing to pay based upon what I saw in the averages, and it spits out a recommendation. If you or your client is comfortable spending this, you can then set a campaign budget somewhere in this range.
I do like setting campaign budgets realistically in case something ever goes amiss, it will have the chance to cap out until you are able to address the issue.
Fair Warning: I cannot say this long or loud enough, but you cannot trust the keyword planner to be exact. It is like Captain Barbossa’s Pirate Code, use it more as a guideline than actual rules.
At the end of the day, the true determiner of budget is your client or manager, but this at least gives you some data to make an initial suggestion.
Scheduling
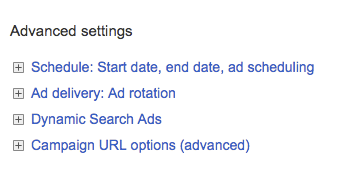
At this point in the game, you will make it to the bottom of the campaign settings page, but don’t stop yet. In the Advanced section are a few more pieces of the puzzle to be aware of.
Expand the first option and you will see you have an option to schedule your campaign.
For evergreen campaigns (campaigns you want to run continuously), you will simply leave the “end date” field empty and move on. However if you are running a specific campaign for a promotion you may want to schedule the campaign to go live and be paused on the specific dates of the promotion.
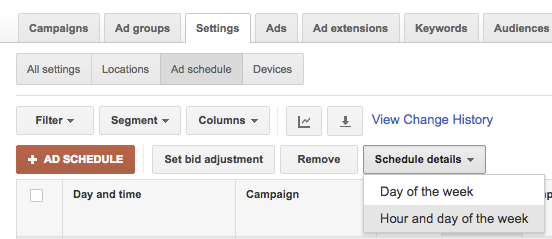
The second option here is one I used to create fastidiously with every campaign build.
In this, you can set your campaigns by a schedule. This will help you later because you can actually set bids based upon the schedule to lower or raise your bids based upon the time of day when people are more/less likely to convert.
If you just want to run your ads at all times to begin with (recommended unless you have a very limited budget or purpose revolving around timing), then leave this alone because you can build these out later based upon what your data shows after your ads have been running for awhile.
Ad rotation
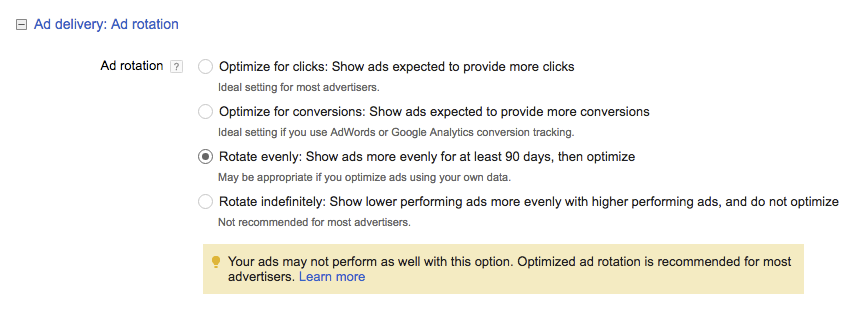
Ad rotation is a somewhat controversial setting.
If you choose the first two options, Google will make the choice based upon what its data tells it is the best ad in an ad group. The problem that expert PPCers have noted in the past, is that Google can often make a choice so fast that it doesn’t seem to be actually taking the ad test of that specific ad group as the primary factor.
I used to be a sole proponent of Rotate indefinitely so I could always decide on my ad tests, however I have begun to use Rotate evenly more. This allows your ads to rotate evenly for 90 days and then Google will choose the winner.
This choice is especially helpful for many ad groups that are not your top AGs so not ones you look at all the time, but that you do want to ensure are still being optimized.
ProTip: One crucial thing to understand with ad rotation is that evenly doesn’t means 100%, 50-50 evenly.
According to Google this is because: “the quality of the ads differ, and quality is used to determine where an ad shows, or if it even shows at all, the percentage of impressions for each ad may not be perfectly even. An ad with high quality may appear on the first page of search results, while an ad with low quality may show on the second page of search results, which reaches a smaller number of users.”
This is helpful to know since many first-time advertisers question why their ads are not being rotated evenly
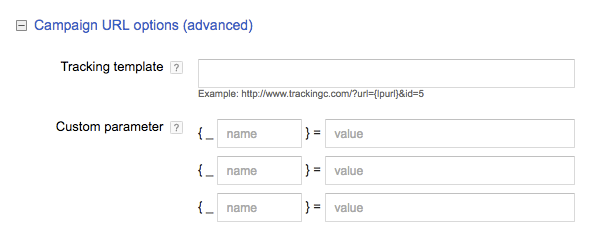
Campaign URL options
Nothing fancy here, just add your 3rd party tracking for your ads (if you have any, most new advertisers don’t), otherwise if you are just tracking through Analytics, make sure you have Auto-tagging in the account turned on so your data will get imported into your connected Analytics account.
There you have it, the basics and pro-tips for getting the settings correct in your Search campaigns.
Part 3: Setting up Search Campaigns, creation & strategies
Now that we have your Search campaign set up, it’s time to get creative. The gory details are out of the way, now you get to have fun filling them.
However, before you start spewing keywords left and right into random ad groups, you need to develop a strategy. We already discussed Naming conventions as a strategy previously, and that will slip hand-in-hand with the preferred strategy you choose for actually creating your Search campaigns.
There are many strategies for structuring your Search campaigns in AdWords, four of which the most common are (1) by Match Type, (2) by Client Parameters , (3) by Revealed Data, (4) SKAGs.
There have been various discussions on all of these, and a quick Google Search will keep your reading for hours. Summaries from debates at SMX East and SMX West are linked to here for your convenience.
As someone who has tried each of these four strategies at various points, and has listened and debated a fair amount over the last few years on the finer points of account structure, I can say with confidence that… there is no perfect system.
In my opinion, each structure has benefits to it and those benefits often depend on the specific client you are working for and their specific needs.
A brief analysis of each structuring system:
- Segment by Match Type - Admittedly, this is my personal favorite. In this system each grouping of keywords is separated into two campaigns. One campaign for the Exact match and one campaign for the Broad Match Modified. Phrase match is used only sparingly in a few ad groups if needed for word order.This system is great for limited budgets, because it allows easy decisions based upon top targeted exact match terms in entire campaign groups. Budgets can be controlled on a campaign level to ensure the best exact terms are getting the most of the limited budget. The primary negative of this structure is that the account can get fairly large and bulky, especially in a large client.
- Segment by Client Parameters - This structure tends to focus mostly on the client category, product brands, or themes and create campaigns grouped around these. The benefit here is that optimization energy and budget can be devoted specifically to the areas a client is most interested in.
The primary concern I have for this is that just because a group of products is categorized in a certain way, doesn’t mean that is the best way to group them for optimization purposes, especially since it can lump poor performing BMM terms with Exact terms and make high level optimization decisions more difficult.
- Segment by Revealed Data - This structure prefers to be flexible. As the data shows support it will set up some SKAGs for this product brand, and then segment by Match Type for that brand, and so on. In some ways, most accounts over time naturally turn into this strategy, simply because multiple managers, and changing data requires adaptability in strategies. This “catch all” strategy works in that regard, because adaptation is crucial for good PPC management. The primary concern I have for this strategy is that it requires a bit of historical data to make these decisions, and this is no help at all to the person wanting to create an account.
- SKAGs (Single Keyword Ad Groups) - The final strategy to note is one first made popular by 3QDigital with their Alpha-Beta process.KlientBoost’s Johnathan Dane has also written on the strategy in depth here: 19 Reasons Why Single Keyword Ad Groups (SKAGs) Always Win. The gist of the strategy is that you pull each of your top keywords into their own ad groups so you can stay laser-targeted with bid changes and ad tests and query filtering on just those top terms.Generally there will be a means of finding alternative keywords to supplement the SKAGs, and this will look like a more general campaign or Dynamic Search Ad campaign in the account. I have found in certain clients that this strategy cannot be beat because of its hyper-focus on those top keywords bringing in a large chunk of the business. On the other hand, the primary concern I have for the strategy is that it also relies heavily on knowing what those terms are before building them into SKAGs, so is perhaps not an ideal strategy for a completely new account.
My preference for new account builds is to begin by researching the top keywords and then breaking them into a Match Type segmentation.
This allows me to have a tight grip on the budget as well as keep a close eye on potential wasted spend with BMM terms run amuck. As we get data, then we can take the top terms and break them into their own SKAGs within those existing campaigns (or create your own SKAG campaign for all I care). This allows us to start somewhere intentional, but also stay up on the top terms as they reveal themselves.
In this way, your starting account may look something like this:
Search - Widget XYZ - Exact - US
Search - Widget XYZ - BM - US
Search - Brand - Exact - US
Search - Brand - BM - US
Search - SKAGs - US
Search - Top Product Category - Exact - US
Search - Top Product Category - BM - US
Keywords
It’s somewhat of a chicken and the egg thing in terms of whether to do keyword research first, or figure out your account structure. Both are important and work together, so as you develop your structure you will need to work that into the actual keywords you are actually going to bid on.
In terms of finding the keywords, there are a number of places you can look to build a keyword list. The main places I look are:
- The client website and information
- The Keyword Planner
- Competitive analysis tools like SpyFu or SEMRush (if you don’t have a subscription, use Fiverr.com. The guy I like using is this one)
- Analytics or previous AdWords query data (look in the search term report, a gold mine of information if you have the history)
My friend Erin Sagin wrote another awesome post on keyword research worth checking out here: 5 Tips for Dominating Your E-Commerce Keyword Research
Once you have a list of your keywords, you will need to get them into the account itself.
As noted previously, a keyword is a word or phrase you choose to bid on in AdWords. A key thing to be aware of with keywords is the idea of match types. Match types are different ways for you to tell Google you are willing to allow your keyword to be matched to specific queries. The four match types are:
Broad - the most lenient, Google will match this up to any word it thinks is related to your term. I personally almost never use broad because you may find yourself losing too much budget to low-quality terms.
+Broad +Modified - BMM or MBM keywords include a + in front of them in your AdWords account. This means the word searched for will include the word you specifically bid on, but the words can be in any order in the search query.
So if you bid on +red +flower, your ad is still eligible to appear for the search query “I saw burning red flames outside the flower shop”. This is better than broad match as long as you keep a close watch on it, it is an excellent source of finding new traffic.
“Phrase” - Phrase match keywords utilize quotation marks and tell AdWords that you want to bid on those words, in that order but other words can appear around your keyword in the query.
I.e., if you bid on “red flower” you would not show up for “I saw burning red flames outside the flower shop” but would show up for “I like to smell pretty red flowers”. This is a good option for brand terms and such where word order can change the meaning.
[Exact] - exact match keywords utilize brackets [ ] to note that only those words, in that order, and nothing else can be bid on.
This is the holy grail of specific targeting, but the problem is that this significantly reduces traffic for your account since you are limited to the number of people searching for that query, and only that query.
Generally, a good mixture of both exact match terms to target your most important terms and some BMM or Phrase keywords to help you expand your reach will allow you to keep a lid on your spend but also find new traffic and get the word out.
Negative Keywords - A final keyword type to note is the Negative keyword. This keyword allows you to actually exclude certain search terms, and is an invaluable tool in your arsenal.
There are three different match types to the negative keyword in AdWords and they act in a similar fashion. If you want to only exclude a specific term, you would use -[keyword], any term that includes the specific -”keyword phrase”, or any words that include any of the broad match negative terms.
One thing to note with negative keywords is to be careful not to over-exclude. You want to ensure you are not bidding on poor terms, but also not accidentally excluding legitimate terms that you aren’t even aware you are excluding.
Ad Group Strategy
Now that you know what campaigns you will be creating and the keywords to fill them with, it’s time to actually add them into your campaigns. You will do this by grouping them together in groupings called Ad Groups.
When you strategize how to group your keywords into Ad Groups, think relevance to the ad that will be shown. I prefer to keep my keywords tightly grouped together in a single theme that can be noted specifically in my ads.
This means that additional works like “best” or “buy” are getting their own ad groups in my campaigns.
Your Ad Groups thus might look something like (the (E) signifies Exact Match in my naming conventions):
Widget (E) - gets keywords: [widget] & [widgets]
Blue Widget (E) - gets keywords: [blue widget] & [blue widgets] & [widgets blue] & [widget blue]
Red Widget (E) - gets keywords: [red widget] & [red widgets] & [widgets red] & [widget red]
Buy Widget (E) - gets keywords: [buy widget] & [buy widgets] & [widgets buy] & [widget buy]
… and you get the idea.
This will ensure that your terms are easy to find, optimize, and even filter queries between. For instance, you may find that a certain query converts better in one of your ad groups with a certain keyword and ad text, so you can exclude that keyword from the ad group in which it is more performing.
Text Ads
Last but not least in your campaign setup, you will need to get some ads running so people can actually see your product.
Brad Geddes (one of the authors in this course) has said before that the ad is the only thing you actually create that prospective customers will see. This is where your marketing knowledge comes in, this is where PPC goes beyond data and strategy, and actually dips into marketing.
The basic text ad in Google has gone through a bit of change around the time of this post. Extended Text Ads were just recently introduced and made default, thus signifying the biggest change in text ads since AdWords began.
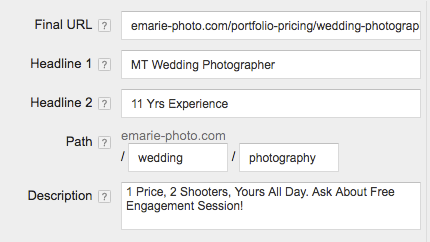
The new layout of the Expanded Text Ad is this:
There are 2 Headline fields that equal 60 total characters, as well as 2 Path fields, and 1 large Description field with 80 available characters of space.
There are several noted best practices, as well as a few practices you have to learn the hard way over time that I’ll share with you now as you create your text ads.
- Utilize your keyword in your ad. This is an oldy, but still a goodie. I often test my Titles including the keyword that is in my ad group (and in all of my keywords since they are tightly grouped as we just learned) against various more click-baity headlines and I’m often surprised to see that the Keyword in the Title still works well much of the time.Part of this is probably due to the fact that Google still highlights the keywords used in the search query in your ad text, so can make it pop more in the SERP (Search Engine Result Page).
- The initial inclination is to use all the characters, but now that we have more characters it may not always be beneficial to go for stuffing your ads with as many words as possible. We live in a post-reading culture, so make sure to run tests with short, punchy ads as well as your regular, lengthy content ads.
- Make sure to get benefits across to the user, not simply facts about your product or service. This is much more difficult to do and takes practice. An example might be, instead of saying “Fast Shipping” like all of your competitor ads say, try presenting the benefit to the consumer. “Get back on your bike asap, with our 2 Day Shipping.”This helps meet their need “my bike broke” and answers the question for them, “how can I get this fixed fast?” by helping them see what they most want to do “get back on the bike and get riding again.”
- Headlines are often more influential than descriptions in affecting traffic. Many PPCers have noted that headlines are the most influential aspects of text ads.Just like everything else, test this for yourself, but definitely be aware of the fact that those big headlines are likely where you want to put your most important, punchiest text.
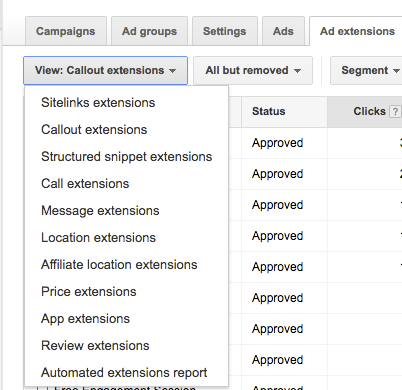
- Ad Extensions are the bomb. Can I bring back some old school lingo to briefly discuss ad extensions? Unfortunately, we can’t go into detail here, but ad extensions can significantly increase your ad real-estate on the top of SERPs so take advantage of as many ad extensions as possible.Here is a relevant huge walkthrough on ad extensions that would be worth going through. 15 AdWords Ad Extensions To Use (& New Ideas To Try)
Well there you have it.
Wrap up on AdWords account structure
In some ways, you are probably as tired reading through this as I am after writing it. On the other hand, we have barely scratched the surface at what you can do with Google Search campaigns.
Do take the chance to read through the article links I included and continue learning in this series as well. Google AdWords search is still an amazingly successful means of advertising, and I’m excited for you to begin this journey.
