


Only 37.7% of marketers use marketing analytics in their decision-making.
Furthermore, only 35% of marketers feel that they can demonstrate the impact of marketing quantitatively.
It makes sense. Analytics and data are hard.
It’s difficult to choose the tools, verify the numbers, it takes time to implement it all, and can require a larger team with more specialized skills.
Truthfully, a lot of marketers get by with just basic analytics.
There’s a lot of opportunities left on the table. With the ability to gather specific analytics (and set it up quickly), it empowers your team to test or experiment and, more importantly, to prove your ROI.
As an agency that prides itself on data and reporting, we have to let you in on a tool that’s going to make your life as a marketer better: Google Tag Manager.
In this article, we’re going to give you the basics on what Google Tag Manager is, why you should use it, how to set it up and test it, what the basic components are, as well as some of our hacks and recommended best practices.
By the end you’ll be following up on last year’s requests to your dev team (that still hasn’t been implemented 🙄) to disregard because you’ve got it 👏 all under 👏 control 👏.
Get brand new analytics strategies straight to your inbox every week. 23,739 people already are!
What Is Google Tag Manager?
Google launched Google Tag Manager (GTM) in 2012 to help marketers understand audience behaviors and gain insights into performance without the barrier of needing to enter code.
GTM is not a replacement for Google Analytics, it’s a tool to use in conjunction with analytics. Put simply, it acts as a house and command center for all your tracking needs.
Rather than needing to edit your website’s code if you wanted to measure something like you would if you were only using Google Analytics, GTM gives you the freedom to control almost all your tracking from their tool AND send the data to be analyzed within Google Analytics. It’s used for PPC conversion tracking, retargeting, analytics, and much more.
Benefits Of Using Google Tag Manager
1) Google Tag Manager Is Free
That’s right. There are no monthly or yearly fees to use GTM.
Before GTM, if your marketing team didn’t know how to add Javascript to a site, you would have asked your IT department for their help with the install.
Most of the developers that I know are pretty expensive and charge hourly, so adding that bit of code to the site can end up costing a lot for that developers’ time.
2) GTM Allows You To Stay Organized and In Control
When you start, it may not seem like carrying out tag management tasks yourself is beneficial. After all, it puts more work on your plate.
That being said, it allows you to control everything from the naming conventions to the setup. You can consistently name everything, divide it into folders, and clearly label all your changes.
Those who have started a new job where you open up analytics for the first time and it looks more like hieroglyphics, will understand the value here.
Since it’s compatible with other tools, there is a lot of opportunity to create a system for labeling everything according to its purpose.
If you use multiple marketing automation services or manage multiple sites with multiple tags, GTM provides an easy-to-use interface for adding, removing, enabling, and disabling tags.
It also allows you to control when and where a tag fires, and what happens after it does get fired. Also, staying organized helps prevent data loss.
3) GTM Is Super Quick
One of the biggest hurdles marketers face is getting the development team to have the same sense of urgency as they do.
Tag implementation and adjustments may seem mundane or not “challenging” enough for a developer, which means the task may take a backseat to other priorities.
On the other hand, if you have a highly complex and large website, it may be more cumbersome and take more time in general for a developer.
Whether due to disorganization or waiting on a developer, you can avoid unnecessary pushback on campaign launch dates as well as clients breathing down your neck, wondering why things are taking so long.
This is a DIY project that most marketers can do. It’s not like those Pinterest baking projects where you want to make that super cute cake for the party and then it flops.
You will be able to think of a new conversion you want to track and immediately set it up by yourself.
4) GTM Supports Faster Loading (And More Conversions)
Piggybacking off the value of speed, another reason you should care isn’t just about manpower hours — it’s also about the load time of your website. With GTM, the code is streamlined, which means that tags will no longer bog down and slow your web pages from loading.
This plays directly into conversions in two ways:
Benefit #1: Increased User Time on Site
Javascript may be a marketer’s worst enemy when it comes to page load times. Basically Javascript is the diva, not letting anything else load until it loads, which means that visitors may get tired of the page loading, bounce, and you lose that potential conversion.
Typically, the sections of the page will load in an order waiting for other sections to load, which is called synchronous. But GTM comes to the rescue. Because GTM will load tags as soon as they’re ready and not in a sequence to other tags, it will fire tags on the page asynchronously and simultaneously, and saves you a whole bunch of time.
Benefit #2: Improved SEO Performance
Because of increased user time on site impacting user experience, it’s factored into SEO ranking considerations.
Saving a couple of seconds on load time may not seem like a big deal in the grand scheme of things. I mean, not much can happen in a few seconds, right? Wrong.
Amazon calculated that it can cost as much as $1.6 billion in sales each year with a slowdown of just one second. Google has calculated that it can lose 8 million searches per day with a slowdown of just four-tenths of a second.
5) Multiple GTM Users & Permissions
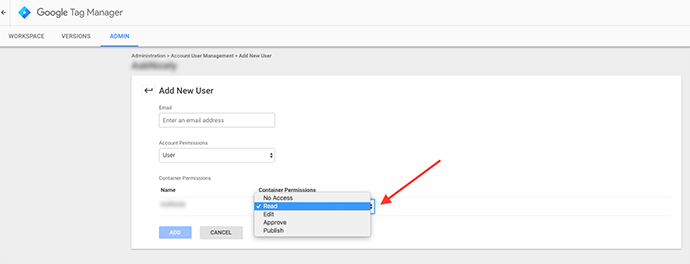
The final reason you should care about Google Tag Manager is that you have the ability to add multiple users with specific permissions, much like Google Analytics. You can control who has the ability to create and edit tags, triggers, and variables.
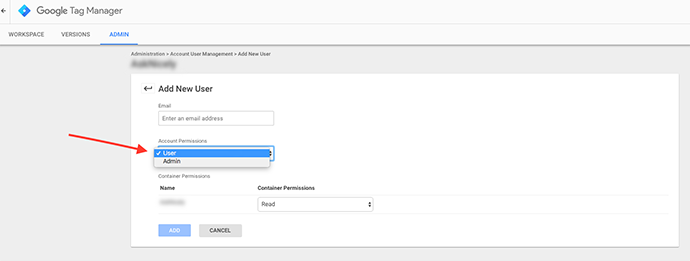
Access can be granted in each GTM container. The types of user access options are as follows:
- No Access: The user can’t see the container in the account.
- Read: The user can see the container, the tags, triggers, and variables in the container, but unable to make any changes in the account.
- Edit: The user can create workspaces and make edits, but is unable to create versions or publish.
- Approve: The user can create workspaces, versions, and make edits in the account, but can’t publish.
- Publish: The user is able to create workspaces, versions, edits, and publish it.
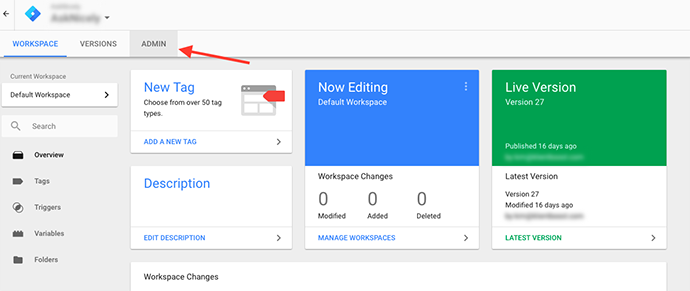
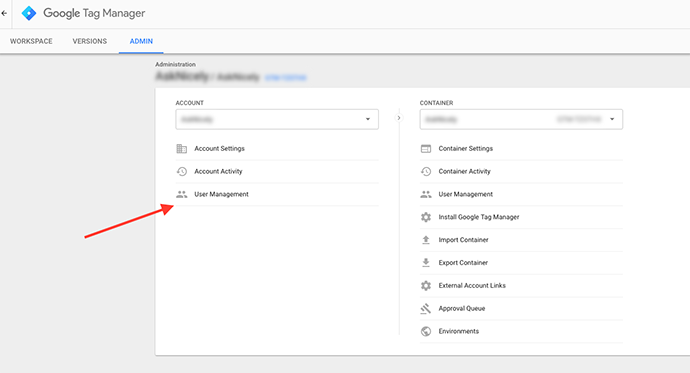
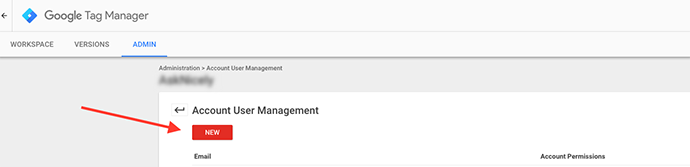
We’ll go over the complete build out of GTM in the upcoming “How to Set it Up” section later, but creating a user is simple:
So, why are users and permissions important? There may be some sections in GTM that you just don’t want other people touching, and potentially messing things up.
In the wrong hands, the ability to add and edit tags, triggers, and variables can lead to lost data and metrics, missed conversions, and crashed websites.
How to Set Up Your GTM
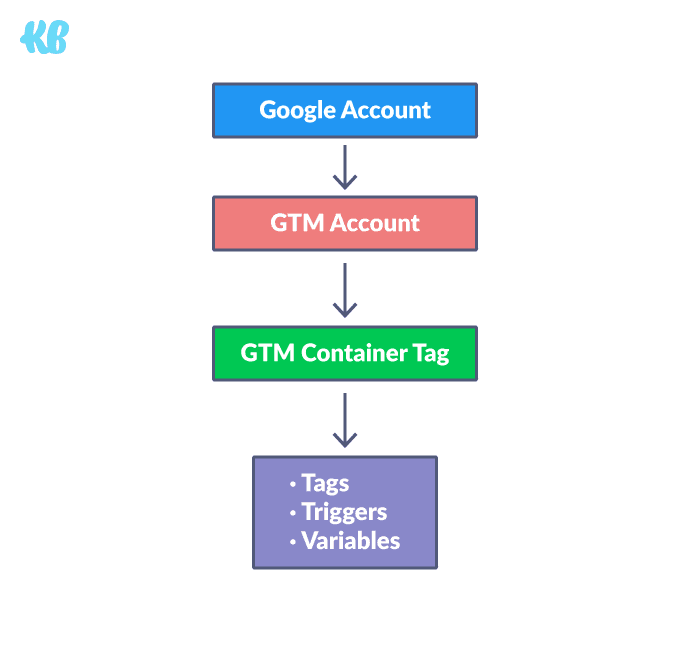
There are three main parts to GTM:
- Tag: A snippet or small piece of code (usually JavaScript) that’s pasted into pages of your site.
- Triggers: Defines when and where tags are executed.
- Variables: Used to receive or store information to be used by tags and triggers.
Create a GTM Account & Container Snippet
You’re (finally) ready to get started!
To create an account, go to tagmanager.google.com. You’ll be prompted to Add a New Account if there isn’t already one listed under your preferred email address.

Once you name your company, you’ll set up the Container with the website that you want to manage.
Name your container after your website and choose where you want to use the container (Web, iOS, Android, or AMP).
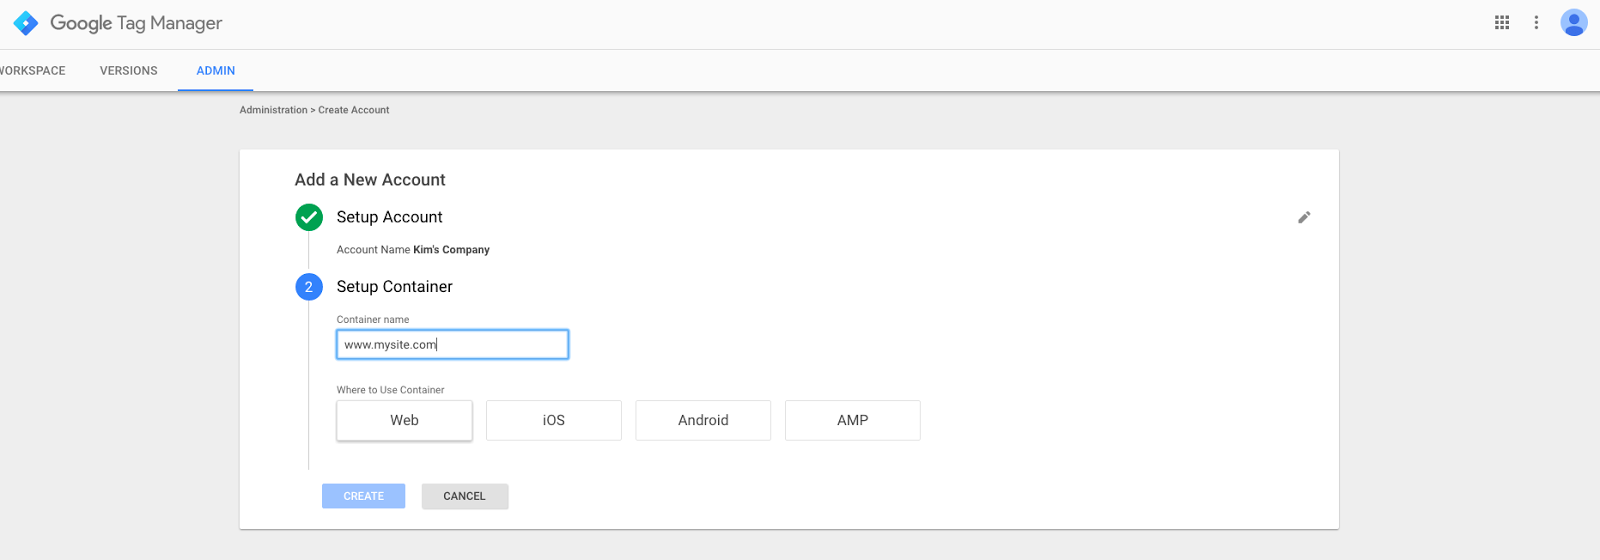
You’ll be asked to accept the GTM’s Terms of Service Agreement, and then you’re set!
You’ve created the account and your container and are ready to start adding in the tags, triggers, and variables you’ll need to start tracking.
Plan Tags For Your Site
Before you start implementing any tags, take time to review your site. Take a step back and think from your visitor’s point of view.
How will they navigate the site? What buttons will they click on? What tags do you need on which page?
Some tags you’ll want to add to every step of the site (Google Remarketing), and some tags only on specific pages (Conversion Tracking).
Install the Google Tag Manager Container Snippet
Yay! Now it’s time to plant that snippet of code onto every page of your website.
You should see a window with two pieces of code, one prompting you to place in the <head> of the page, and the other after the opening <body> tag.
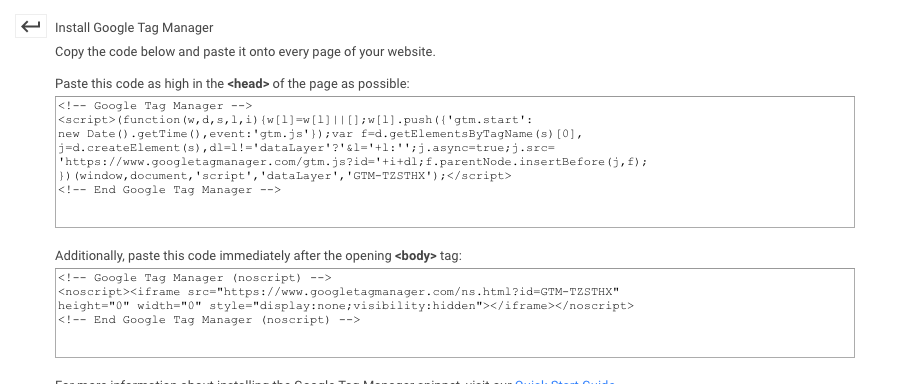
You will need your IT or development team for this one step most likely. Be sure to clarify the urgency and benefit to make this a priority though. It’s the key that will allow you to unlock GTM’s capabilities...which means, IT/dev will need to do less.
Components of GTM
Once you have your account created, the next step is to set up the Container, Tags, Triggers, Variables, and Folders.
Containers
You’ll need to create a container once your GTM account is established.
A container can be thought of as that “house and “command center” that I mentioned earlier.
Within your tag manager account, there can be multiple containers. You can typically think of each container being dedicated to one website. Each container has its own container ID.
It’s where you store all your tags, triggers, variables and folders for that website. It provides the functionality to run and deploy tags, and makes it easy to manage them all in one place.
Every container is made up of tags, triggers, and variables, aka the bread and butter of GTM. This is basically the heart of the entire command center.
Tags
Put simply, a tag is a snippet of JavaScript code that is placed on a website to trigger based on a specific user action.
Here are examples of what these tags capture from visitors:
- Acquisition: How the visitor ended up on the site, what channels they used to get there.
- Behavior: What pages they’re viewing, how many pages and how much time they’re spending on the site.
- Conversions: Form submissions, transactions.
Triggers and variables define each tags’ functions. We’ll get more into triggers and variables in a bit.
Basically, tags can record any behavior or event on a site and send that data to Google and third-party tags. Without Google Tag Manager, the code needs to be placed directly on the site using source files that a developer will need to set up.
Also, don’t forget that tags can have more than one trigger. For example, you might have a tag that fires each time a page loads and when a click happens on that page.
The First Tag You’ll Implement
Most likely, the first tag that you’ll create with GTM is Google Analytics (GA).
To create the new tag, go to the dashboard and click on Add A New Tag.
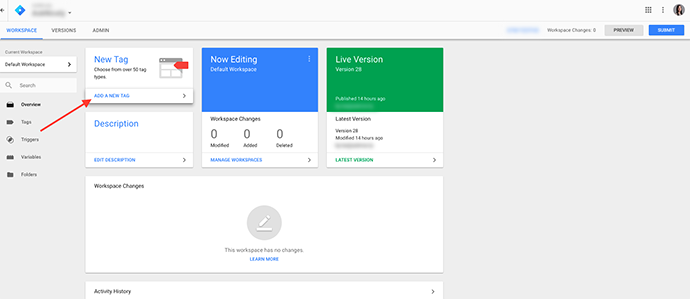
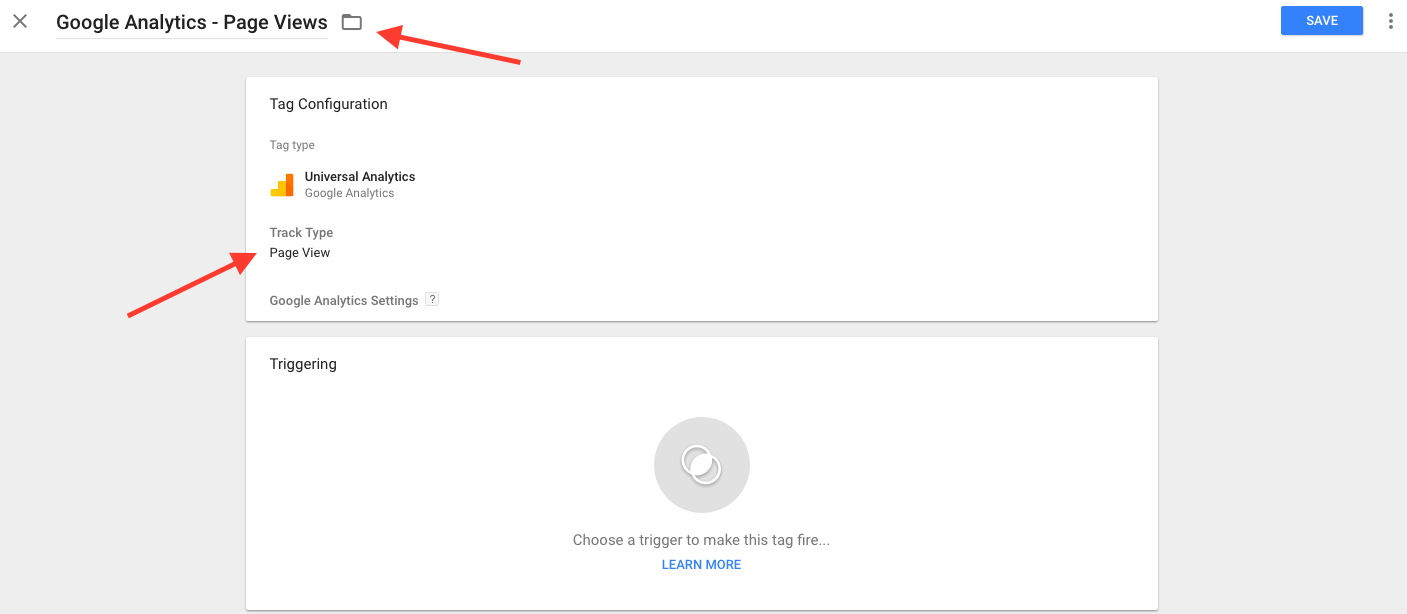
Name your tag something like “Google Analytics – Page Views” in the upper left corner so that you know that it’s tracking page views.
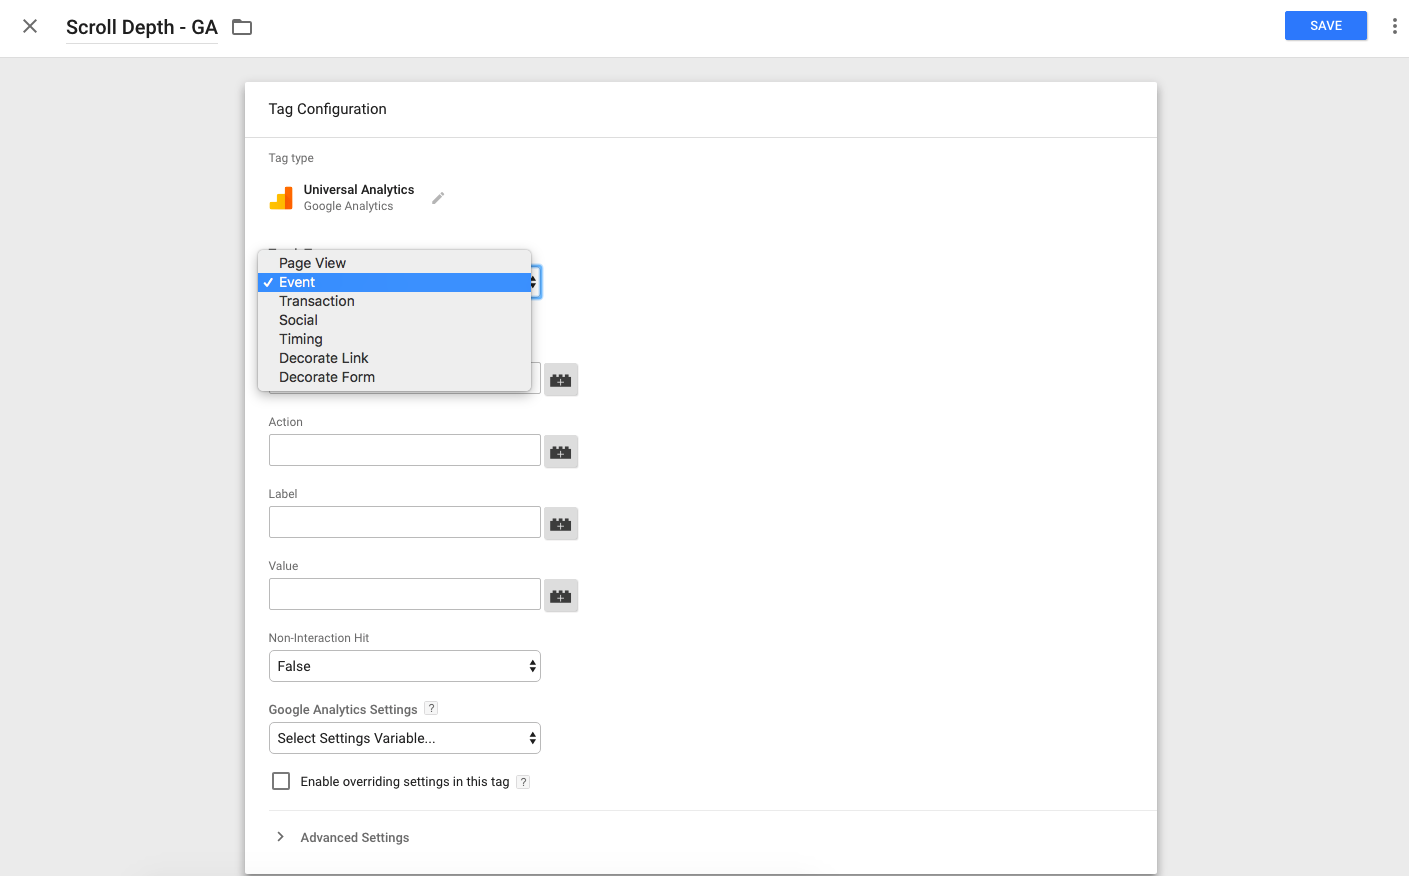
In the Track Type, choose Page Views, which will track every time a visitor loads a page on your site. There are other options like Event, Transaction, Social, etc. But for now, pageviews will be where you can start.
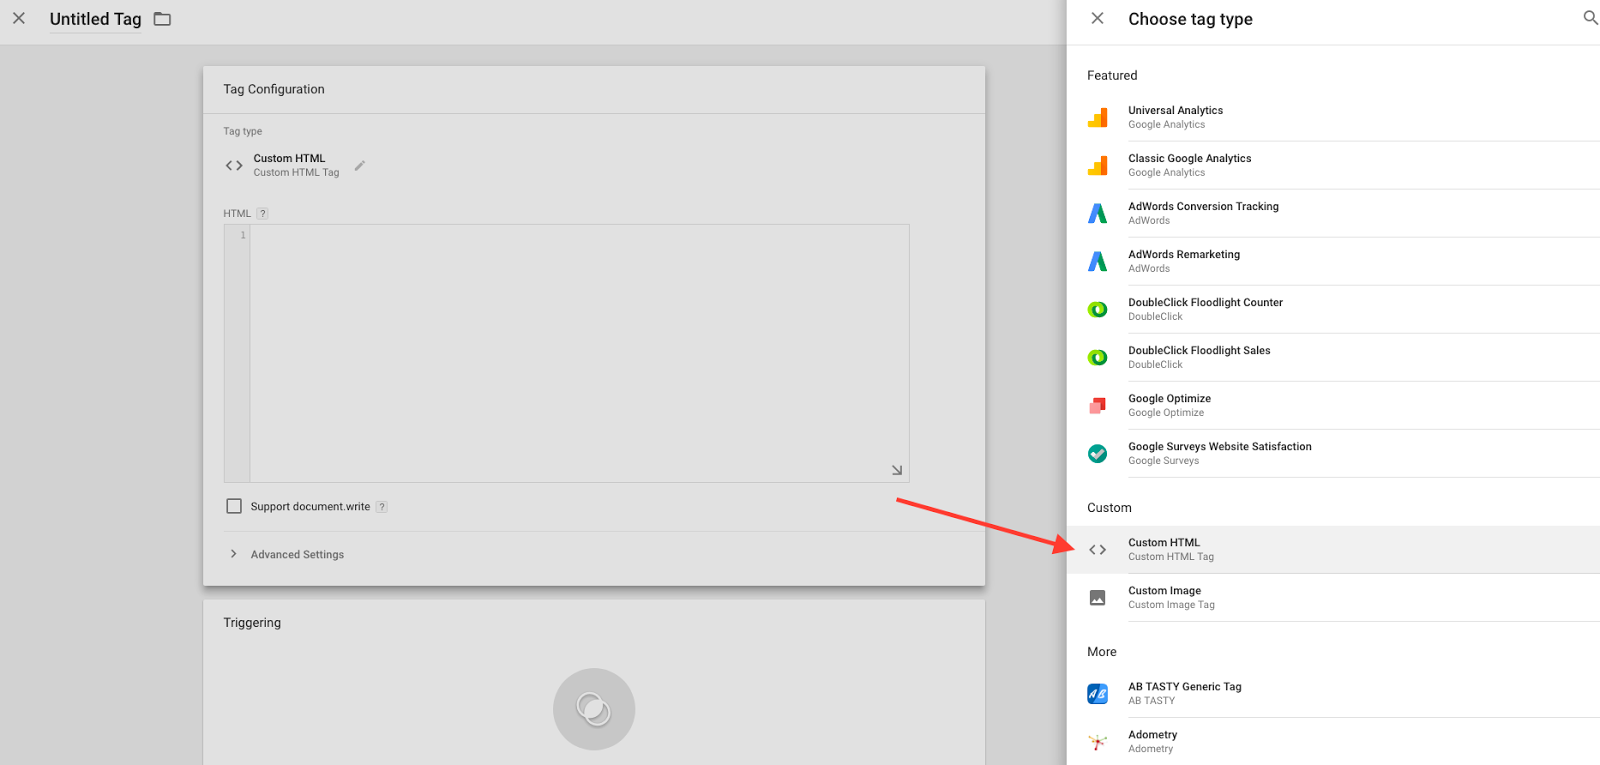
GA HTML Tag Implementation
Adding Google Analytics to GTM with a generic HTML tag is a more involved and complicated process than standard tag implementation. You might need some developer or IT assistance for this task, but it could be the most effective solution for your complex needs.
HTML tags allow you to customize your code and, hopefully, ensure a smooth user experience. And once they’re installed, any tweaks should be manageable by the marketing team after the fact.
Triggers
Triggers define which tag is fired and when, and a tag only fires if it has a trigger (formerly known as a “rule”).
You can add all the tags that you want to the site, but without someone pulling the trigger, nothing will happen.
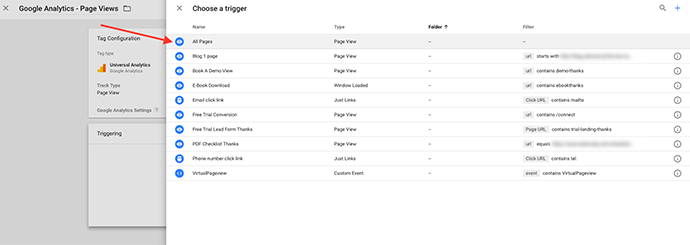
After you create the Google Analytics tag mentioned above, you can move on to creating the trigger.
If you’re doing this for the first time, choose “All Pages.” This means that every time a page is loaded, the tag will fire, which is necessary for Google Analytics.
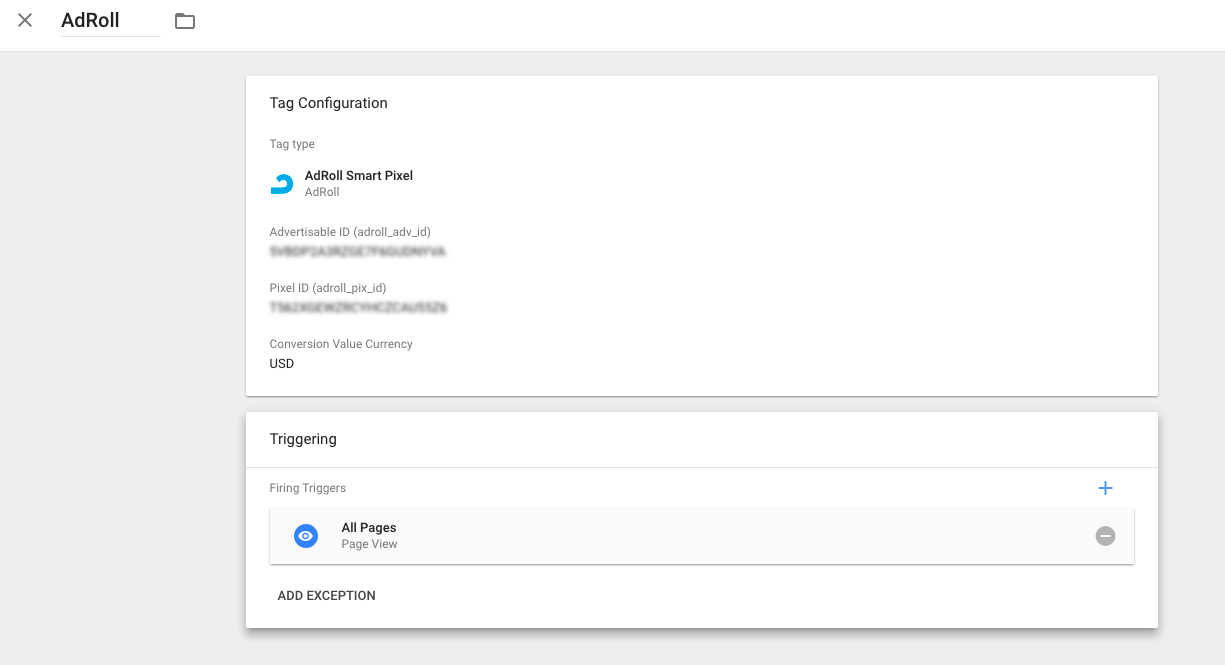
In this example, we’ve created a tag for AdRoll, so now we need to tell GTM when to fire that tag.
Creating & Choosing Google Tag Manager Triggers
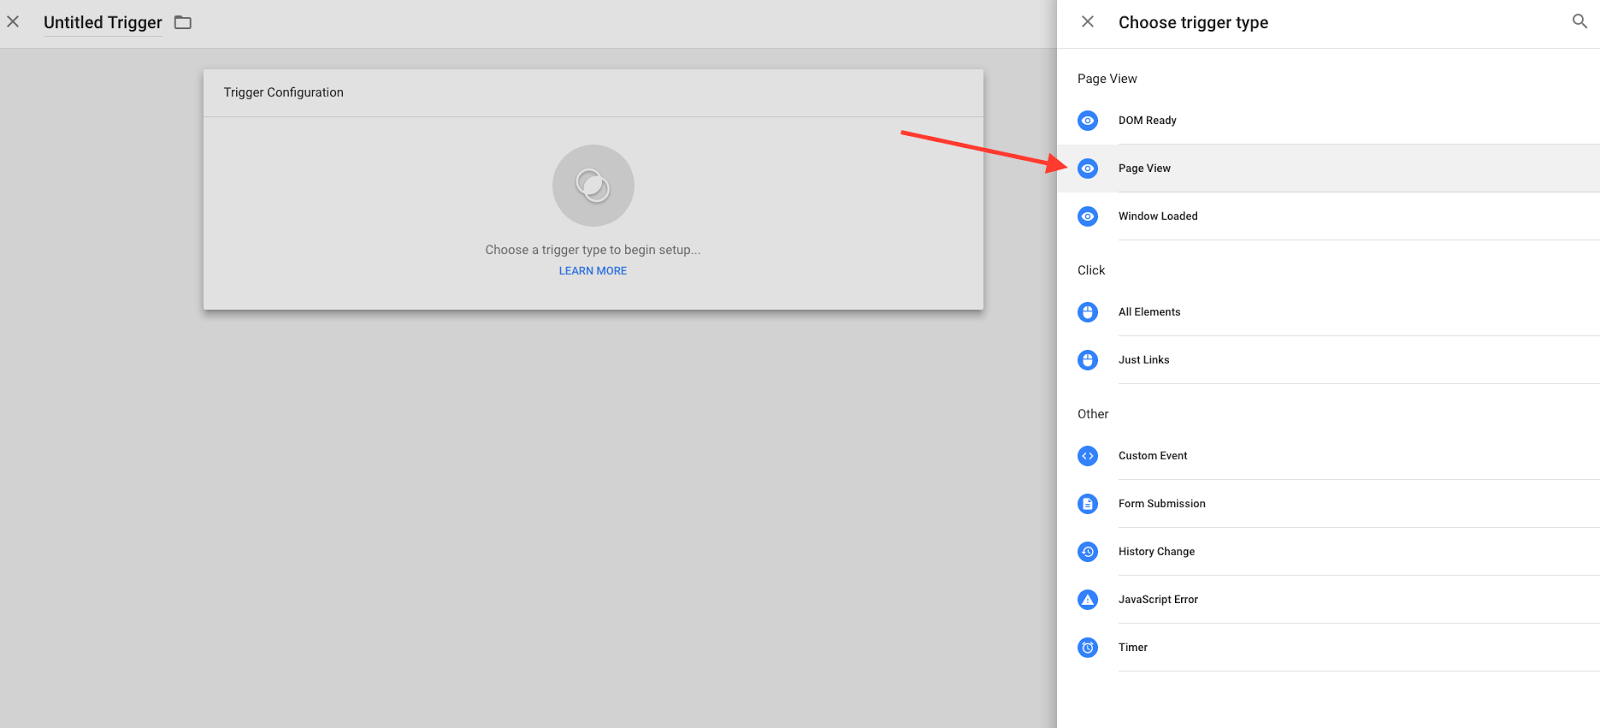
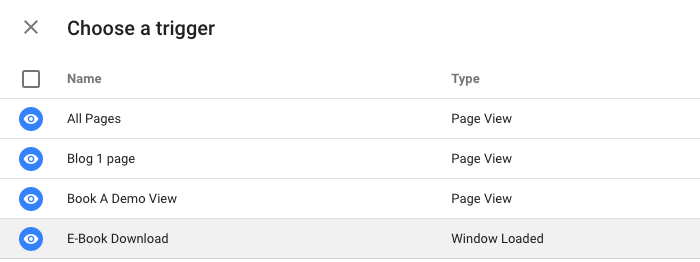
Click on the Triggering box to open up the Trigger options:
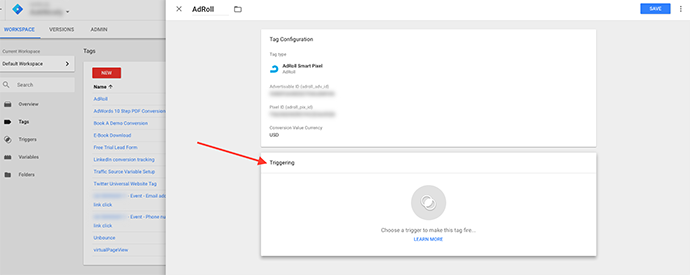
Sometimes users have already created triggers for other tags. You can choose from existing tags or create a new trigger depending on the desired action. To create a new trigger, click on the plus button.
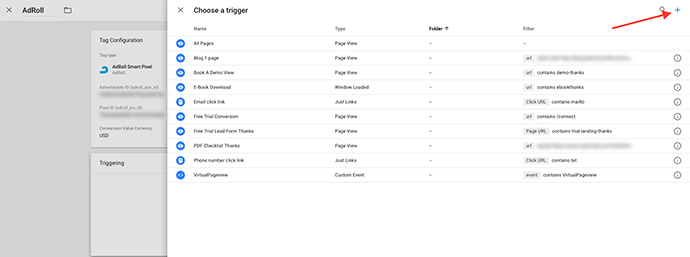
Name your trigger and click on the Trigger Configuration box. From here, choose your trigger (e.g. page view, click, form submission, custom event, etc.).
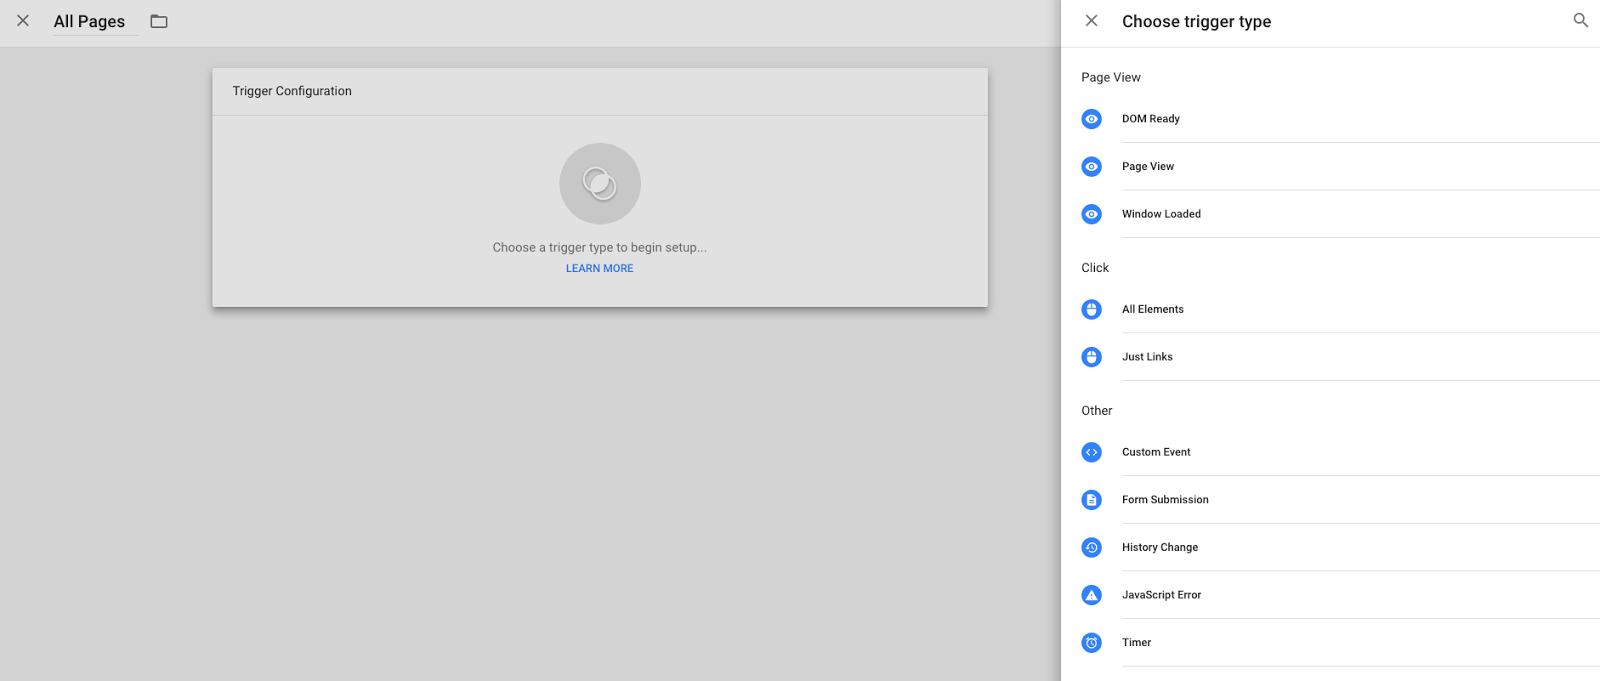
For example, you can create a trigger for “All Page Views.” The tag will fire anytime someone opens a page on your website.
Variables
Variables are any value assigned and are used in both tags and triggers.
In tags, a variable captures the dynamic values such as a transaction amount when an item is purchased. In triggers, a variable defines a filter when that trigger is fired. So when someone reaches the /thank-you page, for example, the URL variable is /thank-you.
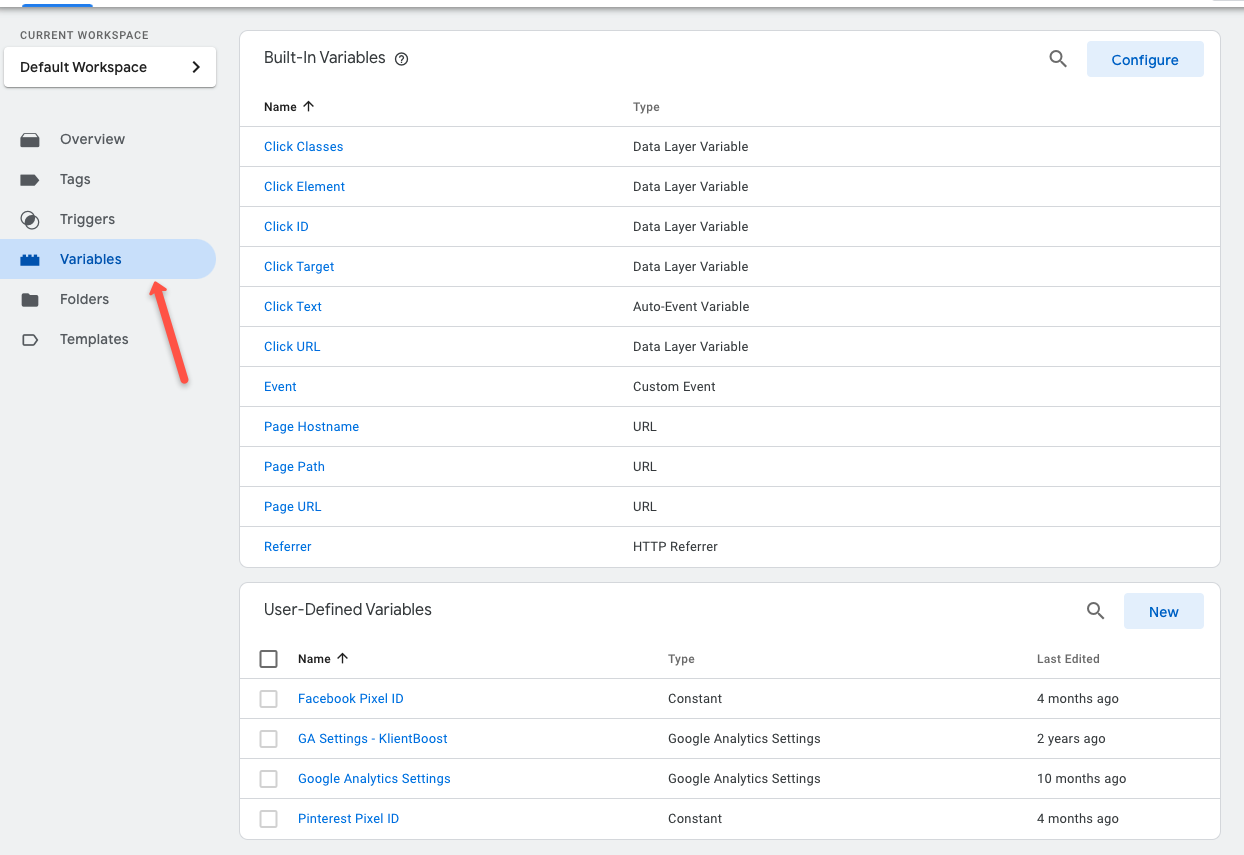
Google Tag Manager provides some commonly used Built-In Variables. They’re segmented into Pages, Utilities, Errors, Clicks, Forms, and History.
You can also create a User-Defined Variable, which is simply a custom variable that you can create. In some of the examples later in the blog, we’ll use user-defined variables.
Folders
Need a break from us defining tags, triggers and variables? Insert Folders, probably the simplest of all these sections of containers to understand. It’s exactly what you think it is, a folder.
If you’ve used Google Drive, you’re probably familiar with this concept. In Google Drive folders, you can keep track of the spreadsheets, docs, and presentations that you’ve put together.
GTM folders can easily organize your tags, triggers, and variables. It makes it easier when you have multiple people working in GTM and organizing the folders by team members, projects, or types of tags.
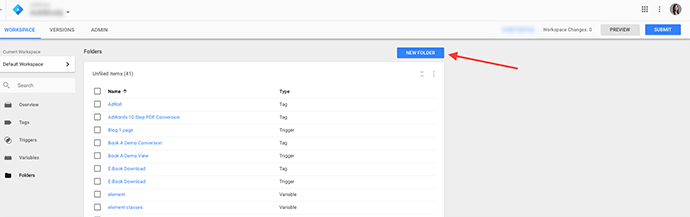
To create a folder, click on the Folder tab in the left hand column.
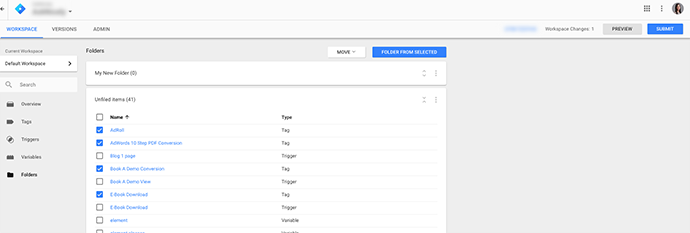
When you’ve defined which items you want to move into the folder, check them in the Unfiled Items:
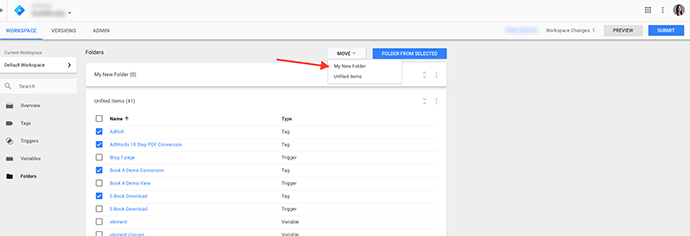
Click on the Move button at the top of the Folder page and choose the folder that you want to put those items into.
Templates
If you’re using Google Tag Manager to gain some independence from your IT or dev team, templates won’t be as useful for you. Templates are a way for you to write your own code for tags and variables.
The templates you create are saved within your container so that anyone of your choosing within your tag manager can also use them. Special emphasis on “anyone of your choosing” here because it provides a nice security blanket.
Just like a marketer without coding experience, wouldn’t want to mess with the actual code of the website, they also wouldn’t necessarily want to mess with a specially coded tag or variable unless we’ve been trained to use it properly.

Our team has created a custom tag template for our Facebook Pixel.
Any templates that have been created will live within the Templates section of your Google Tag Manager container. You can also create new templates from that screen or search from a gallery of community templates.
Preview Mode & Testing Your Work
Once you’ve created your tags, triggers, variables and grouped them into the folders you want, it’s time to launch! (Almost.)
We talked about previewing your work back in the Why You Should Care section above. Before you launch, go through the testing process and ensure everything is working correctly.
Is something messed up? As you’re testing, you may realize that something happened and you need to remove a tag. No worries.
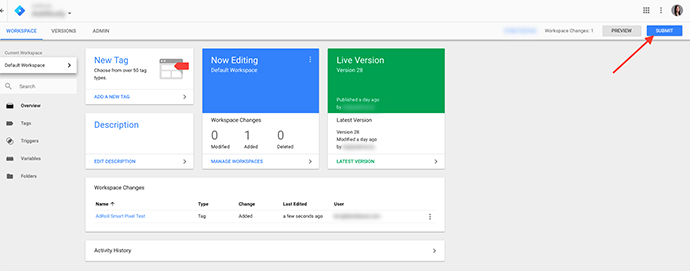
Take a look at your Workspace changes in the Workspace dashboard. Click on the three dots to bring up the options to Abandon Change or View Change.

Launch Your Tags
Yay! You’ve come to the best part of the whole creation process. All the work that you did to create the tags is coming to fruition.
On the next screen, you’ll see the option to create a new version for these changes. Add a version name and any description so you can easily identify the version if you need to find it later.
Below that, you’ll see the Workspace changes that you made, the type, when it was edited, and by which member of the GTM team.
Verify that everything looks good.
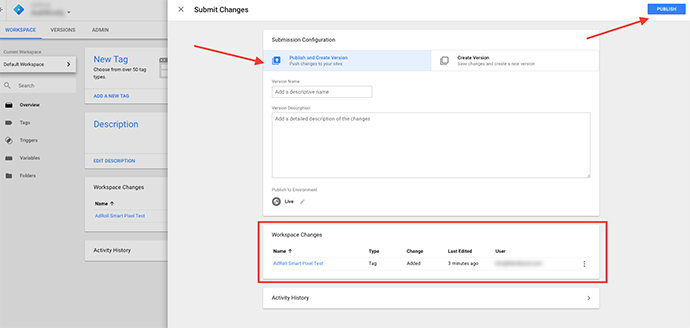
Congrats, and happy tracking.
19 Google Tag Manager Hacks & Best Practices
Okay, so you’ve created a GTM account and created some new tags. But now we’ve come to the fun part with some GTM hacks and best practices to make it even better for you.
The first four are failsafe features that will help you prevent and recover from any mistakes you might make within Google Tag Manager.
These four failsafe features can help you prevent and recover from any mistakes you might make within Google Tag Manager.
- Workspaces
- Previews
- Versions
- Third-Party Tags
1) Workspaces
If you have multiple users working in GTM, Workspaces makes it easy to work on something without even touching what other users are working on.
Workspaces are great for companies with multiple departments working on different projects and for companies working with agencies.
2) Preview Your Work
As a PPC-er, I think we’ve all made that mistake of publishing an ad only to realize that there’s a misspelling in the ad copy. Yikes!
With GTM’s preview feature, you can see in real-time — on the page where your tag should be firing — if it actually has fired.
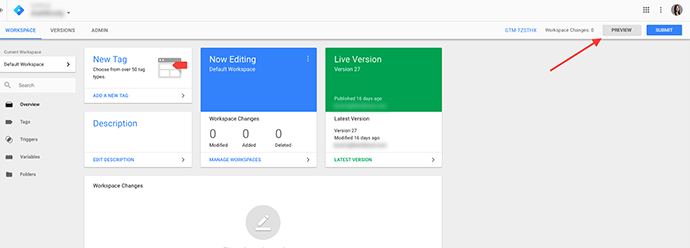
Once you do that, visit the landing page where that tag should fire from.

From there, you can determine what’s working and what’s not before you publish your new tags.
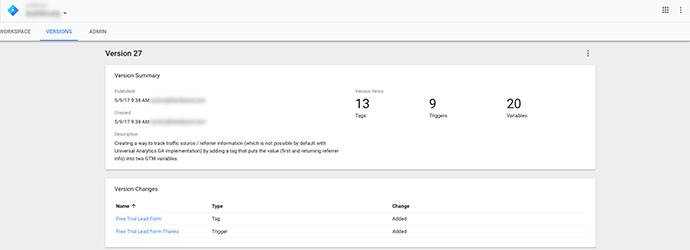
3) Versions
A version is created each time you publish a change to the container. This will help a user create a history of the changes in GTM, when those changes were made, and by whom.
Imagine you notice that something has gone horribly wrong and a tag is broken somewhere. You can simply republish one of the previous versions of GTM.
When you visit the Versions section of GTM, you’ll be able to see when the last version was created and published, by who and the Version items such as tags, triggers, and variables.
4) Built-In Third-Party Tags
If you’re new to GTM, their built-in third-party tags will be like a party for you.
Third-party tags require very little coding experience and allow less technical users to be more active in GTM, which makes deploying tags quickly easier and errors less likely.
The built-in tags include Google properties like Google Ads, Google Analytics, and Google Remarketing. GTM also offers some more popular tags like AdRoll, HotJar, LinkedIn, Bing UET, and many more.
5) Container Creation
A best practice is to set up an account per company and one container per website.
Many companies will not need more than one container. Remember, the key is to consolidate.
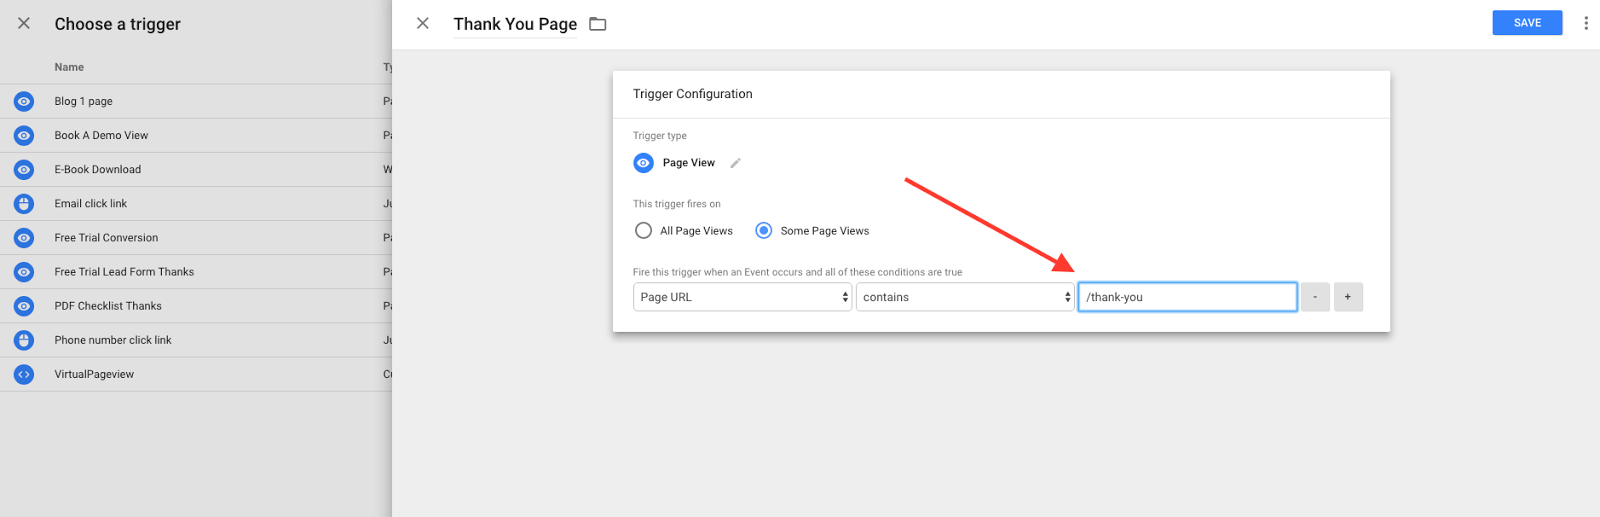
6) Specifying Triggers For Website Pages
Say you want to create a trigger for a visit to your thank you page. Start by clicking on Page View under Trigger Type.
Rename the trigger “Thank You Page” or another term to identify it easily. You might use it for different campaigns, or you might have different thank-you pages.
Choose Some Page Views, so that it doesn’t trigger on all pages. That’s a sure way to inflate your conversions without meaning to.
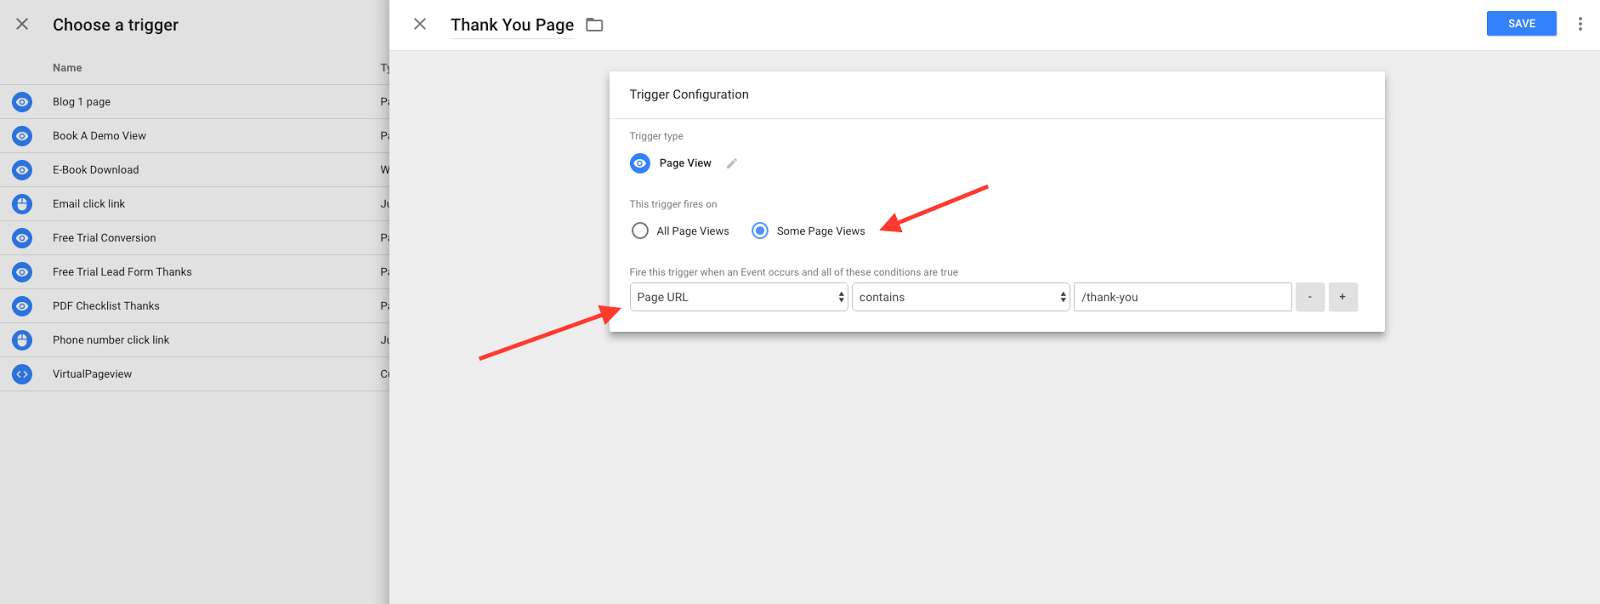
Below that, you’ll choose the conditions when the event occurs. The first dropdown has a number of variables to choose from.
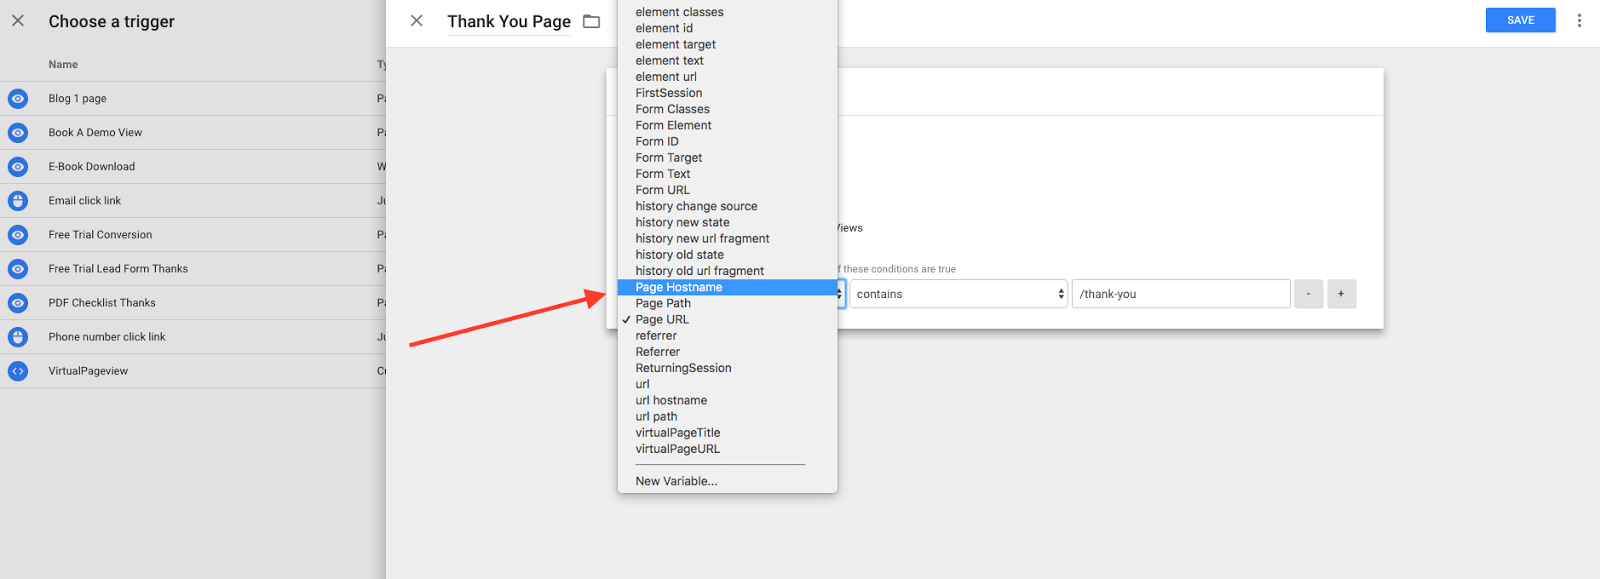
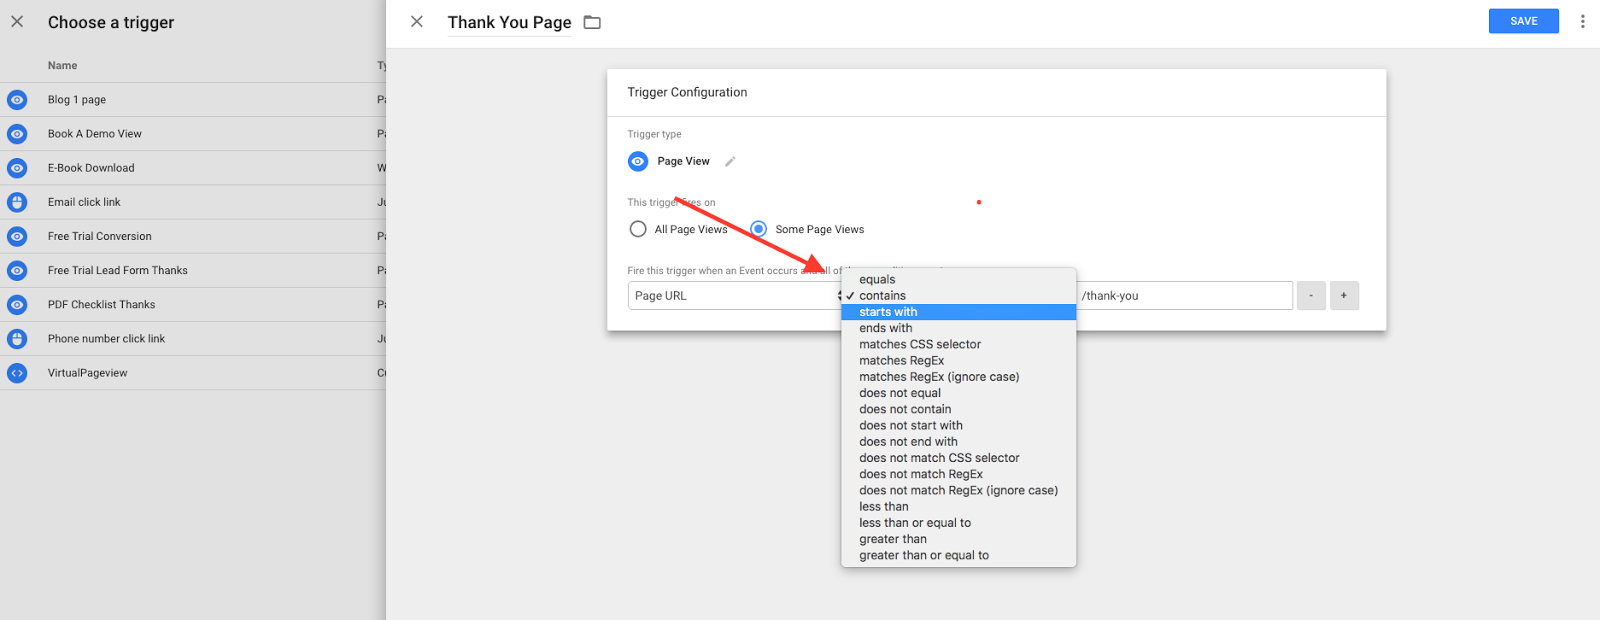
The third field is where we define the URL.
7) Event Tracking
Event tracking is an area where GTM can really shine.
Before GTM, if you wanted to track events such as button clicks and video plays, you would have a developer add the tracking code for each. GTM’s value is really seen when you have a bulk amount of codes to add.
Event tracking is super awesome. Has a client ever asked you how many times a visitor has clicked on a link, video, or multiple buttons, and you just weren’t sure? If yes, event tracking is going to be your new BFF.
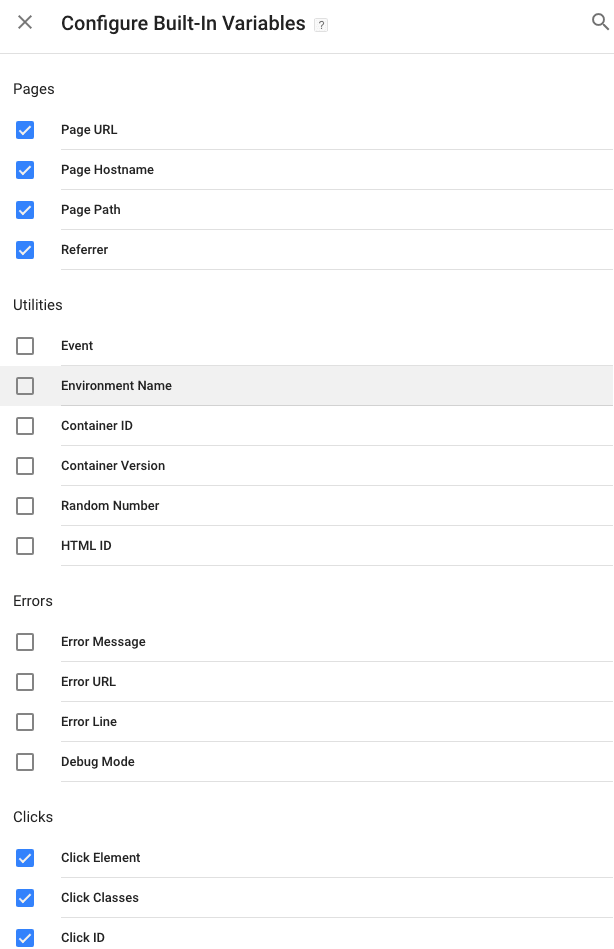
Before you start implementing, you’ll want to be sure your tag configuration is set up for the Built-In Variables: Pages, Clicks, and Forms. This makes it easy when you start creating more tags and triggers down the line.
8) Scroll Tracking
Do you ever wonder if all that content you created is actually getting eyeballs on it — especially below the fold?
You can use tools like HotJar, which provides heat maps. But this is about GTM, and it has a solution.
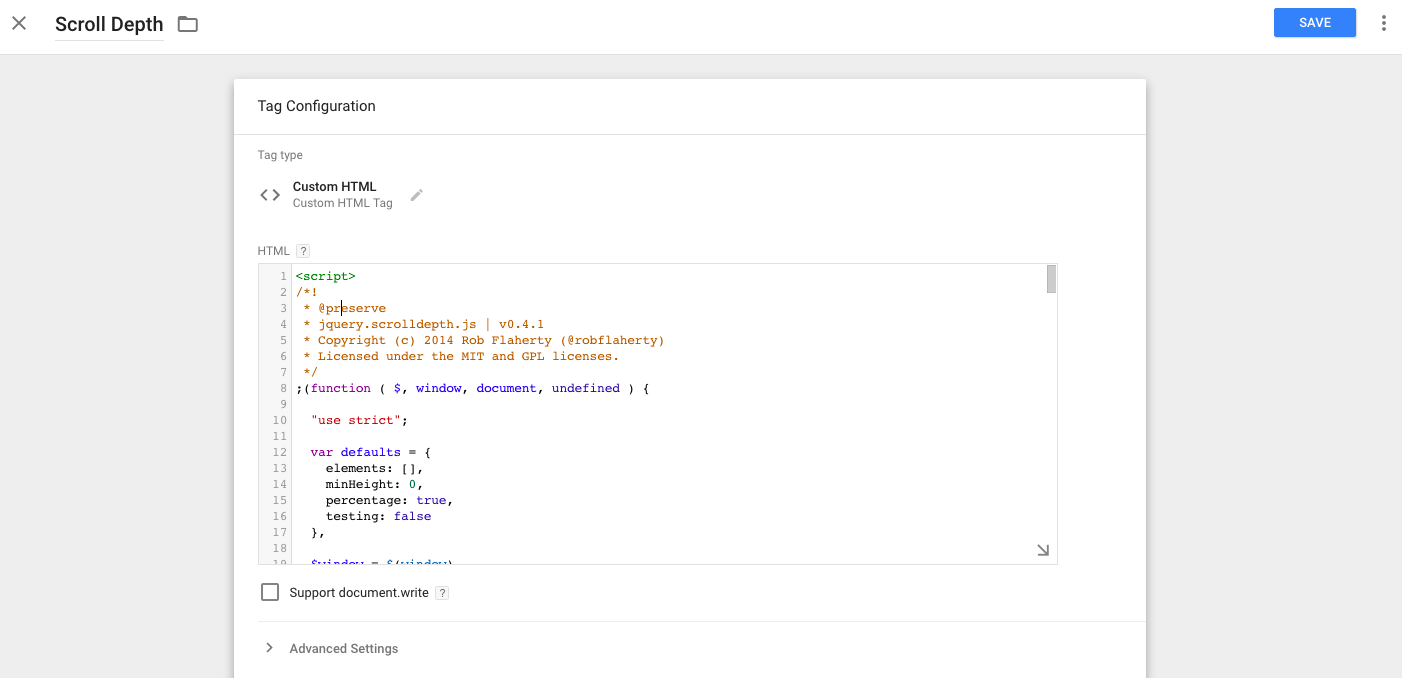
Rob Flaherty from Parsnip.io created a plugin that uses jQuery to measure how far a visitor is scrolling down a page.
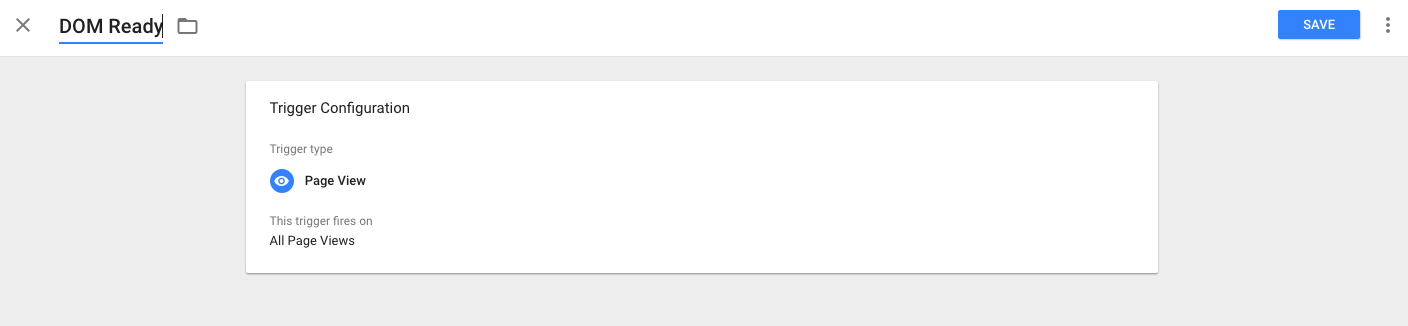
To get started on this, create a trigger and name it something like DOM Ready, which just means that the scroll depth tag will fire when the DOM is ready.
DOM stands for Document Object Model. For our purposes, however, think of it as a whole HTML page. And every time an HTML page (or DOM) finishes loading, the browser will fire a trigger called DOM Ready.
Using Javascript, we can hook into this DOM Ready trigger, so that our code also runs every time a browser loads a new page. Because you want this to fire on all pages when loaded, you’ll choose Pageviews as your event, and to fire on All Pageviews.
Once this trigger is created, move on to creating your tag.
Next, we’ll set up the Variables that we need to make sure this is fired correctly.
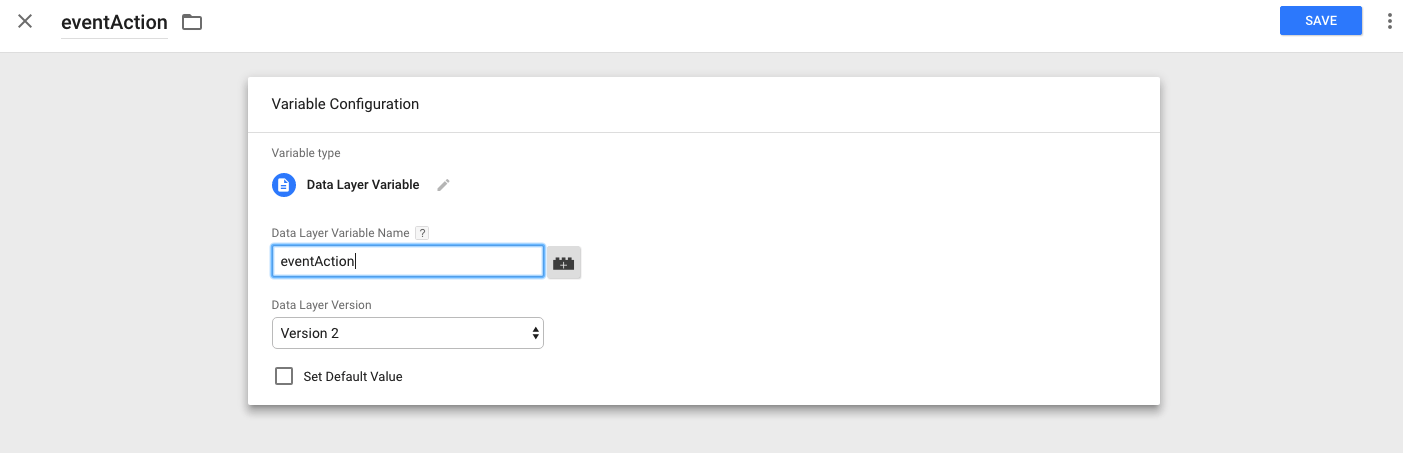
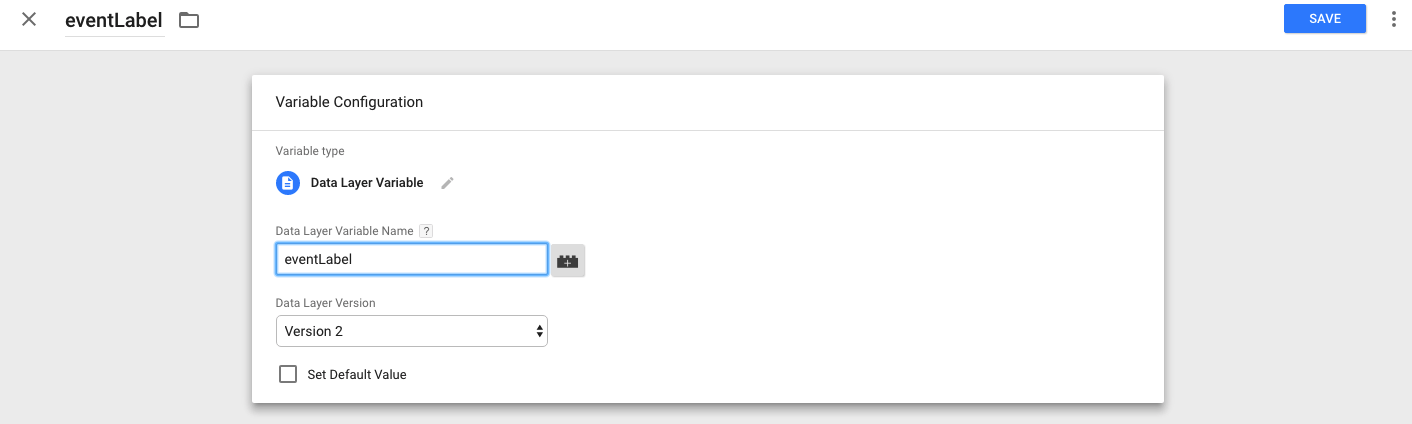
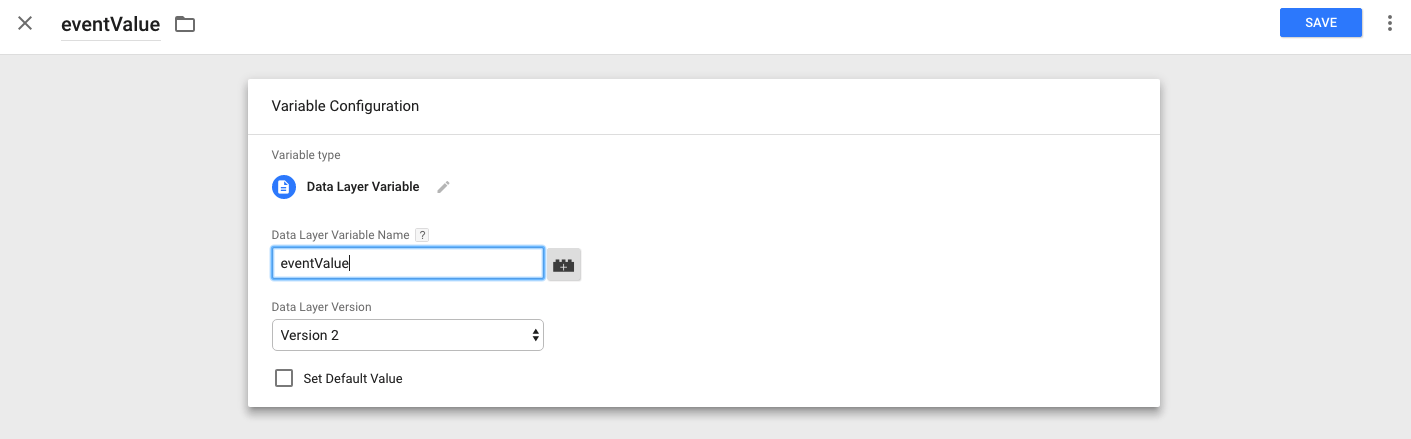
Setting Up Variables
Variables are split into four different types: Category, Action, Label, and Value.
For each of the variables, you’ll create a Data Layer Variable in the Page Variable Types.
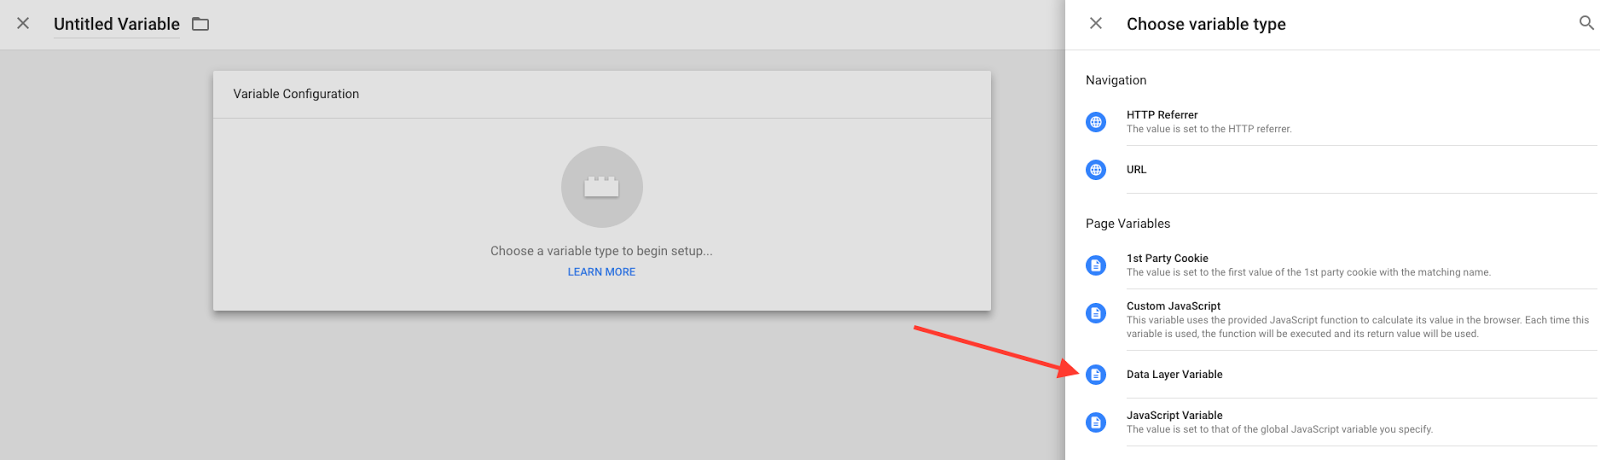
The four variables will look like the screenshots below:

Applying Variables
Once your variables are created, you’ll want to send that tracking information to the data layer. Then you’ll create another Google Analytics Tag specific to scroll depth.
Add in the variables that you just created to the forms below.
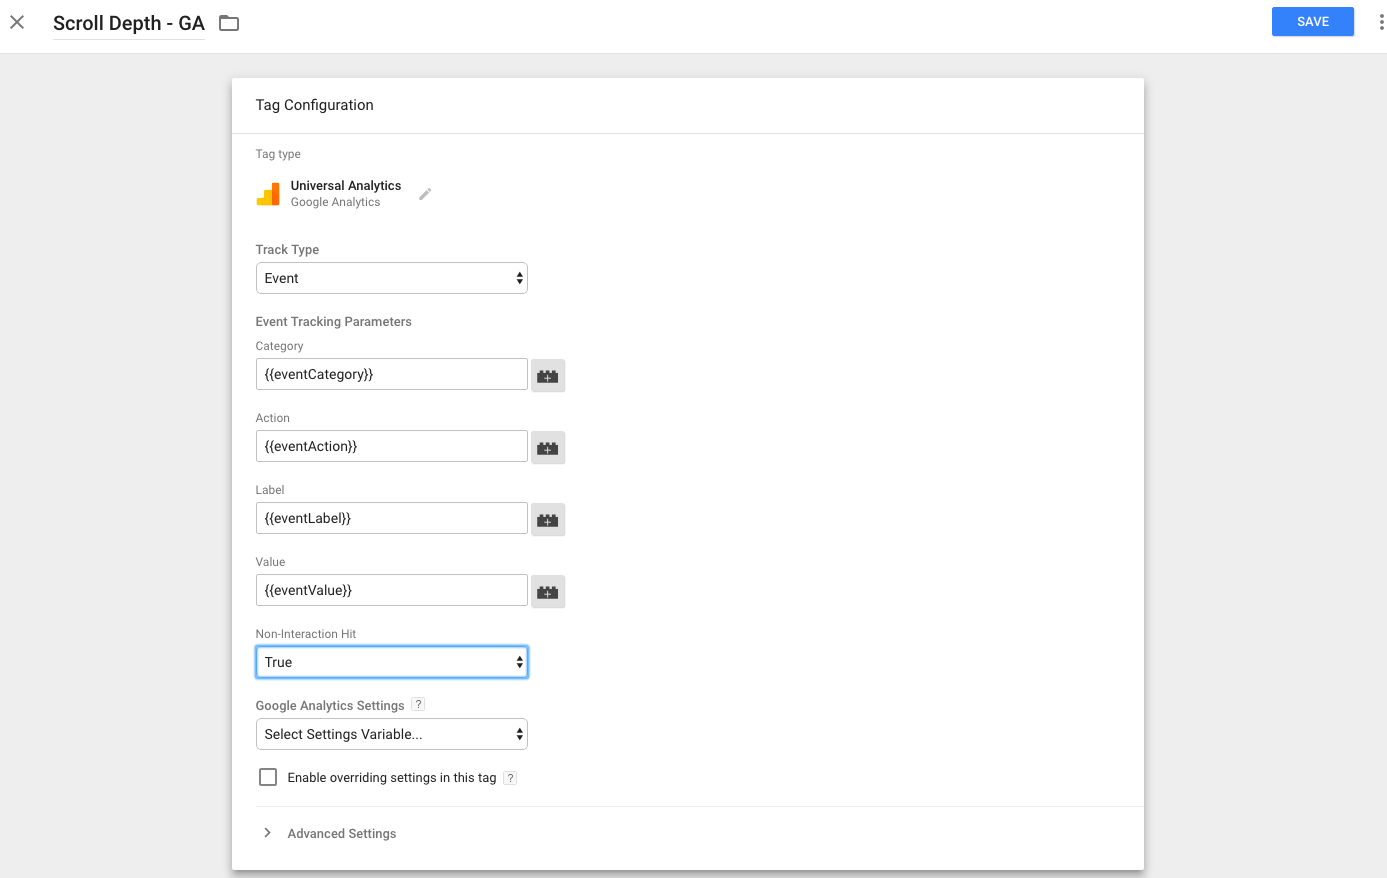
If you have the field titled “Non-Interaction Hit” set to “True,” these events will not affect the site’s bounce rate.
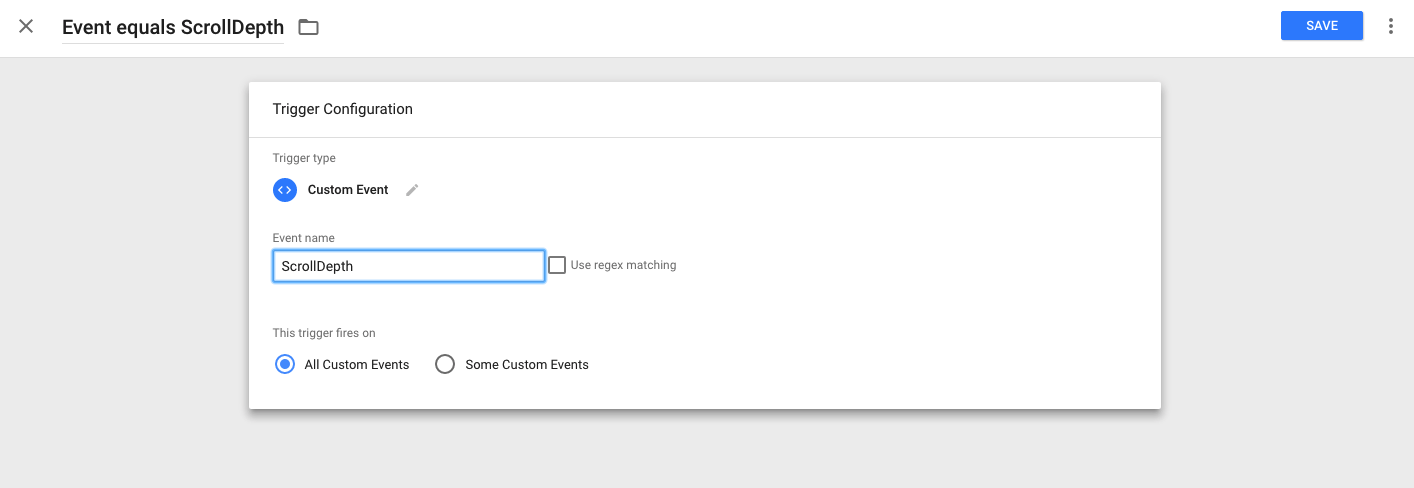
Creating a Custom Trigger Based on Your Variable Event
Finally, you’ll want to create a trigger to fire when the “event equals ScrollDepth”. The trigger type that you’ll choose is the Custom Event.
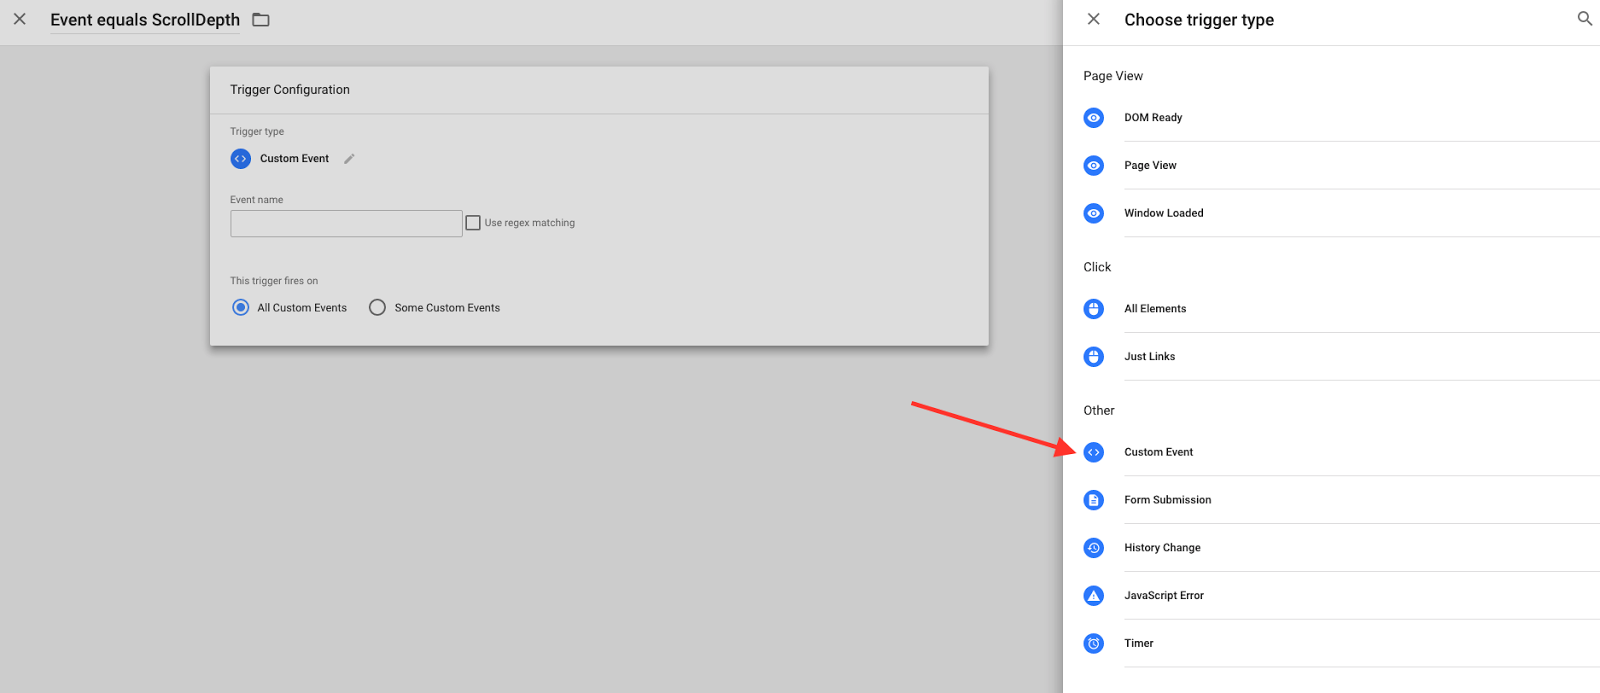
Name your trigger, add the event name, and save everything. Test your version to make sure everything looks good, and then publish your work.
9) Track On-Site File Downloads
While conversions are important, don’t underestimate the power of micro-conversions. These can come in handy before the conversion or even after the conversion.
For example, we have a client who, after their visitors downloaded the white paper, were given the option to download other PDFs. We wanted to track this to see what visitors’ interests are, so we can offer something different at another time.

To do this, start by creating a new Trigger.
- Choose the Trigger type.
- Click “All Elements”.
- From “This trigger fires on,” choose Some Clicks.
- Change the first dropdown to Click URL.
- Change the second dropdown to matches RegEx (ignore case). It’ll match a regular expression of text string, ignoring the case.
- In the form field, add in the fire on condition. If you want to track a PDF, PPT, PNG, you’ll want to use \.(pdf|ppt|png)$
There may be other types of documents that you want to track, and you can make that change in the form field.

Once your trigger is created, you’ll just need to add it to the tag that will send the data to GA where you can see the downloads. In addition, you can set up a goal, so that you can track this simply in GA.
10) Cross-Domain Tracking
Tracking traffic across different domains and subdomains can be a pain.
If, for example, you have a client who has a domain on one website, but checkout on another, this section will be helpful for you.
To get started, you’ll want to create a few user-defined variables.
Creating User-Defined Variables
Go to the Variables section in Google Tag Manager, and click to create a new User-Defined Variable.
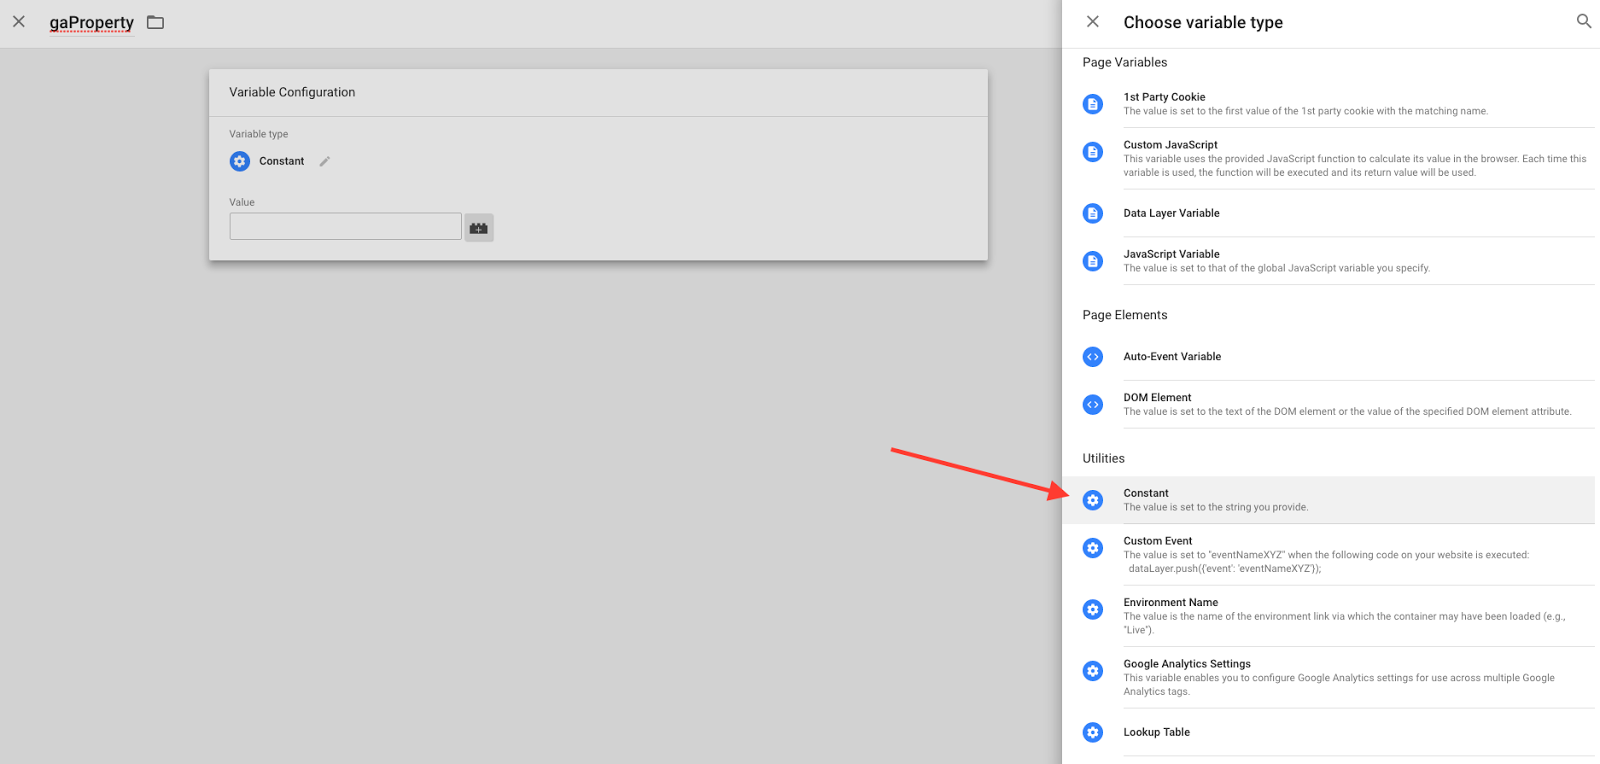
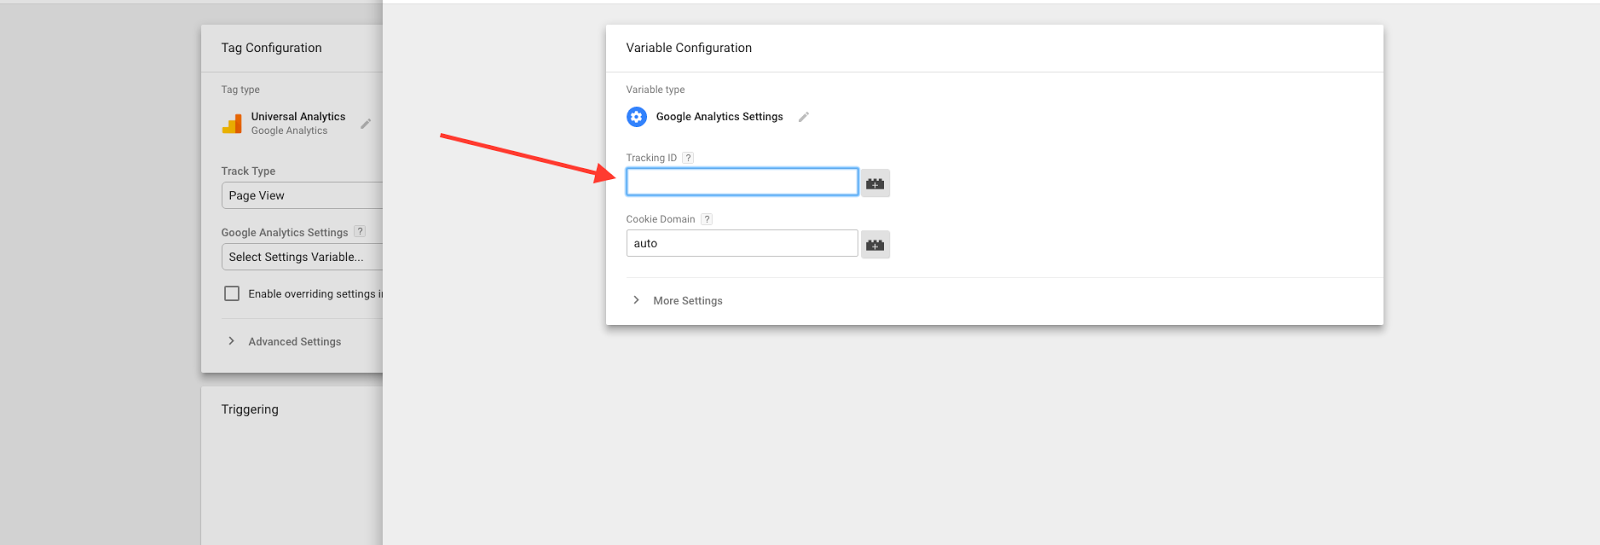
The first variable that we’ll create is the gaProperty one, which is simply the fastest way to add the GA Tracking ID to all new tags that you’ll create.
In the value field, enter in your GA ID, which will look like UA-XXXXXXXX-X (the X’s are your numbers).

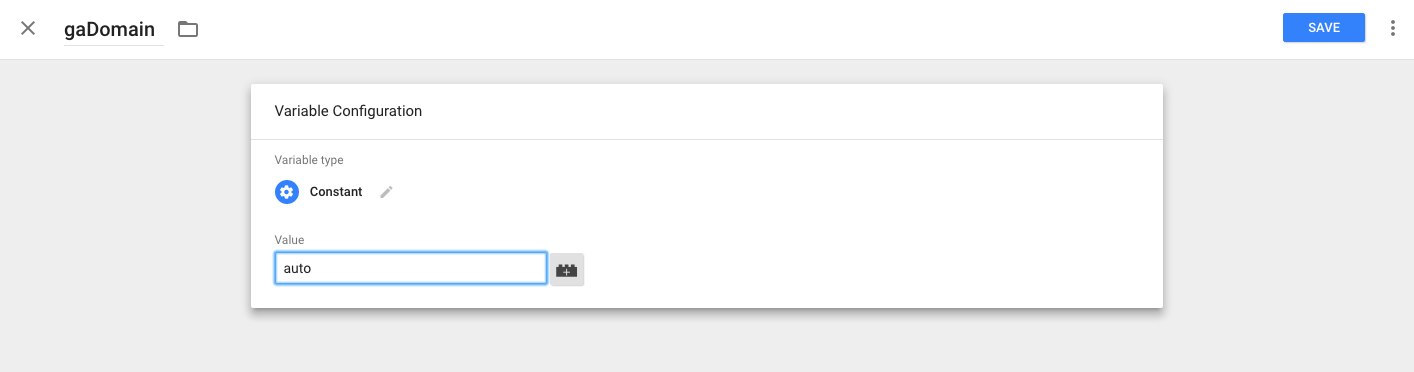
The second variable that you’ll set up is the gaDomain. This variable is to make sure that the website domain is always set to auto.
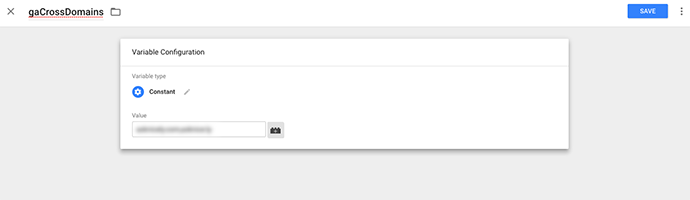
The third variable that you’ll set up is the gaCrossDomains. You’ll set this up if you have traffic going from one domain to another.
With these variables in place, cross-domain tracking will be much easier. Go into your Universal Analytics tag:

The field name will autofill as you type in. For allowLinker, type in true for the Value. Do the same for cookieDomain. Because you created the gaDomain variable, you can choose that easily here.
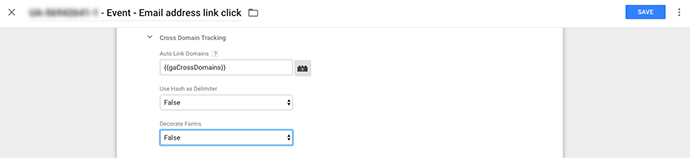
Next, under More Settings, click on the Cross Domain Tracking dropdown.
Because we added all the domains that we want to track in the gaCrossDomains variable earlier, just choose Auto Link Domains here. Choose False and False for the Use Hash as Delimiter and Decorate Forms fields.
As soon as you test, debug, and publish, you’ll be tracking cross-domain traffic.
11) Track Time On-Site With Timer Triggers
While Google Analytics measures time on site, doing it through Google Tag Manager can measure the visitors with a bit more accuracy.
For example, let’s say a visitor spends one minute on one page of your site. Then they go to the Pricing Page, read some information, and then close the tab.
In Google Analytics, the time on the Pricing Page isn’t counted. GA tracks the time on site between two hits, not the amount of time spent on two pages.
That’s where Trigger Timers come to the rescue.
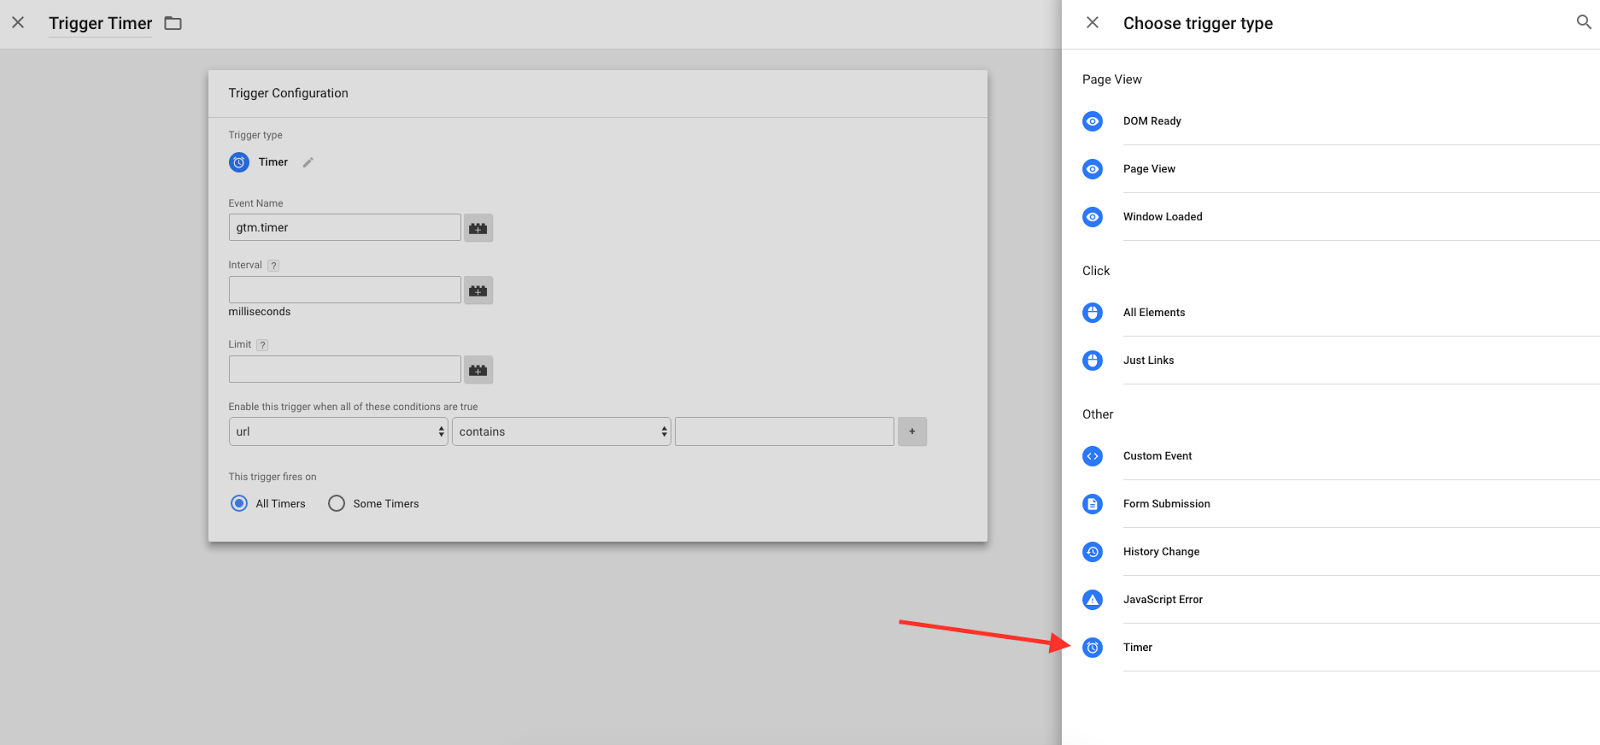
Set an interval in the field, and keep in mind that 30 seconds equals 30,000 milliseconds. Limit the trigger to fire only once.

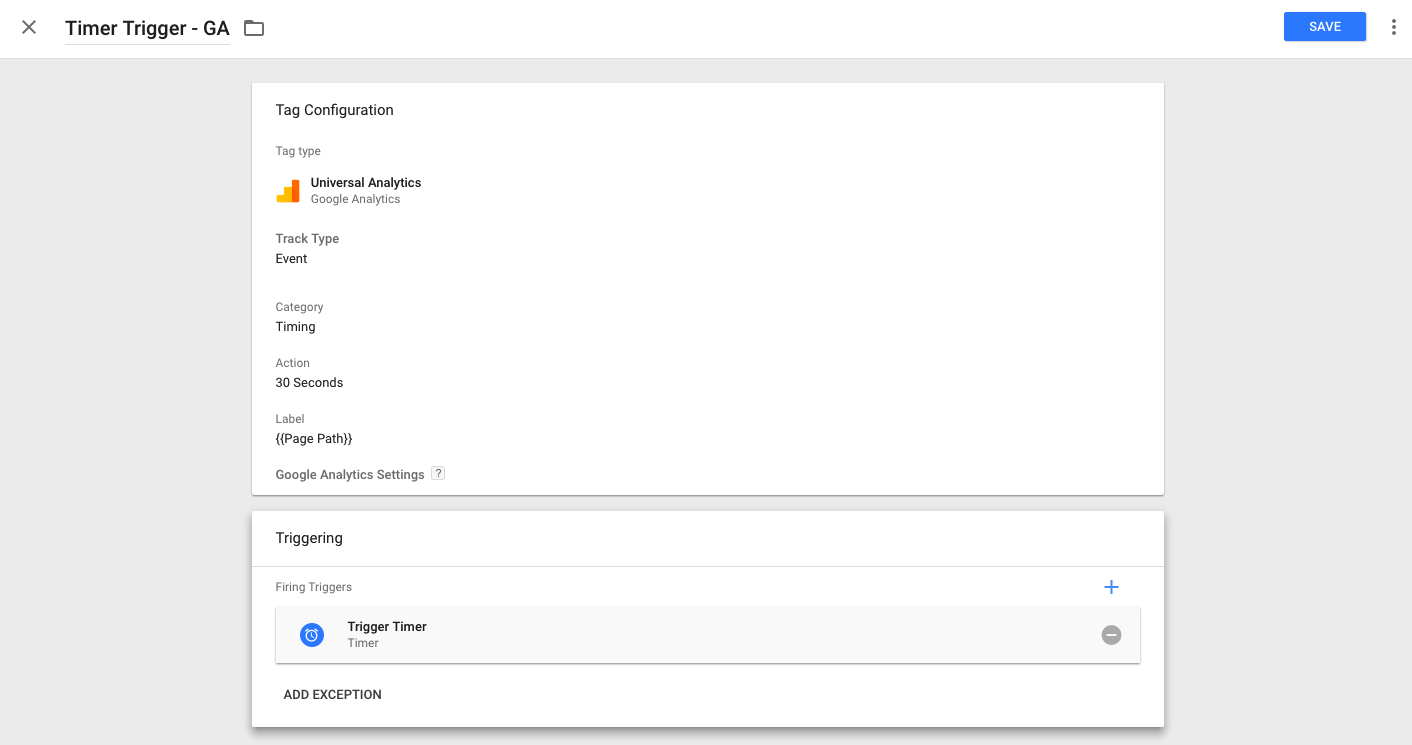
Now that that Timer Trigger is created, you’ll want to create a tag to push this event to GA.
Creating Tags For Pushing Events To Google Analytics
Start by creating a new Event Track Type tag for your Timer Trigger GA.
Add in the variables into Category, Action, and Label to define the tag. Finally, you’ll choose the trigger that we just created, save, test and publish.
12) Tag Sequencing
Not all tags are created equal, and you may want certain tags to fire before others.
If you have a specific order for which you want your tags to fire, Tag Sequencing will allow you to specify if you want the tag to fire before or after another tag.
If you’re looking to establish dependencies, Tag Sequencing can be really helpful. It’s a complex feature offered by Google Tag Manager that can get a bit more technical. Read this Google post to learn more.
13) Exclude Internal Traffic
It’s beneficial to exclude internal traffic from your Google Analytics tracking. Traffic coming from the people that work at your company can mess with your visitor data by skewing time on site and page views.
Further, internal traffic isn’t going to convert, which can bring down your overall conversion rate.
To exclude internal traffic, create a variable and name it IP Address. Choose Data Layer Variable as the Variable type.
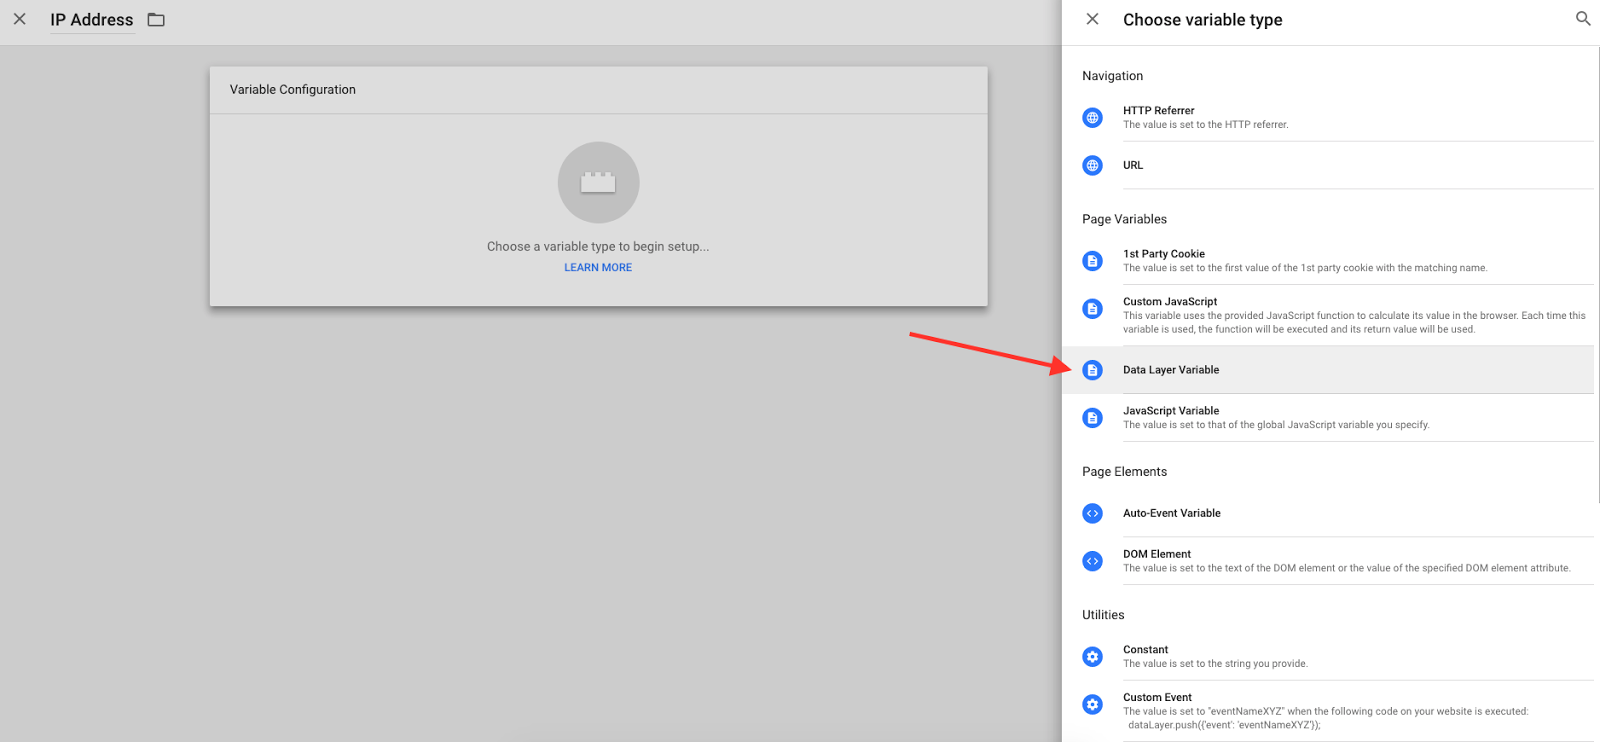
Name the Data Layer Variable and save.

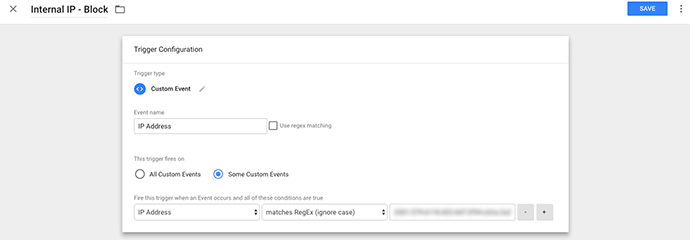
Next, you’ll create the trigger to fire this.
You’ll choose Custom Event as the Trigger type, add a name for the event, and choose for the trigger to fire on some custom events. In the fields below, you’ll choose IP Address and add in the IP address that you want to exclude.
You can then add this event to your Universal GA tag.
14) Tag Assistant For GTM
Once you have your tags added to each page of your site, you might want to check if GTM is actually there when you browse your site.
If you’re using Chrome as your browser, you can add the Tag Assistant, which will help you troubleshoot any tags that you’ve installed.

Once you’ve added the Chrome extension, it’ll appear in your browser with the Tag Assistant icon. When you’re on your site and click on the Tag Assistant icon, you’ll see the following screenshot:

15) History Change
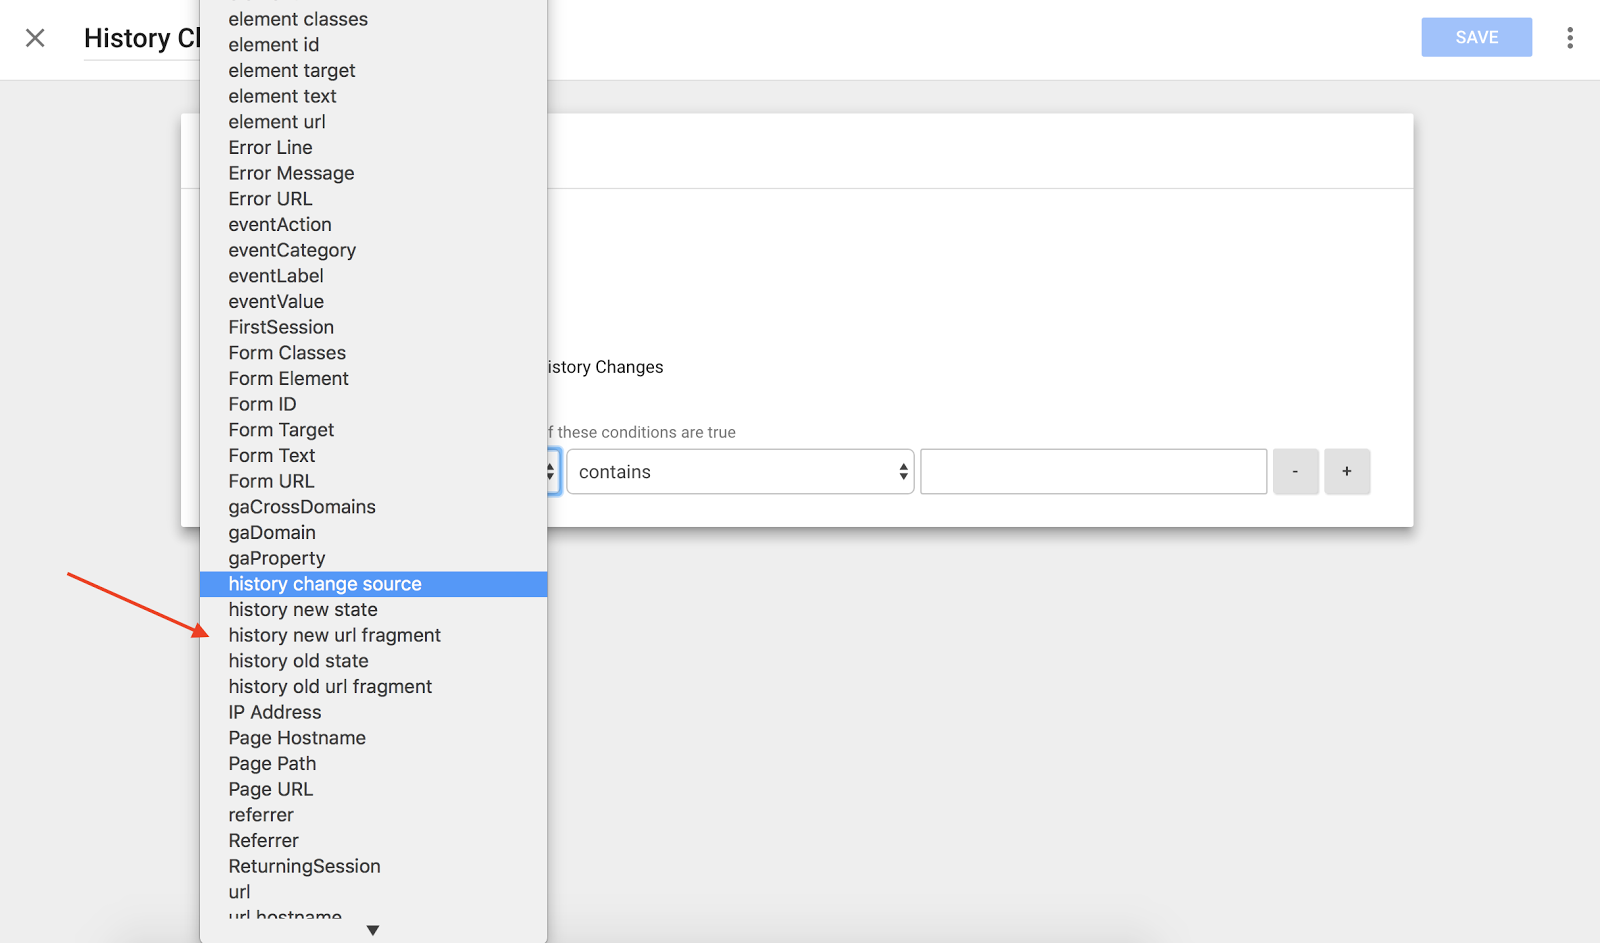
Another trigger type that’s available to use is the History Change, which will fire when the browser history changes. This trigger is useful for tracking virtual pageviews in an AJAX application.
In plain English, this is when you click something on a page and you don’t see the URL change, but a hashtag is added to the end of the URL.
A good example comes directly from the Google Support page about Triggers:
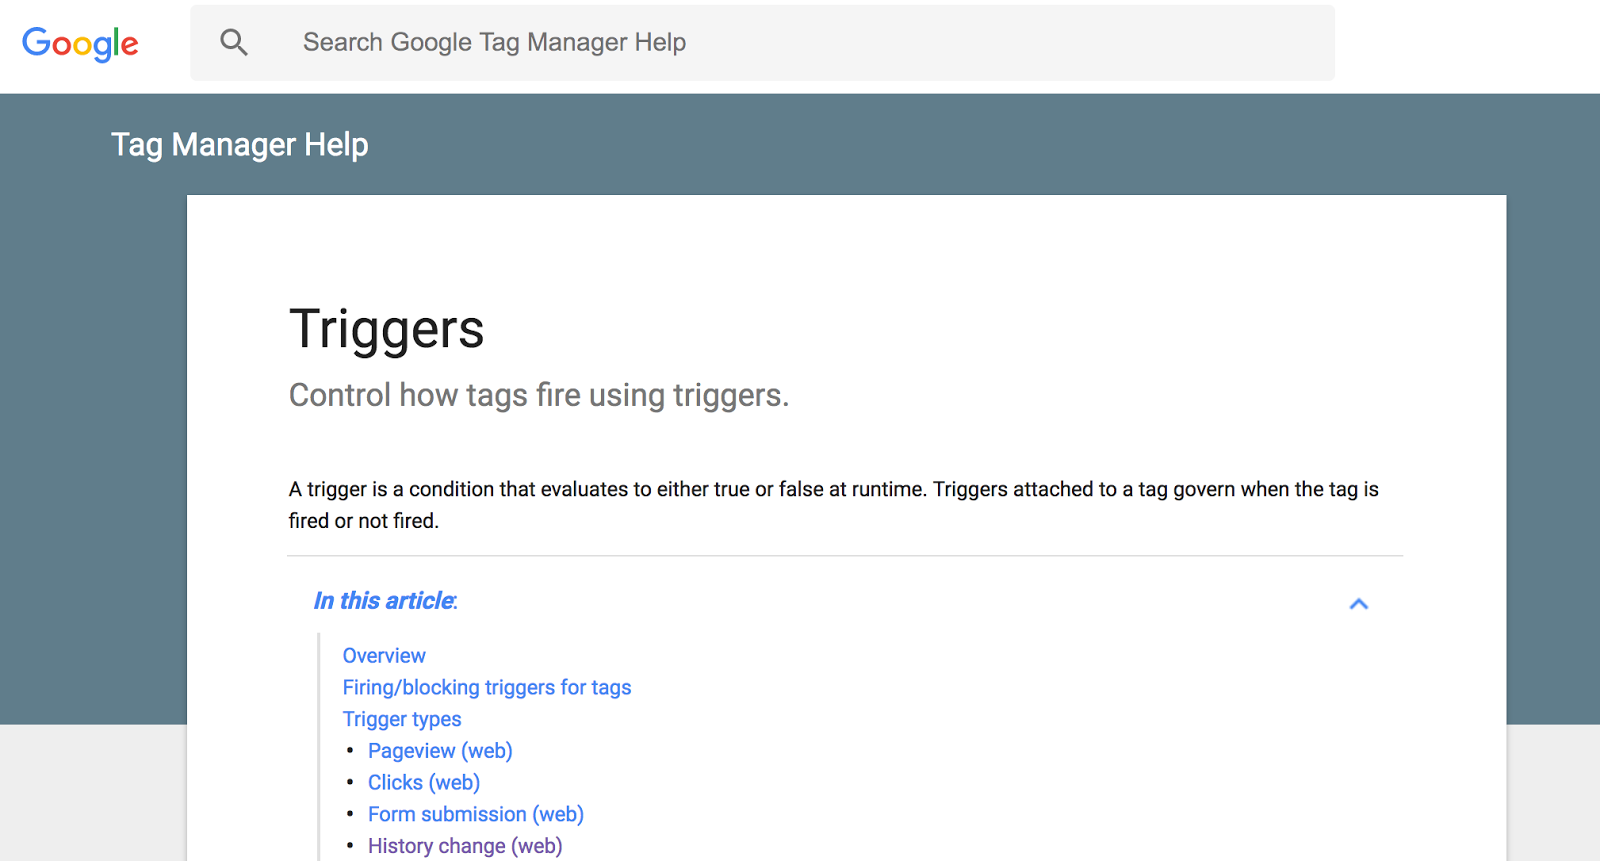
When I clicked on History Change, the page reloaded, but the URL didn’t change and the hashtag was added.

There are five variables to choose from, which you can learn more about from Google’s Trigger Support.
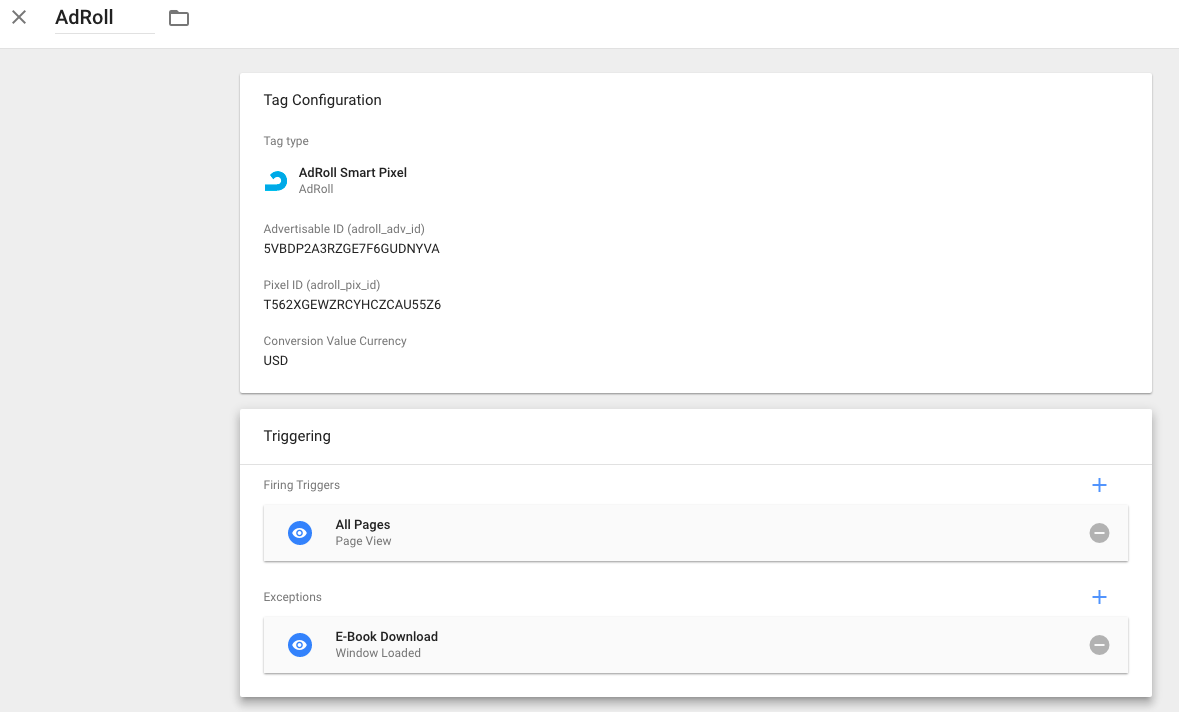
16) Blocking Triggers For Tags
When a trigger is tripped, a tag will fire. There may be circumstances, though, where you don’t want a tag to fire on certain pages. Luckily, there’s a solution for this.
Say, for example, that you have a tag to trigger on “all pages,” and you add a blocking trigger of “URL equals /ebook-download”, the tag will never fire on the Ebook Download page. The blocking trigger will always override the other trigger.
17) Tag Blacklist & Site Security
The security of your website is super important. Luckily, Google Tag Manager has a hack to ensure it’s secure.
Tag Blacklist will allow you to define which tags should never be added to the website in order to maintain security of the site.
This is another hack that needs to be implemented by your dev team, but it’s important for you to understand the use cases of this feature.
Read this post from Google to learn more about site security measures in Google Tag Manager.
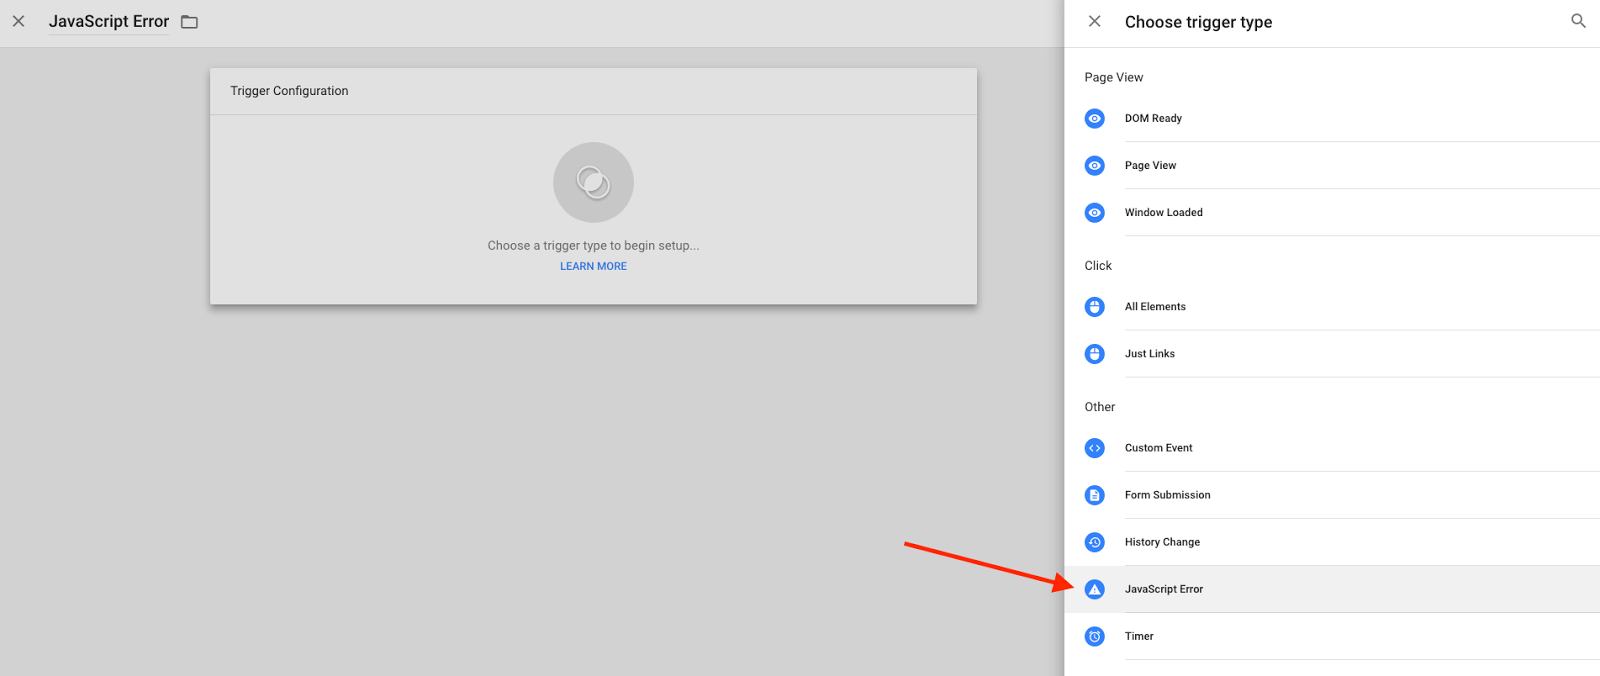
18) Track JavaScript Errors
This is commonly used by development teams, but it’s important as a marketer to understand JavaScript errors and how they can affect you — or when you need to get your dev team involved.
In a worst-case scenario, JavaScript errors can prevent all of your website’s JavaScript from working, which includes dropdowns, tagging, analytics, hovers, etc., and leads to a terrible user experience.
To track this, you’ll need to start by creating a trigger called “JavaScript Error,” which is an existing trigger type that you can choose.
Next, you’ll create a tag. You’ll want to duplicate the GA tag and rename it “Google Analytics Exceptions” so you’ll know that it’s different from your other GA tags.
The Track Type is an Event, and you’ll want to fill in the other fields based on the screenshot below.
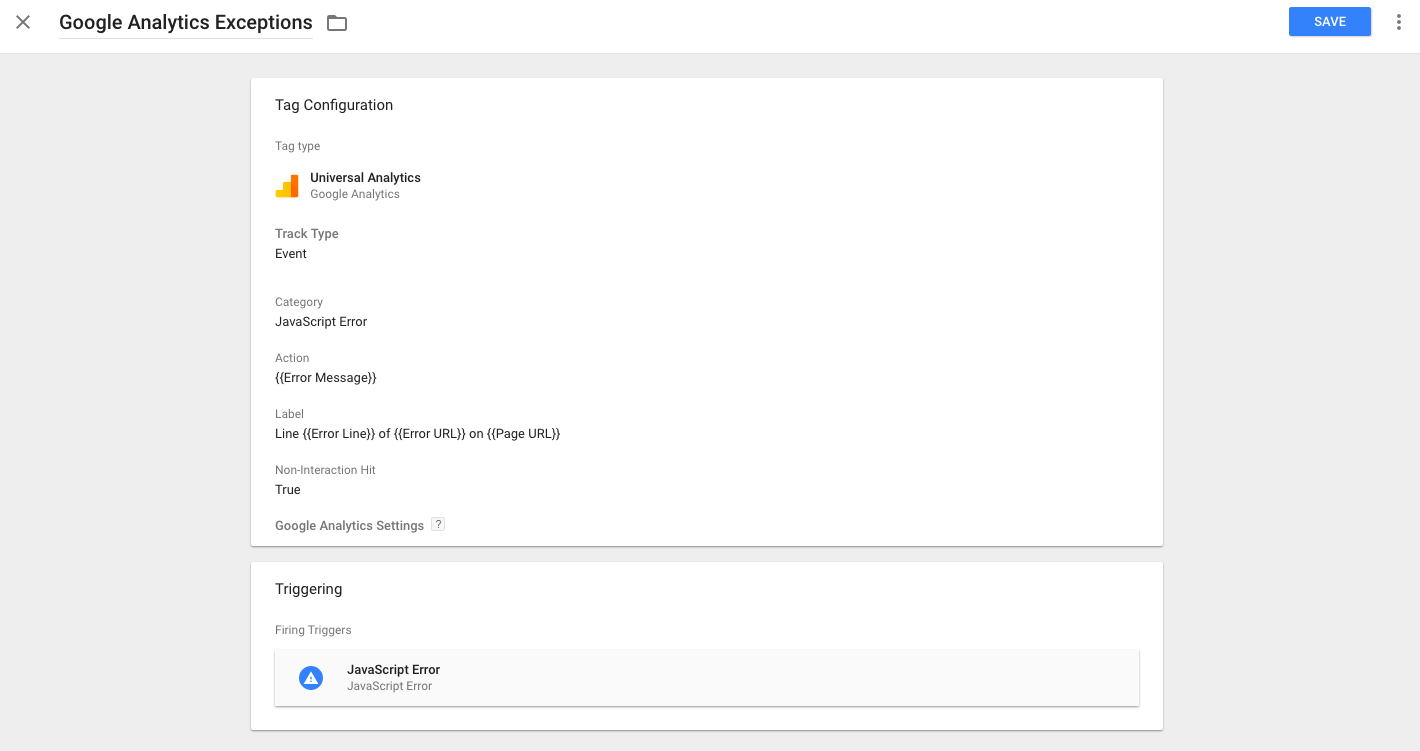
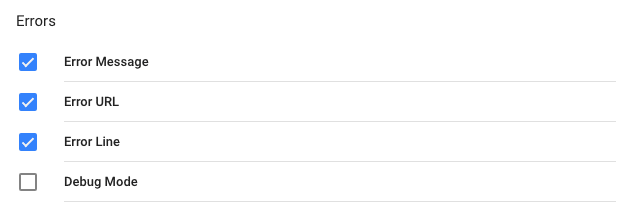
Finally, you’ll want to ensure that your variables are enabled. In the Built-In Variables, go to configure it, and in the Errors category select Error Message, Error URL, and Error Line.
19) Tracking JavaScript Errors as GA Goals
Most marketers are familiar with creating goals in GA to track positive conversions like purchases and free trial sign-ups. Well, you can also track negative goals, and JavaScript errors fall under that category.
Creating a goal in GA can help you identify when a JavaScript error occurs so you can pinpoint the problem quickly.
For more information on how to create GA goals, read about them here.
Wrap Up on Google Tag Manager
Have you sent that email to your IT or development team yet telling them to disregard your last request? At this point you should be feeling empowered that you can track what you need in order to start experimenting and proving marketing’s ROI.
GTM has been the solution that we’ve been waiting for. It helps us take full advantage of the power of Google Analytics, navigate tracking code on sites, allows us to be more efficient with our time, and prioritizes what we task to our IT and development teams so that they can focus on what really matters.
This post is really meant to help you understand the basics of Google Tag Manager and open up your mind to the possibilities.
Take advantage of how fast you can create tags, triggers, and variables as well as play with them without having to publish them. GTM provides a great opportunity to test and see what works.
If you want to start getting into more of the nitty gritty of analytics, we’ve got you covered. Whether it’s cross domain tracking, auditing everything in your Google Analytics to optimize performance, tracking user engagement or setting up new goals to track—we won’t let you leave any big opportunities on the table.