Now begins the epic saga of Facebook Dark Posts.
A long time ago, in a Facebook Ads Manager account far, far away…

No, it’s not a war between the Jedi and the Sith. This raging battle is between advertisers trying to boost conversions on Facebook. And it's because they're all asking the same question -- “What else can I do to get more conversions?”
As advertisers, we search every day for that new audience, that new offer, or that new piece of content that will be our holy grail and our saving grace.
What if I told you that you don’t need to launch new audiences, new offers, new content, or new ads to lift your account?
What if I told you that all you had to do was simply change the way you build and launch your ads?
You might be saying, “Matt, is this some sort of Jedi mind trick?”
Well, yes it sort of is. I’ll walk you through the traditional way advertisers build Facebook ads. But I’ll also show you how, if you make one small change, it’s possible to see a big lift in a Facebook ad performance.
That Jedi mind trick is called Facebook Dark Posts.
Get brand new Facebook ad strategies straight to your inbox every week. 23,739 people already are!
Building Ads The Traditional Way In Facebook
For a thousand generations (not really), Facebook ads have come in many shapes and forms. There are standard banner ads, carousel ads, canvas ads, video ads, page like ads, and many more. Depending on your goals, you can build and launch a specific type of ad accordingly.
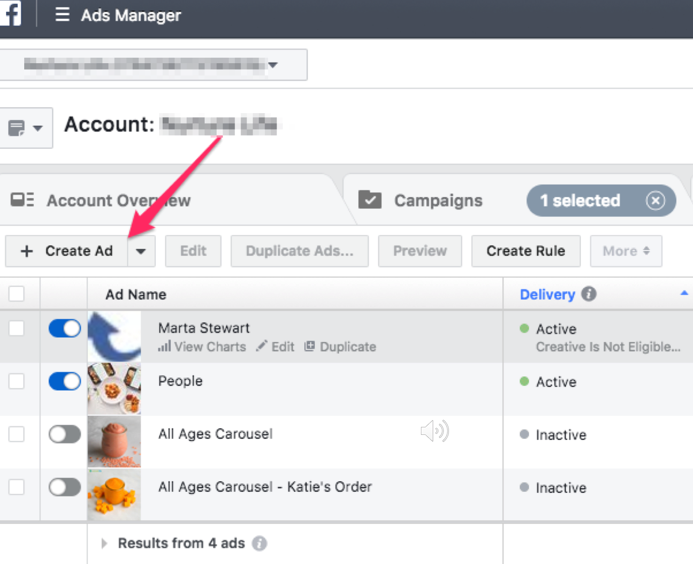
When it comes to building the ad itself, most advertisers will open the specific campaign and then the specific ad set to create their ad. All you do is click on “Create Ad” and then enter in all your information like the website URL, to the headline, to the CTA button.
It’s simple and easy to do, and once you submit your ad, you’re done.
Using this method, if you want to launch a new ad in another ad set, you simply rinse and repeat. You go into your next ad set, click “Create Ad” and then rebuild your ad again. This method is effective and simple, which is why most advertisers use it.
However, I am here to tell you that this is not the most effective or efficient way to launch your ads.
Why Traditional Ad Builds Fail
Although building ads this way is simple, there’s one huge problem: the lack of social proof. One of the biggest reasons Facebook ads succeed is the potential viral effect and social proof that your audience can provide.
Now, when you click “Create Ad” and input your information, you create an ad with a unique post ID.
The more individual ads you create, the more individual post IDs you create. This is a big problem when you want to use the exact same ad across multiple ad sets. (And when I say the same ad, I mean the same landing page, the same headline, same image creative -- EVERYTHING is the same.)
For example, you might have an ad that is relevant to multiple audiences, and you want to leverage it broadly across your account. However, inputting the same ad the traditional way across 10 ad sets would create 10 unique post IDs.
Here's the problem with that.
If you create 10 unique posts, all of the likes, comments, and shares that your post accumulates are spread over 10 different places rather than just one. This will make it much harder to build up the social proof that will make your ad post successful.
Now you’re saying, “But Matt, I don’t want to do that. That doesn’t seem very effective. If it’s the same ad, I want my social proof to build up in one place. I don’t want to spread myself too thin. Is there another way?”

Well, you can call me Obi-Wan Kenobi, because I have a solution.
We like to call it “Dark Posting.”
What Was Dark Posting Originally?
Dark posts sound like some sort of sinister voodoo and black magic, but they’re really just “unpublished page posts”.
They used to be called dark posts, but the evil-sounding name confused people. A lot of advertising teams still like to say "dark posts," though (including us).
Dark posts are posts (or ads) with unique post IDs that aren't live and can't be found organically. They don't appear in your Ads Manager either. Dark posts only show up in your page posts tab, under 'Account Options' in the top left hamburger menu. They stay there, unpublished, until you choose to use them in your ad sets.
With dark posting, you could choose from several ad options depending on your goals and campaigns. These included link (standard banner ad sending to a landing page), carousel, photo, video, and status.
At least, you used to be able to.
How Did Dark Posting Change?
Not so long ago, you could create any type of Facebook ad in its entirety as a dark post.
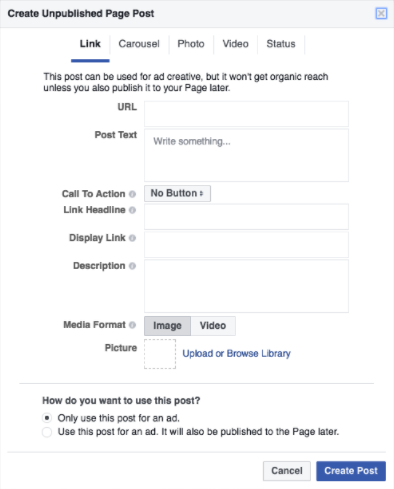
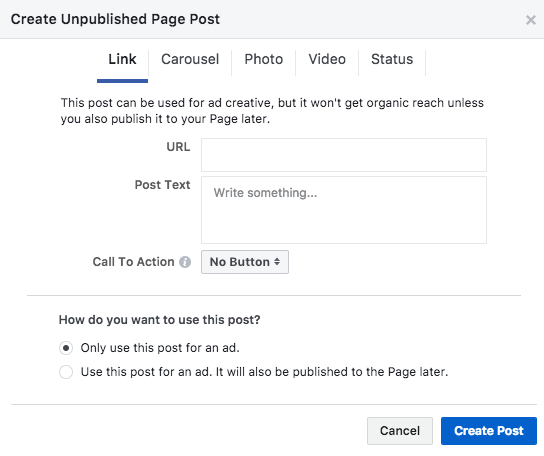
See how you can create a full-ad dark post in the image above?
You could enter your destination URL, post text, CTA, link headline, all the way down to choosing a photo or video. The end result would look and function exactly like a Facebook ad created in the Ads Manager.
Facebook has changed this.
Notice how all you can choose now are your URL, post text, and the CTA button. There’s no headline, no descriptor text, and no display link.
The posts (ads) are shadows of their former selves. And there are fewer options to include information in your post to improve ad performance.
To date, there’s not too much information out to as to what led to the change, but it seemed to change overnight.
Think of these extra pieces as Google Ad Extensions. Theoretically you don’t need them, but they make your ad perform that much better.
At this point, you say: “But Matt, what if I want the full ad and also want to dark post? I want to use one unique ID per identical ad. Is there another way?”
Yes, there’s another way. But it’s not technically a dark post anymore.
Back From The Dark Side
Since Facebook changed the dark posting function, we had to find another way to boost the same post ID to continue accumulating social proof in one place.
We solved this with three steps. First, we created an ad the traditional way in Ads Manager. Second, we then looked up the unique post ID associated with that ad. Finally, we copy the post ID and replicate it across multiple ad sets. (I’ll explain how to do this in more detail later in this post.)
The functionality and results of dark posting are still the same. The main difference is that the original source ad is published within Ads Manager. It doesn't live unpublished in the page posts tab like before.
Why “Dark Posts” Still Win & Why You Should Use Them
As we mentioned before, one of the main reasons Facebook is so successful as a social media platform is the viral potential of content.
Ad content is no different. Social proof is powerful and can help people make decisions, so this should be used to your advantage.
By allowing your social proof to build on one post ID rather than splitting the pie, you’re improving the likelihood that more people will click. The potential customers see others engaged with your ad post (that don’t appear biased on the brand side), the more likely they are to purchase.
For example, if you have an ad post with 10 likes, 3 comments, and 2 shares, that may help convince a customer to purchase. But what if you could have that same post with 100+ likes, 10+ comments, and multiple shares?
The user would think, “Whoa! This company is a big deal,” and be much more likely to engage.
So, what does this look like exactly?
The Clone Wars: Replicating Posts Across Multiple Ad Sets
I mentioned earlier that you can take a post ID and replicate it across multiple ad sets. It’s actually quite easy.
We start by creating an ad in Ads Manager or Power Editor. Click into your campaign and then click into the ad set that you want to create a new ad in. At the ad level, click “Create Ad.”
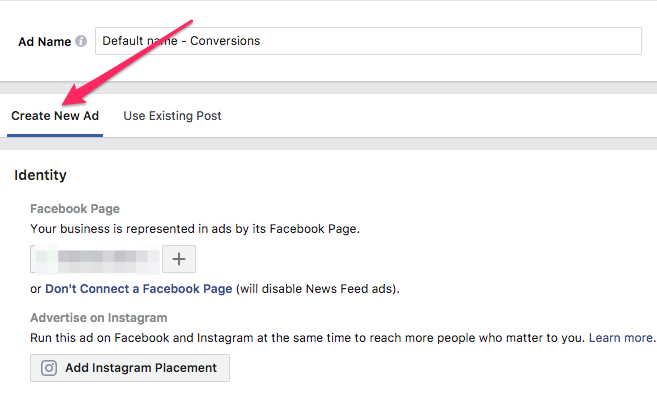
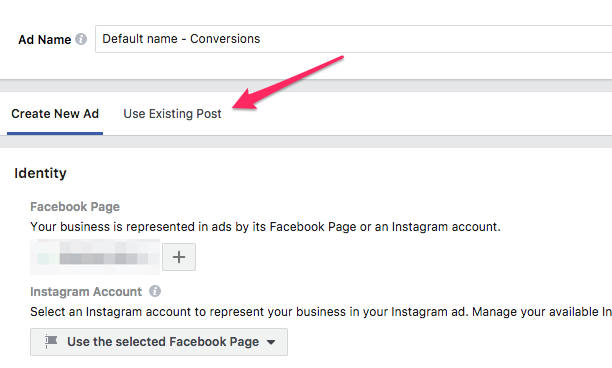
Clicking “Create Ad” takes you to the ad creation window. You have two options: 1) Create New Ad and 2) Use Existing Post.
Select “Create New Ad” to build your base ad first.
After selecting “Create New Ad”, you’ll (as the button implies) create your ad. Enter everything you want to include -- the destination URL, the headline, the text above the ad, and even the news feed link description if you’re running on a Facebook desktop.
Also, don't forget to double-check your content -- you don't want to duplicate incorrect information across multiple ad sets!
When you're done, save and post the new ad.
The Phantom Menace: Building More Ads
Now that you have a new ad created, you can replicate that same ad across multiple ad sets without building multiple ads. You can start by grabbing the post ID of the ad you just created.
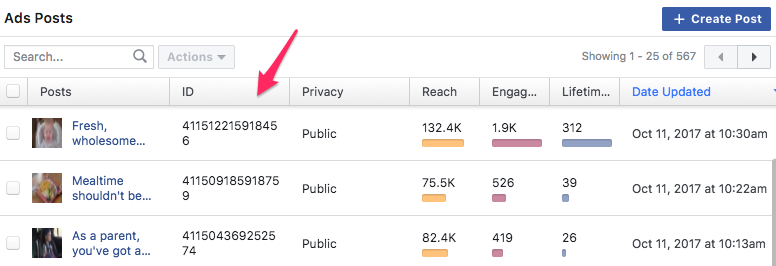
There are two ways to do this. The first and easiest is to click on the hamburger menu in the top left and go back to the “Page Posts” window.
If you get to the hamburger menu and don’t see “Page Posts” as an option, select “All Tools” and you will find it on the next screen. Your recently created ad will appear at the top of the list in the Page Posts screen.
More ads inevitably means more post IDs. And at a certain point when you're looking for a specific post ID in page posts, you may not find it right away.
The Empire Ads Manager Strikes Back
As your ad library fills up, the most common way to grab a specific ad ID will be in Ads Manager, not the Page Posts tab.
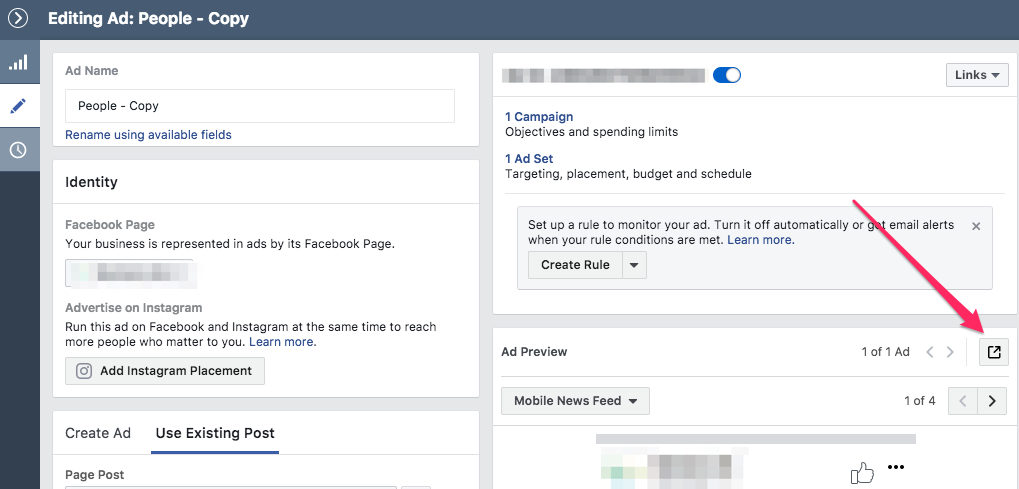
To grab the post ID of a specific ad, go back to your campaigns and go down to the ad level. Once you have found the ad you want, hover over it with your mouse to see the "Edit" option and click it.
Once the ad edit option opens, you can edit any aspect of the ad.
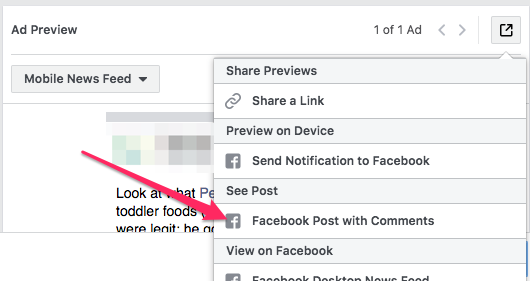
Instead of editing the ad, however, you’ll want to find the little square button with the arrow through it above the ad preview.
After clicking the square arrow button, the next step will be to select the option from the dropdown of “Facebook Post With Comments.”
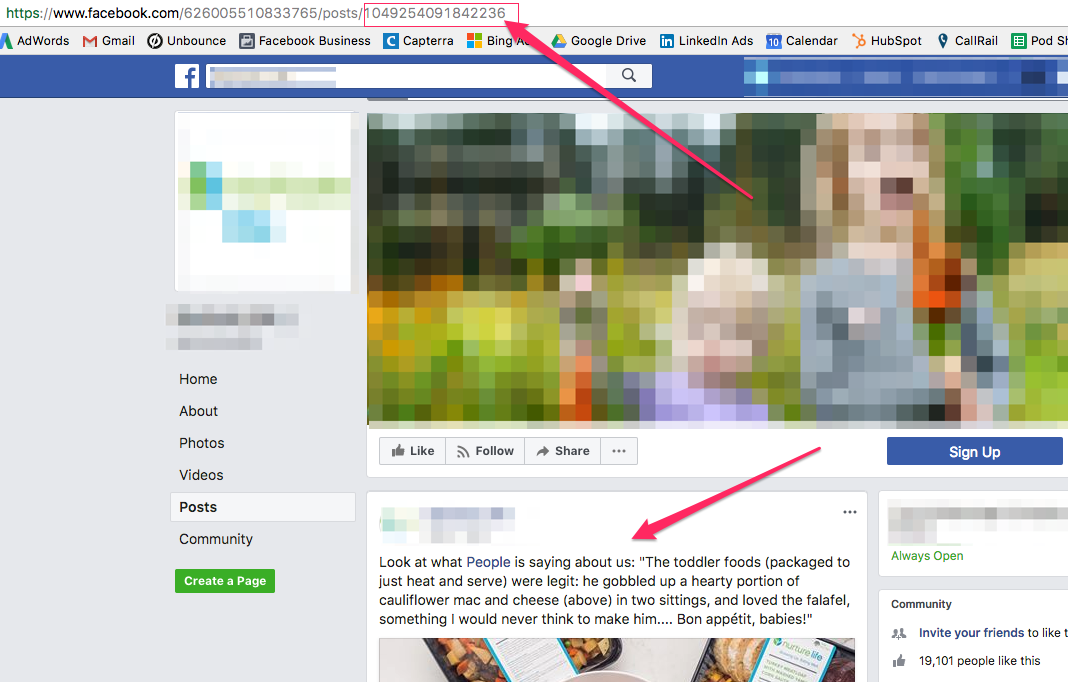
Clicking “Facebook Post With Comments” takes you to a page that shows the ad post as if it were live on Facebook. On this screen, you can view all comments, shares, and likes.
The Important Part
The important part is to spot the URL at the top of the page. The string of numbers at the end of that URL is your post ID.
Using this strategy, you can easily find the post ID for any ad.
With the post ID, you can once again boost the same post across other ad sets--and keep all of your social proof together.
Next Steps: The Ad Level
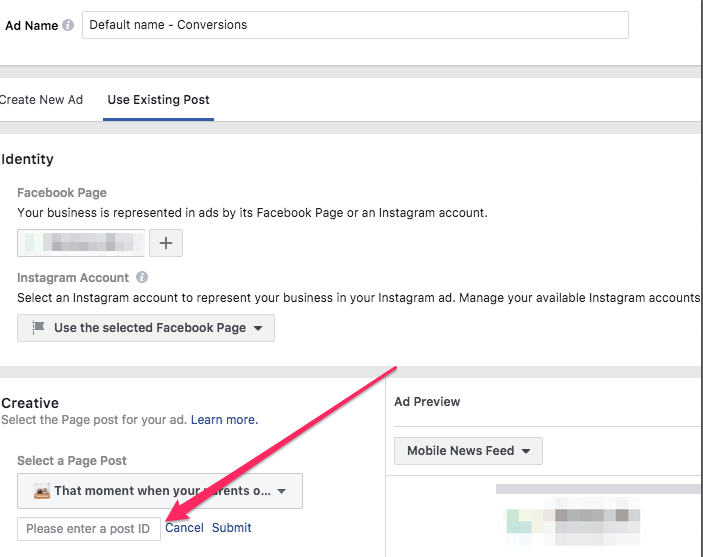
The next step is to click into your ad set. When you’re at the ad level, you want to click “Create Ad” as shown earlier. This time, you’ll select “Use Existing Post” instead of “Create New Ad”.
When you’re on the "Use Existing Post" screen, all you have to do is go to the “Creative” section and enter the post ID there.
Once you enter the post ID and submit, the ad will load, along with all of your social proof.
How to Optimize Dark Posts
Like any Jedi, to get better, you need to test and train yourself with the Force. The same goes for optimizing dark posts.
You always want to test new variables to improve performance. When it comes to optimization, you want to follow ad testing best practices such as:
- A/B Testing: Choose one variable to test. You always want to isolate the variable, so you know what’s responsible for being the winner. For example, test the ad image or the headline with everything else staying the same.
- Facebook Optimization: To help Facebook optimize your ad, choose the metric that defines your success. Nine times out of 10, you’ll choose conversion or purchase. In some cases, however, you’ll simply want traffic for your content. In that case, you can optimize for link clicks or landing page views.
- All Tests As Dark Posts: In order to test faster, make all of your tests dark posts and launch them across multiple ad sets. This will help scale your efforts, so you can learn what works and what doesn’t more quickly.
For other tips and strategies, be sure to check out more articles on Facebook advertising from the KlientBoost blog.
Downsides of Turning to the Dark Side?
Like any internal struggle between the light and dark sides of the Force, there are some downsides for turning.
The biggest complaint about dark posts is that you cannot edit them. If you’ve boosted an existing post to an ad set, you cannot edit the headline or link. If you notice a spelling error, you'll have to create a new post and then boost that new post across all of your ad sets.
You can still edit the original post you created, but editing that ad will create a new post ID, so you’ll lose all of your social proof. In other words, it’s basically like creating a new ad at that point, and you’ll still have to boost the new post ID across all of your ad sets.
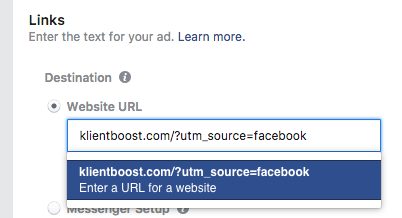
Also, if you’re the type to hard code your UTM parameters into the link itself, that will affect tracking across all of your ads.
This affects tracking because, for example, if you have a UTM for “utm_campaign,” that UTM will stay with you as you dark post. So if you want to launch this ad in a new campaign, the UTM you created will follow with you as you promote it--and it will show all leads as coming from that one campaign in your CRM.
To eliminate this, you’ll want to utilize Facebook’s “URL Parameters” option at the ad level for each ad post you create.
By using their URL Parameter tool, you can update your UTM parameters for more accurate tracking as you change campaigns or ad sets.
Facebook Dark Posts: A New Hope?
Implementing dark posting will help with your social proof and overall Facebook ad performance.
It will also help you be more efficient, as dark posting is a huge time saver when making the same ad over and over for multiple sets.
Have you tried dark posting before? Did you find it easier and more efficient? Did you struggle with doing it right? Or did you receive results that made you happier than Yoda?
I would love to hear about your experiences with Dark Posting below in the comments.

