Bing Ads conversion tracking has been around for a while, but there’s a chance you haven’t given it a shot it deserves.
You know the ins and outs of conversion tracking in general, and you’ve put all your trust into AdWords. But Bing Ads conversion tracking terrifies you.
Here’s the good news: Bing Ads conversion tracking will arm you with a mountain of data to track and improve your conversions, understand visitor behavior, and remarket to existing audiences like a boss.

This guide covers everything you need to get started. I’ll take you through setting up your Bing Ads conversion tracking, creating goals and remarketing lists, and best ways you can report on your conversions. Let’s get started.
Subscribe to our weekly newsletter for tips so good that we might put ourselves out of business.
What Is Conversion Tracking?
Simply said, conversion tracking is the process that helps you measure the return on investment of any advertising campaign by measuring the activities people complete on your website.
It’s up to you to define the actions that are valuable to your business. These may vary based on your local or international presence, in-store activities, and business model; actions like contact form submission, webinar registration, whitepaper download and completing a purchase are the usual suspects.
Identifying your audience’s most valuable actions and how they align with the current actions you want them to take may be some work on your part--but once you do it, it’s a game-changer for all the PPC effort you put in afterwards.
Why Use Bing Ads Conversion Tracking?
If you ever feel like your advertising money somehow keeps melting, but you’re not able to point at the positive result of it, you need conversion tracking.
If you’ve ever launched a Bing Ads campaign and your strategy to measure success was to click ‘Refresh’ with one hand and have your fingers crossed on the other, I’m guessing it probably didn’t work too well.
Bing Ads is no ground for a guessing game. And, when you think about it, no paid advertising should ever be. The only way to ever see a return on your investment is to know how each dollar performs, every single time.
Otherwise, it’s kind of like throwing your money at a cashier in a supermarket without being 100% sure you can take your groceries with you.
On a serious note, Bing Ads conversion tracking empowers you to measure and improve your ROI. When you monitor what your visitors do after interacting with your Bing ad, you can:
- Determine which ad campaigns, ad groups, and ads are the most effective in driving conversions
- Identify the most successful keywords, and increase ROI by investing more budget into keywords that worked and avoid those that didn’t
- Optimize ads to a longer decision process by remarketing to users that have previously visited your website
It’s simple.
Don’t say no to more money, okay?
Why Bing Ads?
PPC commonly implies Google AdWords--but today, I’m here to convince you otherwise. With over 5 billion monthly searches on Bing, you can’t afford to ditch it until you check if this is where your audience searches.
Numbers Don’t Lie
Bing’s largest reach is undoubtedly in the U.S., where it holds a third of the desktop search market. The split is equal between males and females, and over half of the Bing Network audience is aged 25-54.
In Bing’s own words, their network connects you with 68 million searchers that Google can't reach. One fourth of their clicks come from searches exclusive to the Bing Network. Pretty cool if you ask me.
And if this wasn’t good enough already, Bing Network audience spends 32% more online when shopping from their desktop computers than average Internet searchers.
Read that again: they spend more money. If their demographics breakdown aligns with your audience, Bing is a no-brainer.

Bing’s Cost Per Click Is Lower
It’s not the first time we’re using this particular piece of data to convince you to give Bing a shot.
A study run by AdGooroo discovered that advertisers paid 93% more per click on AdWords than on Bing. And in the immortal words by Joel Neustaedter:
“I heard there’s a sale going on over at Bing.”
So now, you’re like…
“Hold on, I can spend less money and use it to make more money?”
Hell yes. It’s simple: less competition means lower bids. Google’s larger market share comes with the downside of pricier ad real estate.
Combine this with Bing Network’s audience that’s willing to spend more when buying online, a test run of Bing Ads is the least you can do to give Bing a fair chance.
Setting Up Bing Ads Conversion Tracking
To get started, you’ll have to create your Universal Event Tracking (UET) tag. As its name implies, this tag works universally for any website activity, and you only have to create it once.
You may notice this is quite different to the multiple conversion pixels for each conversion goal in AdWords, because UET is a single tag to rule all your tags. Technically, it’s more similar to the Facebook pixel’s structure. Google’s equivalent of this would be the Google Tag Manager.
And the true beauty of the UET tag is that not only can you perfectly measure conversions--you can also remarket super-targeted content to the audience that already knows you.
Creating Bing Ads UET Tag
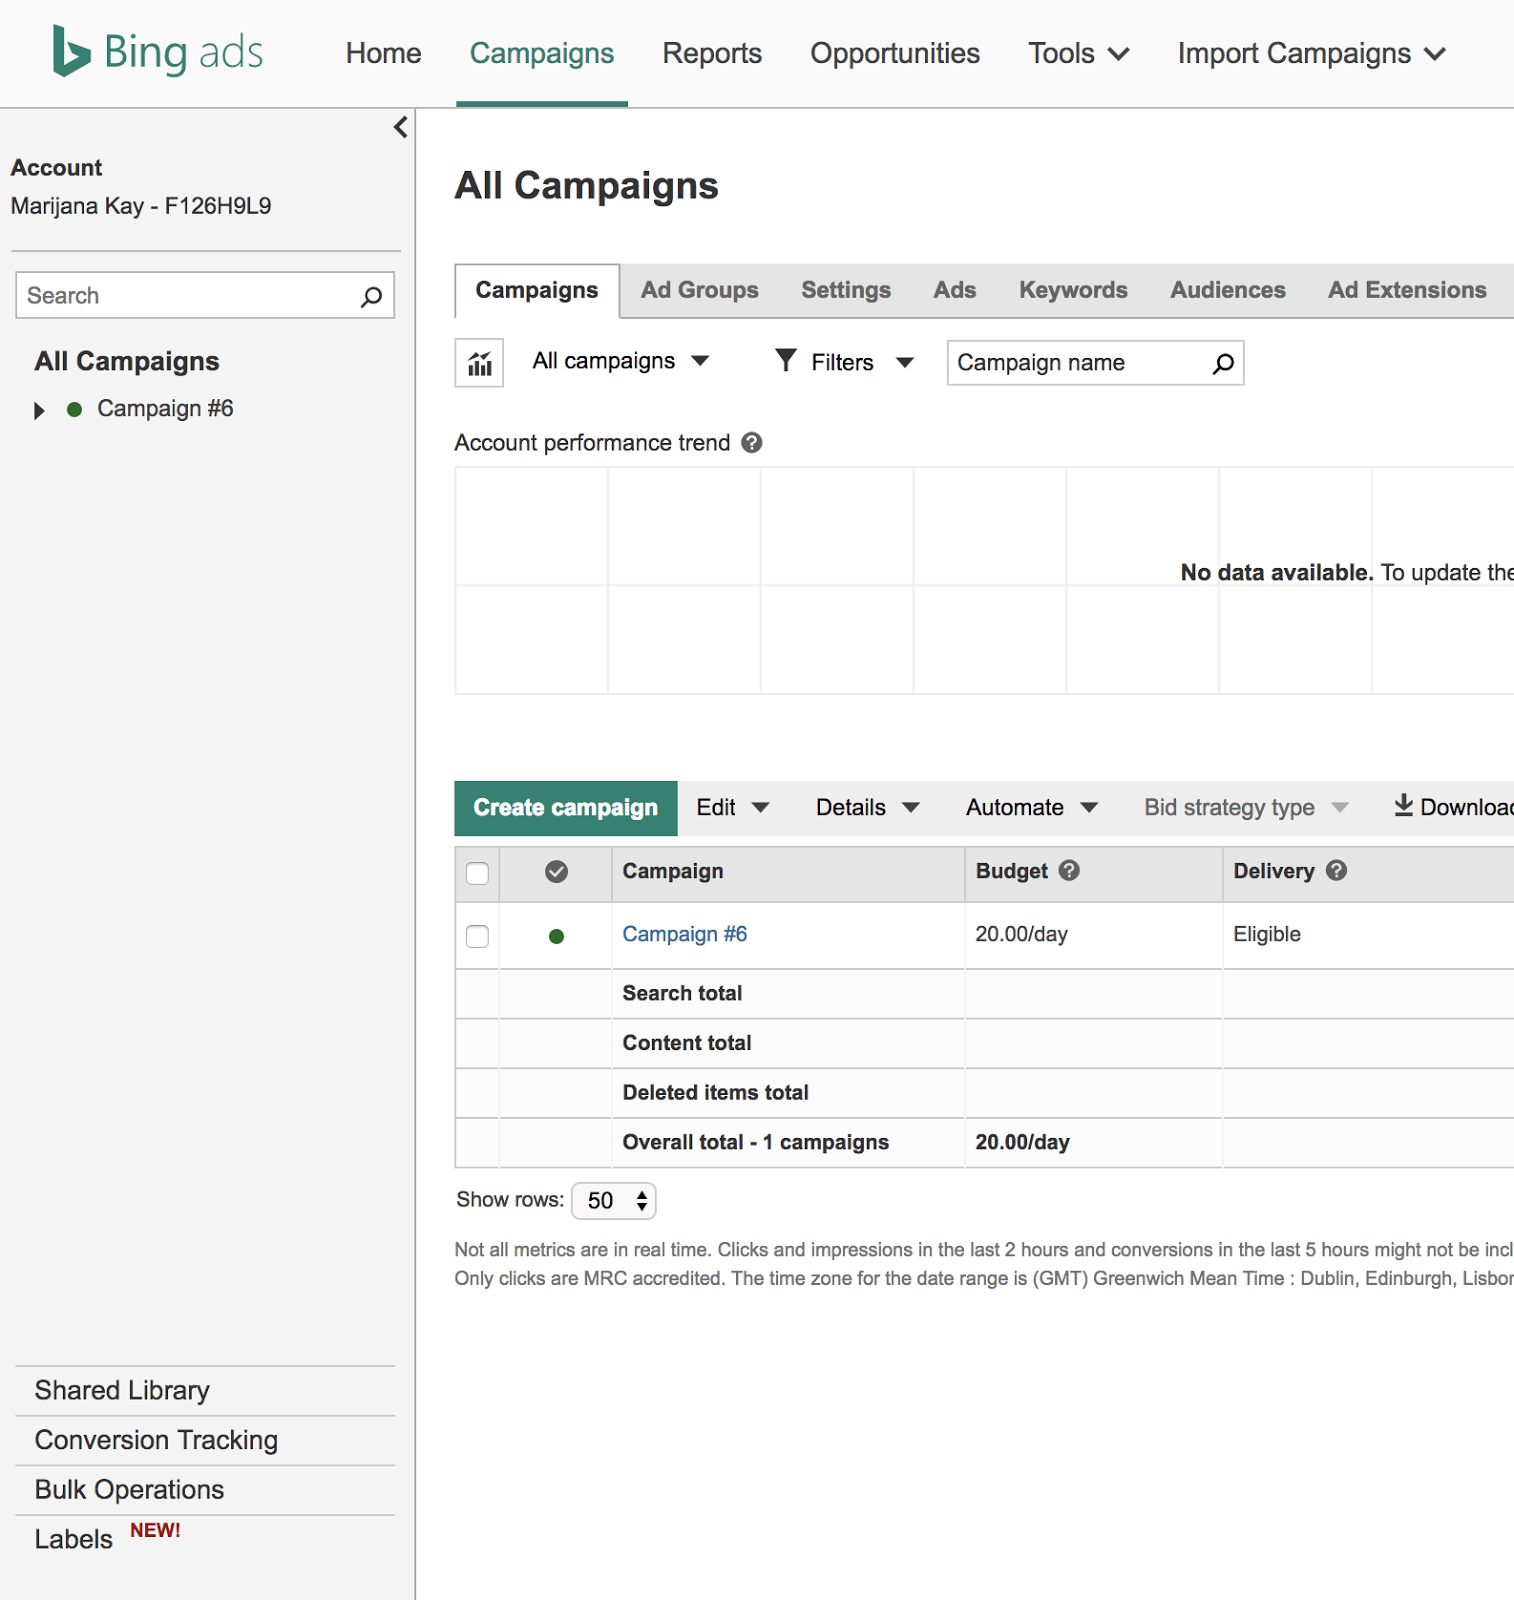
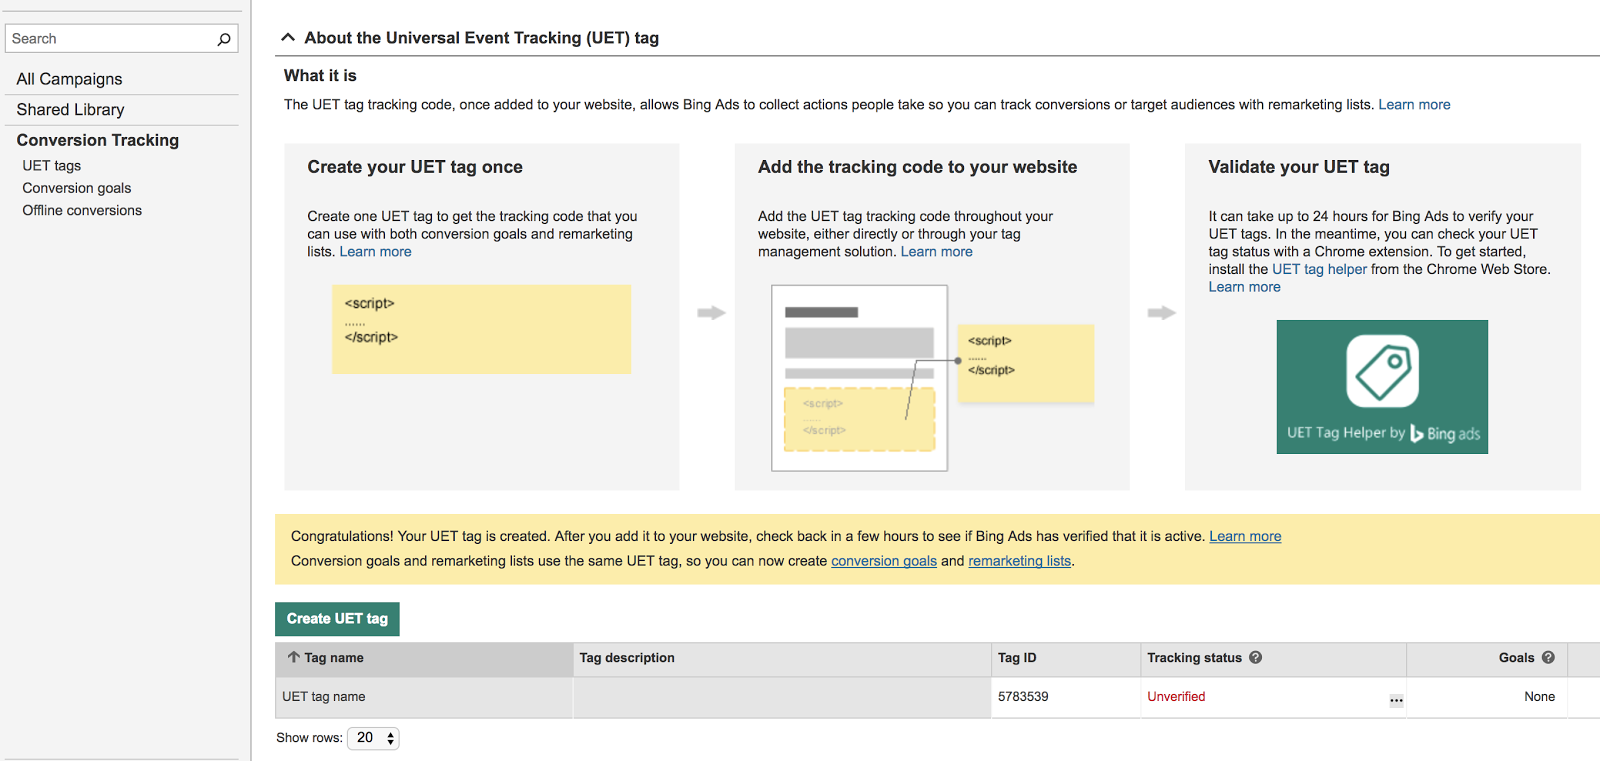
To generate your UET tag, your first step is to head over to your Campaigns tab and click Conversion Tracking at the bottom left menu.
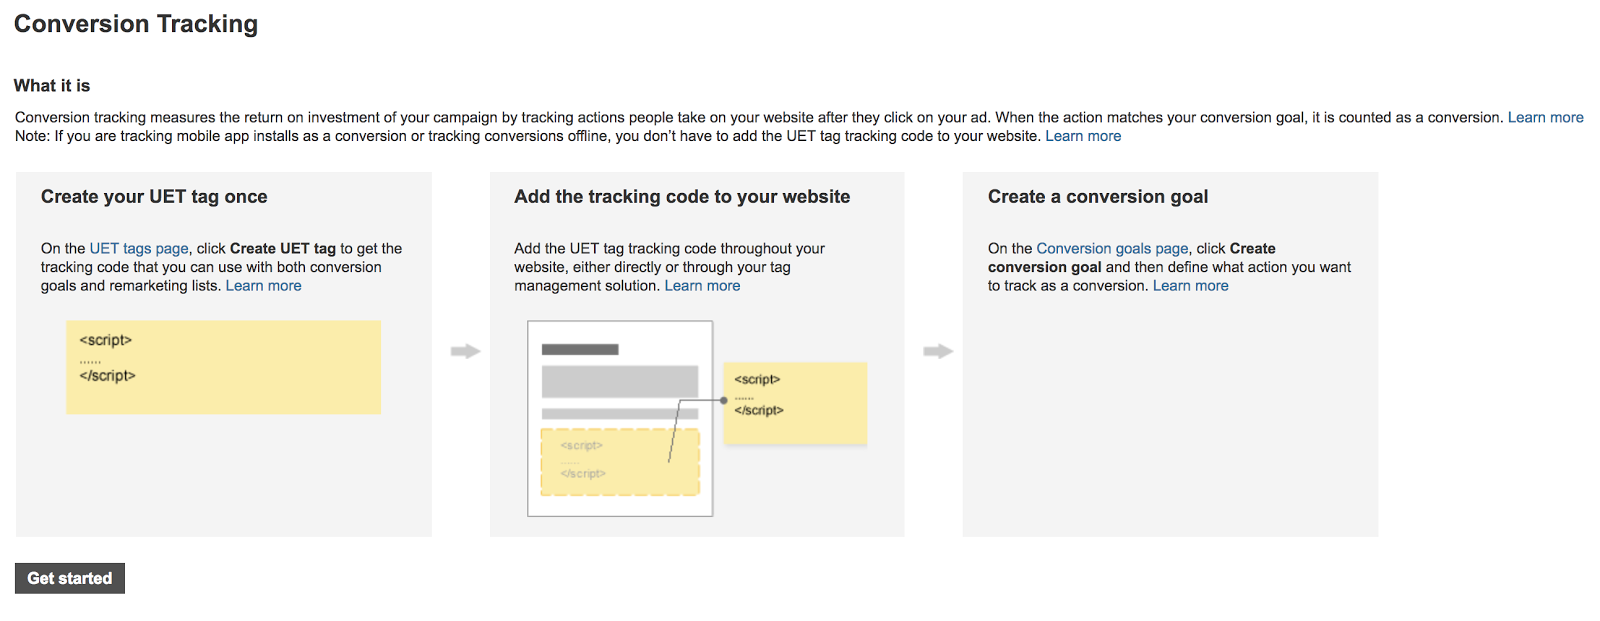
The interface will briefly explain conversion tracking and prompt you to get started creating your UET, also reminding you that you only need to do it once.
Below it, you’ll also see options to view the UET tags page, conversion goals page and offline conversions tracking, but these will make much more sense once we set up the UET tag.
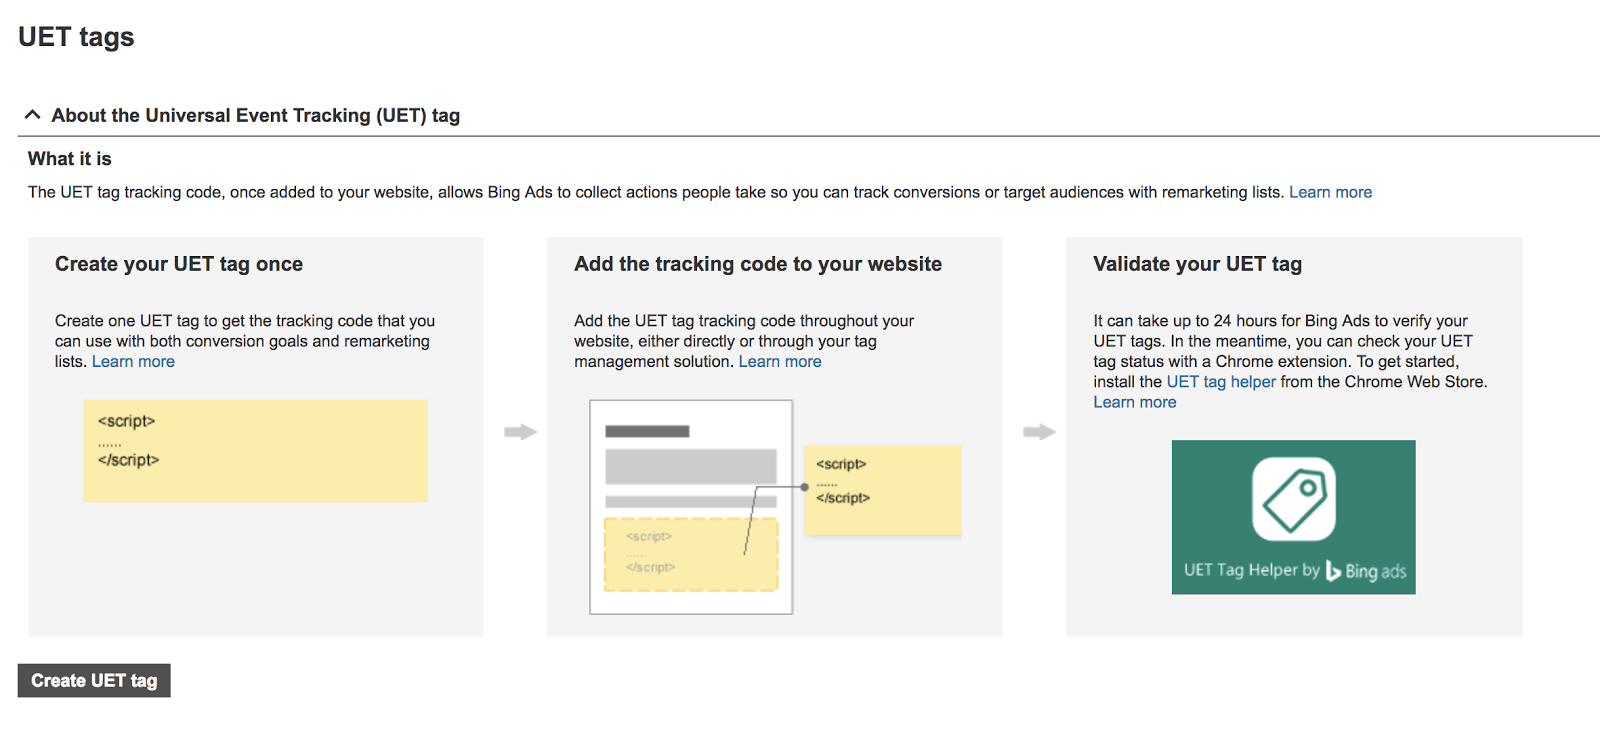
Go ahead and click Get started, and then click Create UET tag.
Next, enter your UET tag name and an optional description, like your website name or URL. Then, click Save.
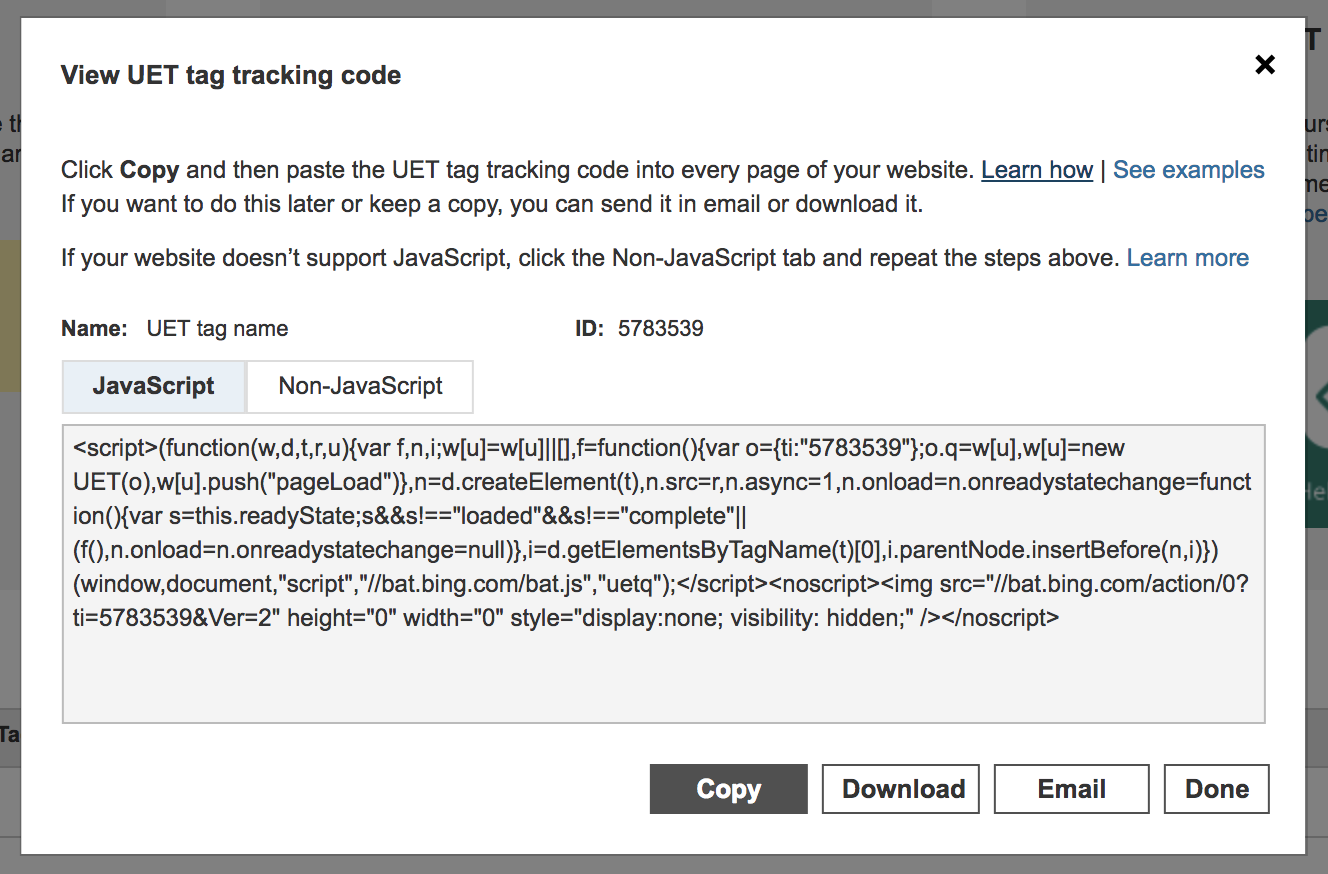
And that’s your UET tag tracking code.
Next, you’ll want to copy or download your tracking code and add it to your website. There are two ways you can do this:
- You can add the UET tag tracking code directly to your website.
- You can use your tag manager - such as Google Tag Manager - to add your tag.
Adding the UET Tag Tracking Code Directly to Your Website
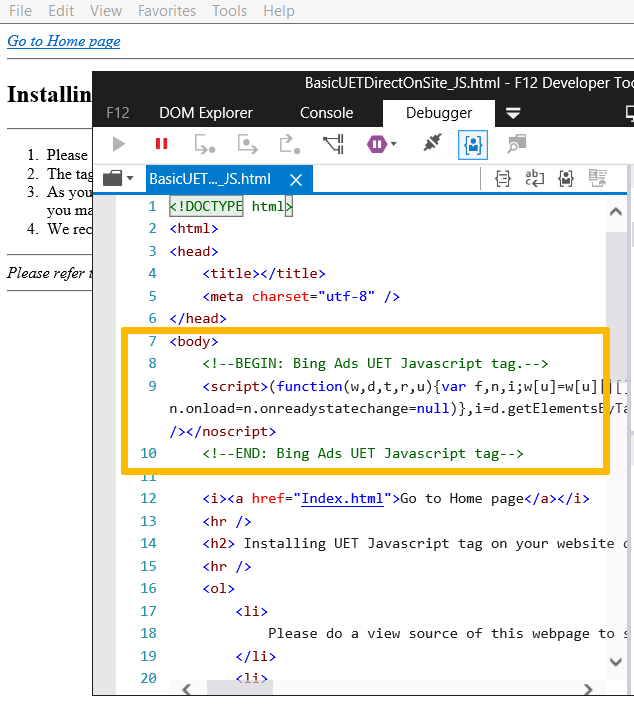
If you want to manually add your tracking code, this is quite simple: you need to add the snippet to every page of your website or to the master page. The latter is ideal, because you add it once and it’s included on all pages.
The code can be added anywhere on the webpage, in the head section (before the closing head tag </head>) or the body section (before the closing body tag </body>).
Adding the UET Tag Tracking Code with Google Tag Manager
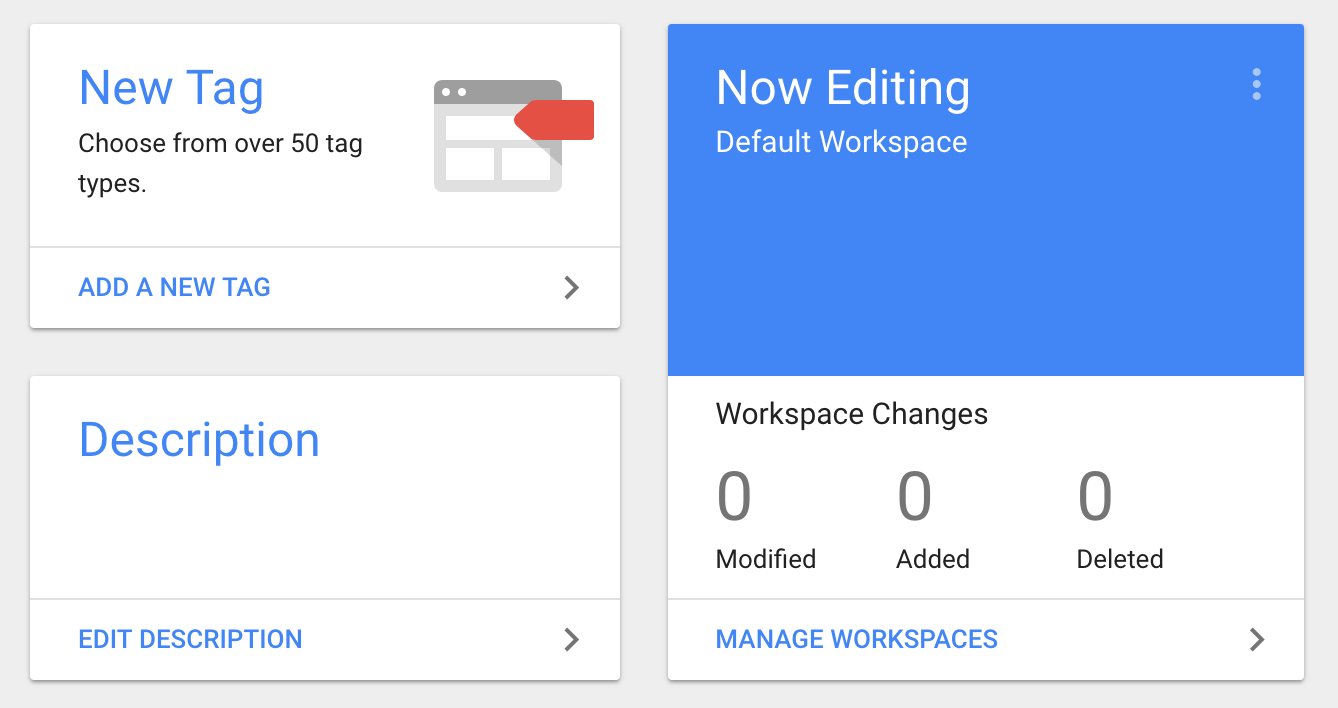
Head over to your Google Tag Manager interface and click Add a New Tag on your dashboard.
A new popup window will open. At its top, enter Bing UET tracking as the title of this tag.
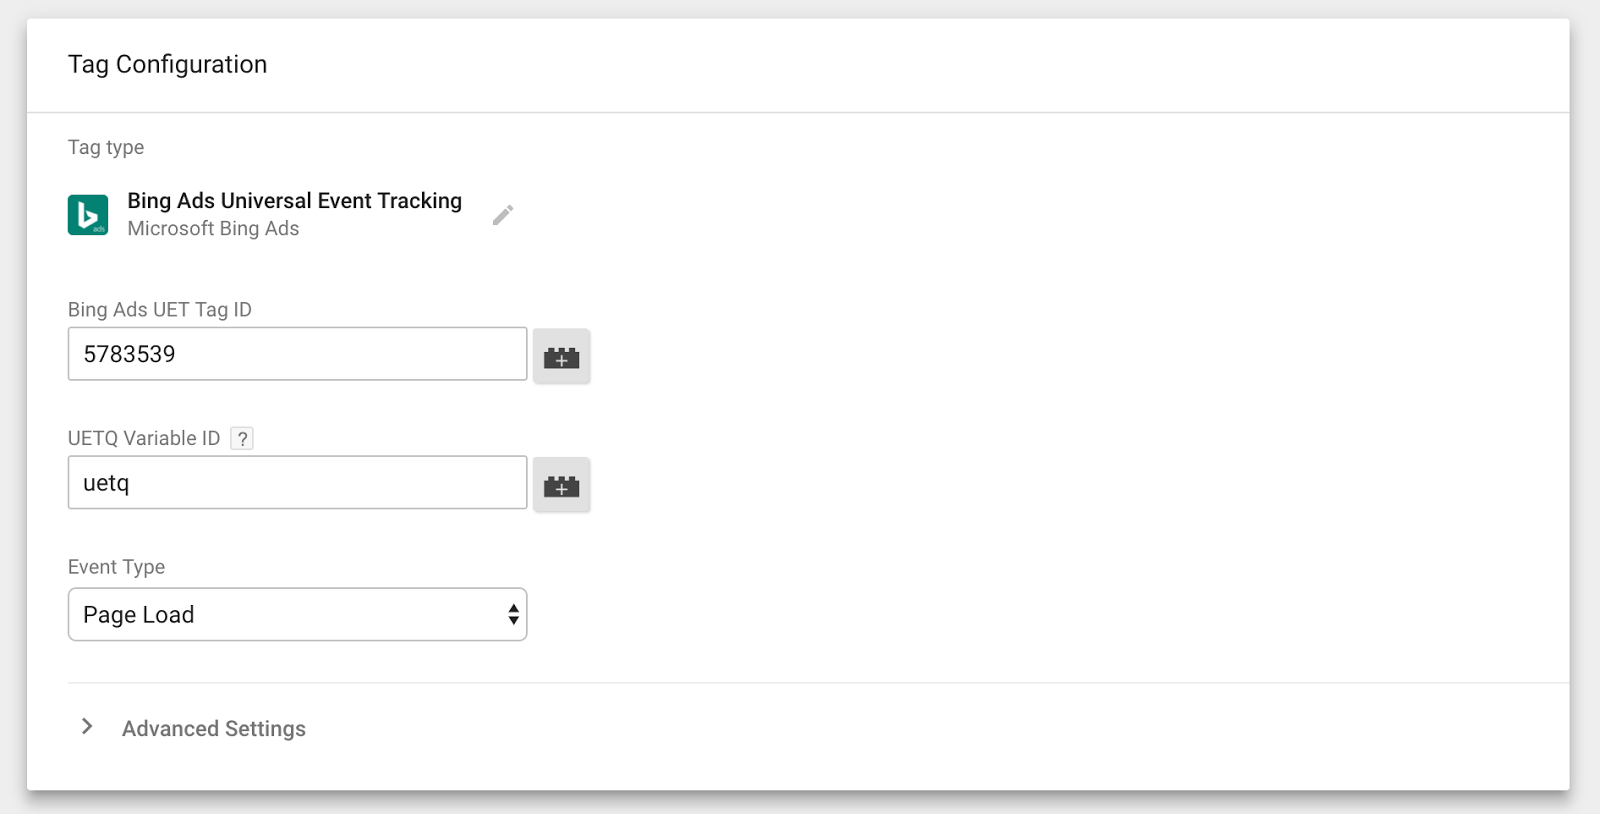
Next, click anywhere in the Tag Configuration box. In the list that populates, select Bing Ads Universal Event Tracking.
In the Tag Configuration menu, paste the ID we created earlier. It’s a 7-digit number and you can find it right above the full tracking code that Bing populated for you.
Click anywhere in the Triggering box below and select All Pages, which simply ensures the UET tag is applied across your entire website. When you’re done, click Save at the top of the page and the tracking is now active.
Confirm the UET Tag Is Running
You can quickly confirm your UET tag is set up properly by installing the UET Tag Helper browser extension.
Once it’s in your browser, head over to your website, open the extension, switch it on with the On/Off toggle, and reload your website. Then, just open the extension again and it will confirm your UET tag is set up correctly.
Keep in mind it may take a few hours for your UET tag tracking code to be verified.
And that’s it. You made it.

Creating a Conversion Goal
Now that you have all the foundation in place, let’s set up Bing Ads conversion goals.
This process is so crucial, because it helps you track all the actions you define as valuable to your business, like contact form submissions and actual purchases.
Conversion tracking is the only way you can make the above mentioned confetti make sense.
So, to make this happen, you’ll now go back to your Bing Ads dashboard and under Conversion Tracking, select Conversion goals.
Then, you can give your goal a name, making sure it’s something you can distinguish when you have more than one conversion goal set up.
Now, it’s time to select your goal type. The most common one is Destination URL, and it’s ideal when you’re tracking events like signups or purchases that usually result in some version of a thank you page. If, however, you want to track session-based metrics like duration or pages viewed per visit, this is where you’ll have the chance to configure them.
You would use the Event goal type when your conversion goals would represent multiple actions on a single page, like downloading a whitepaper and viewing a video. Setting up Event goals requires some more coding--see more here.
Let’s look further into Destination URL
Bing Ads Conversion Tracking with Destination URL Goal
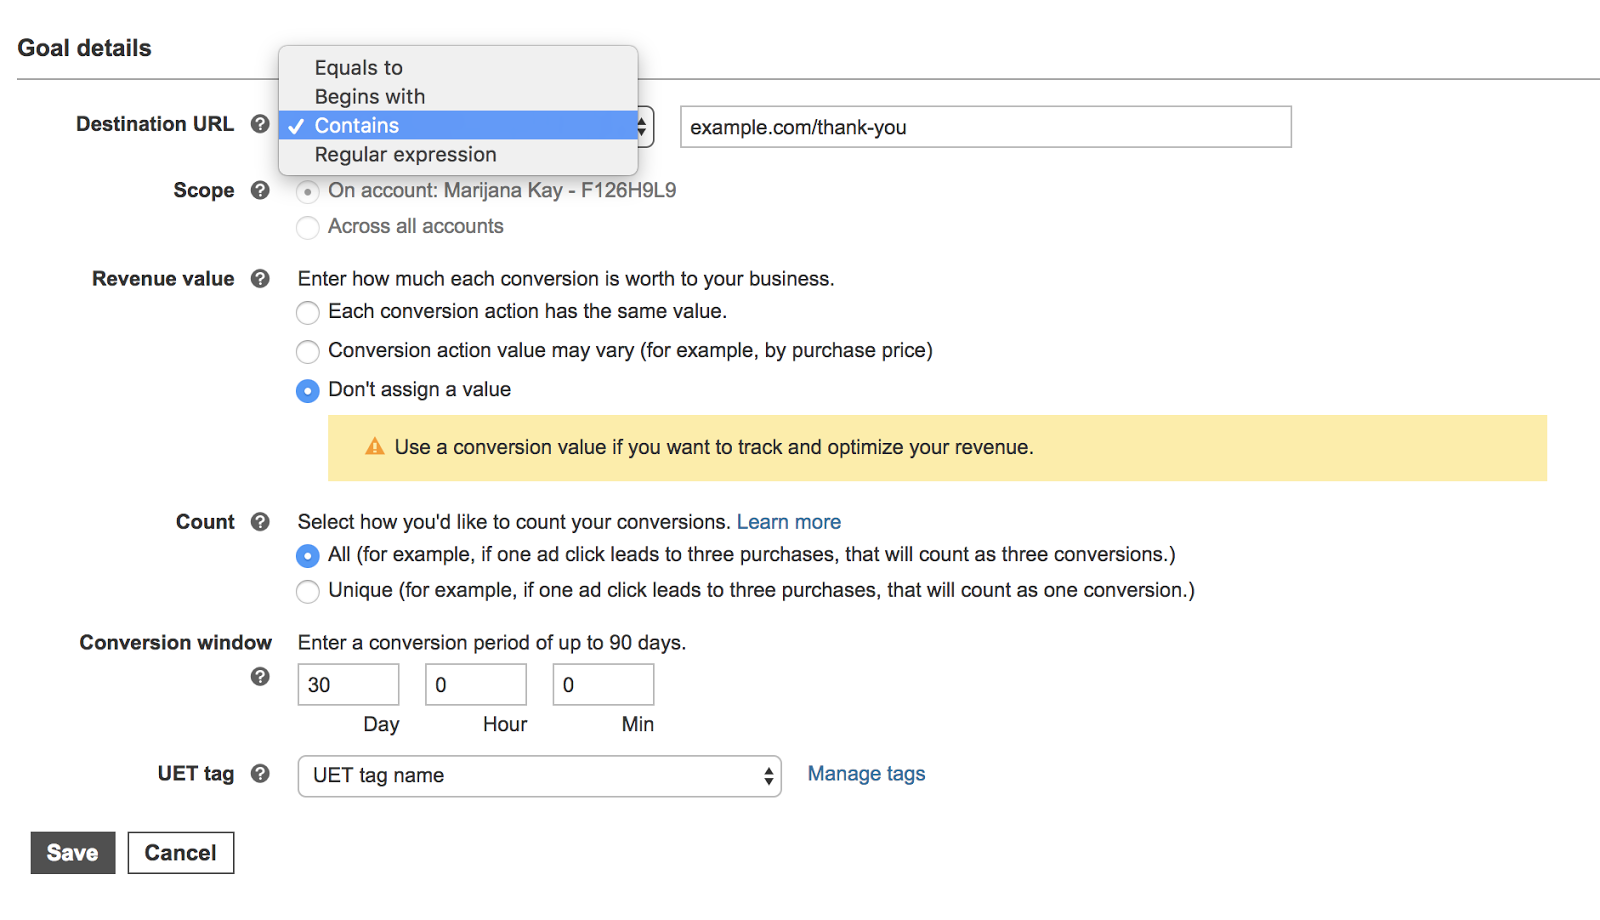
Setting up the Destination URL goal is super simple: after you select Destination URL goal type and click next, you’ll define the web page URL that counts as a conversion. You’ll have several options when choosing the condition to match the webpage URL: equals to, begins with, contains, and regular expression.
The chances are, you’ll use one of the first three ones, which are all quite self-explanatory. The only thing to keep in mind is that http(s) and www are ignored, meaning that https://example.com/thank-you and example.com/thank-you will both be considered a match.
Once you entered your URL and condition, you can configure more settings, such as adding a conversion value, or you can simply leave everything else as it is.
Click Save, and your conversions are now being counted.
Creating a Remarketing List To Track Those Who Haven’t Converted
Remarketing is a smart marketer’s strategy to bring back those visitors who previously left your website without purchasing.
Warm audiences are the best, and remarketing using Bing Ads UET tag is the magical tool to attract them.
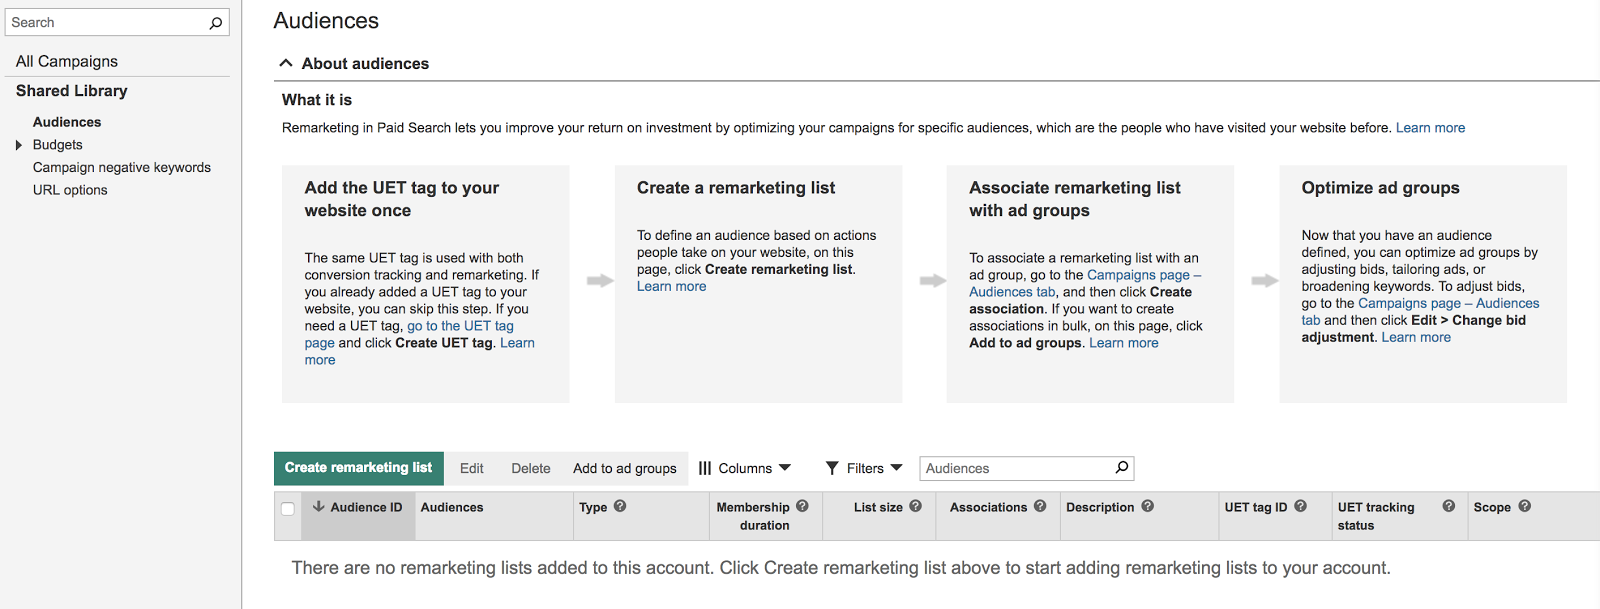
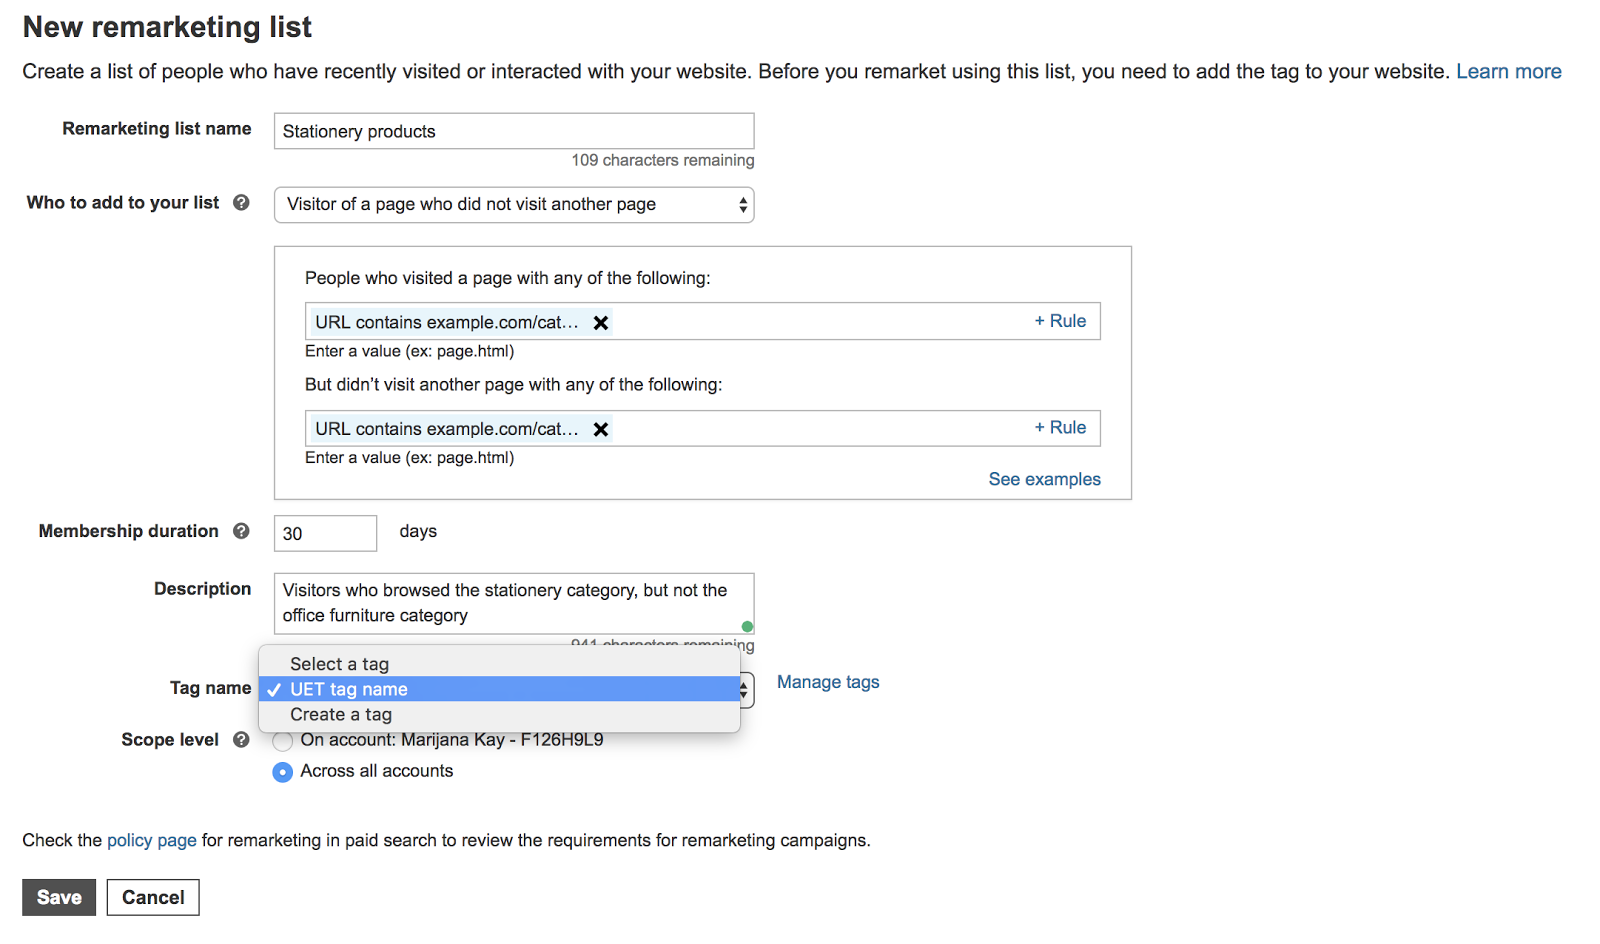
To set up your remarketing list, head over to your Bing Ads dashboard. Under Shared Library, click Audiences, and click the Create remarketing list button.
Next, give your remarketing list a name, ideally something you’ll be able to differentiate in case you have more than one remarketing list.
Under “Who to add to your list”, you can choose between several conditions. The main ones are: visitors of a single page, and visitors of a specific page who either have or haven’t visited another page you set as a parameter.
So, in the first case, you may target any visitor that visited a specific page of yours, like a product page or an FAQ page.
In the other two cases, you can get very detailed and target visitors who’ve viewed a certain category of products, but not any other product category at all. You can also particularly target those who have visited multiple pages of related products and thus be of huge value to you.
And finally, select how far back in your Bing data should these conditions apply, select your website UET tag name, and click Save.
You’re now ready to remarket to your targeted list of past visitors to help get more conversions.
Bing Ads Conversion Tracking: 5 Reporting Best Practices
Conversion Goals Page: High-Level Reporting
The first place you can access your conversion tracking data quickly is the Conversion Goals page.
Just like above when you were setting up your conversion goals for the first time, select Conversion Tracking in the menu on the left. Then, click Conversion goals.
This report will show you conversions, revenue, and repeat rate for each of the goals you’ve earlier set. This is the best place for high-level reporting and seeing how your campaigns are performing overall per goal.
Some important things to note here:
- The data is displayed based on the date range selected at the top right corner, which you can change at any time.
- Revenue for each goal will be tracked in case a value was assigned to the goal in the setup process.
- Repeat rate is the ratio of all conversions and unique conversions, giving you insight into how often a click converts
Campaigns Page: Day-to-Day Reporting
If you want to monitor your conversion performance daily, but you want finer details than the ones on the Conversion Goals page, the main Campaigns page is your solution.
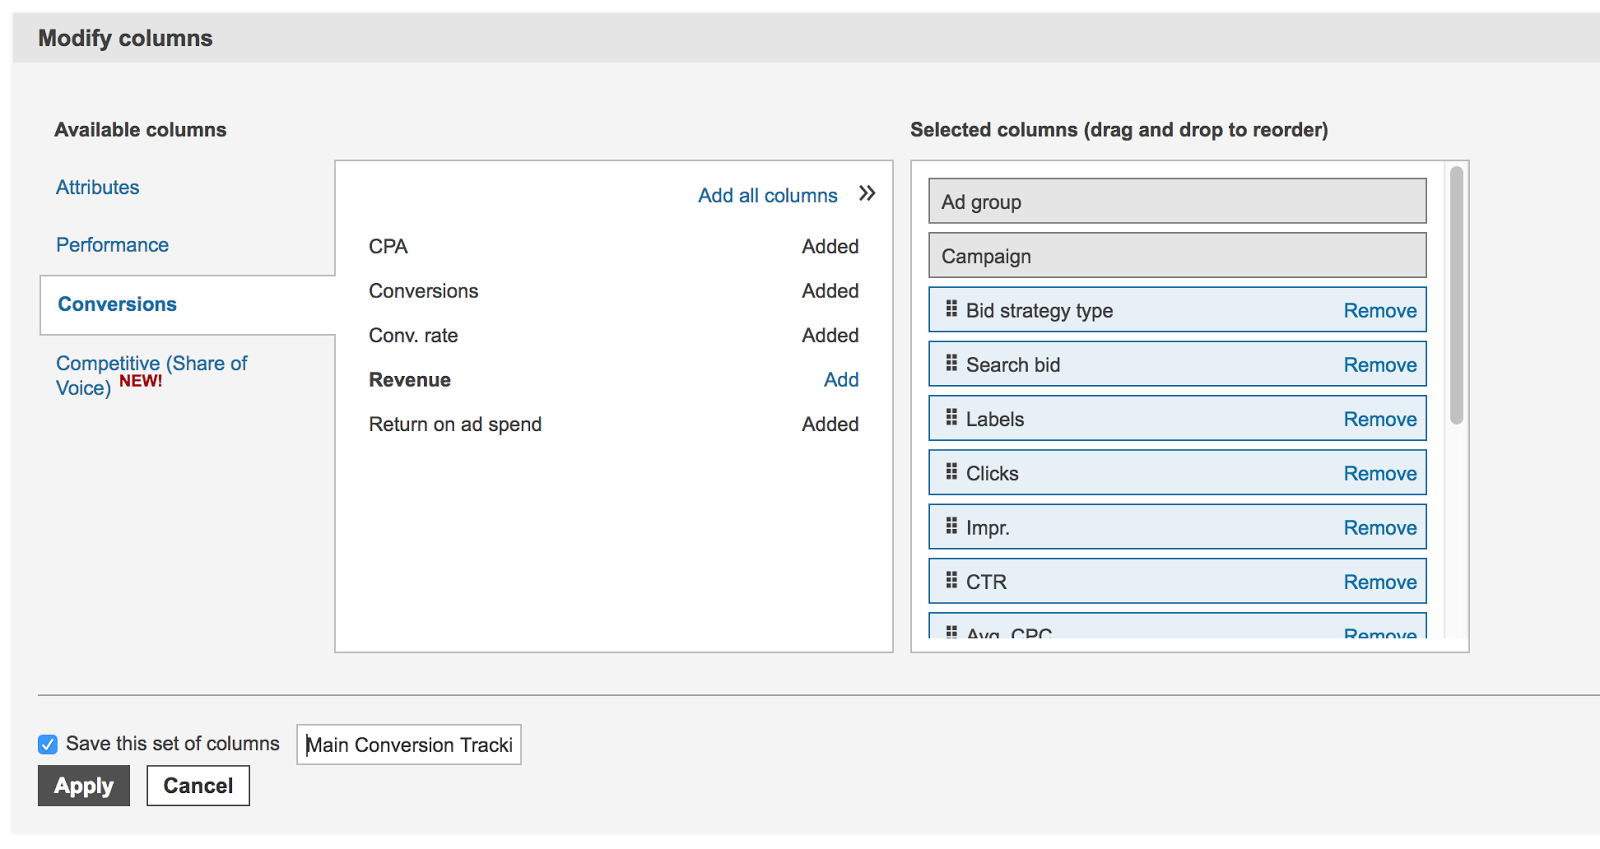
Click on the Campaigns tab at the top of your Bing Ads dashboard. From here, you can add conversion-specific columns to the Campaigns, Ad Groups, Ads, Keywords and Ad Extensions tabs. These columns are:
- Conversions
- Conversion Rate
- Revenue
- CPA
- Revenue on Ad Spend
Essentially, this means you can monitor your conversions based on individual parameters that matter to you.
To set these up, open the tab for which you want to track conversions. Then, click Columns > Modify Columns above the table.
In the Modify Column window that populates, click Conversions on the left-hand side. From here, click “Add” next to any metrics you want to see in your view.
This reporting view is perfect for looking at your conversions on a daily basis, and monitor any spikes or extremes in performance. It allows you to increase bids on campaigns, ad groups or ads that outperform the others and keep an eye on those that underperform.
By doing this, you can ensure you’re investing your budget in a way that maximizes conversions.
Also, keep in mind:
- Date range at the top right corner applies here too, so make sure you’re looking at the one you’re interested in.
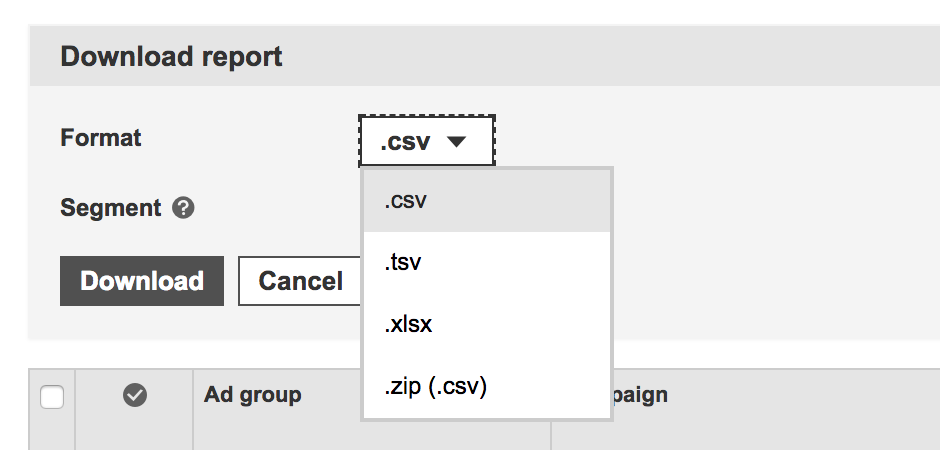
- You can export any of these reports into a .csv, .xlsx, .tsv or .zip file.
- You can sort the data based on any column, which makes it easy to identify extremes.
Conversions Reports Page: In-Depth Reporting
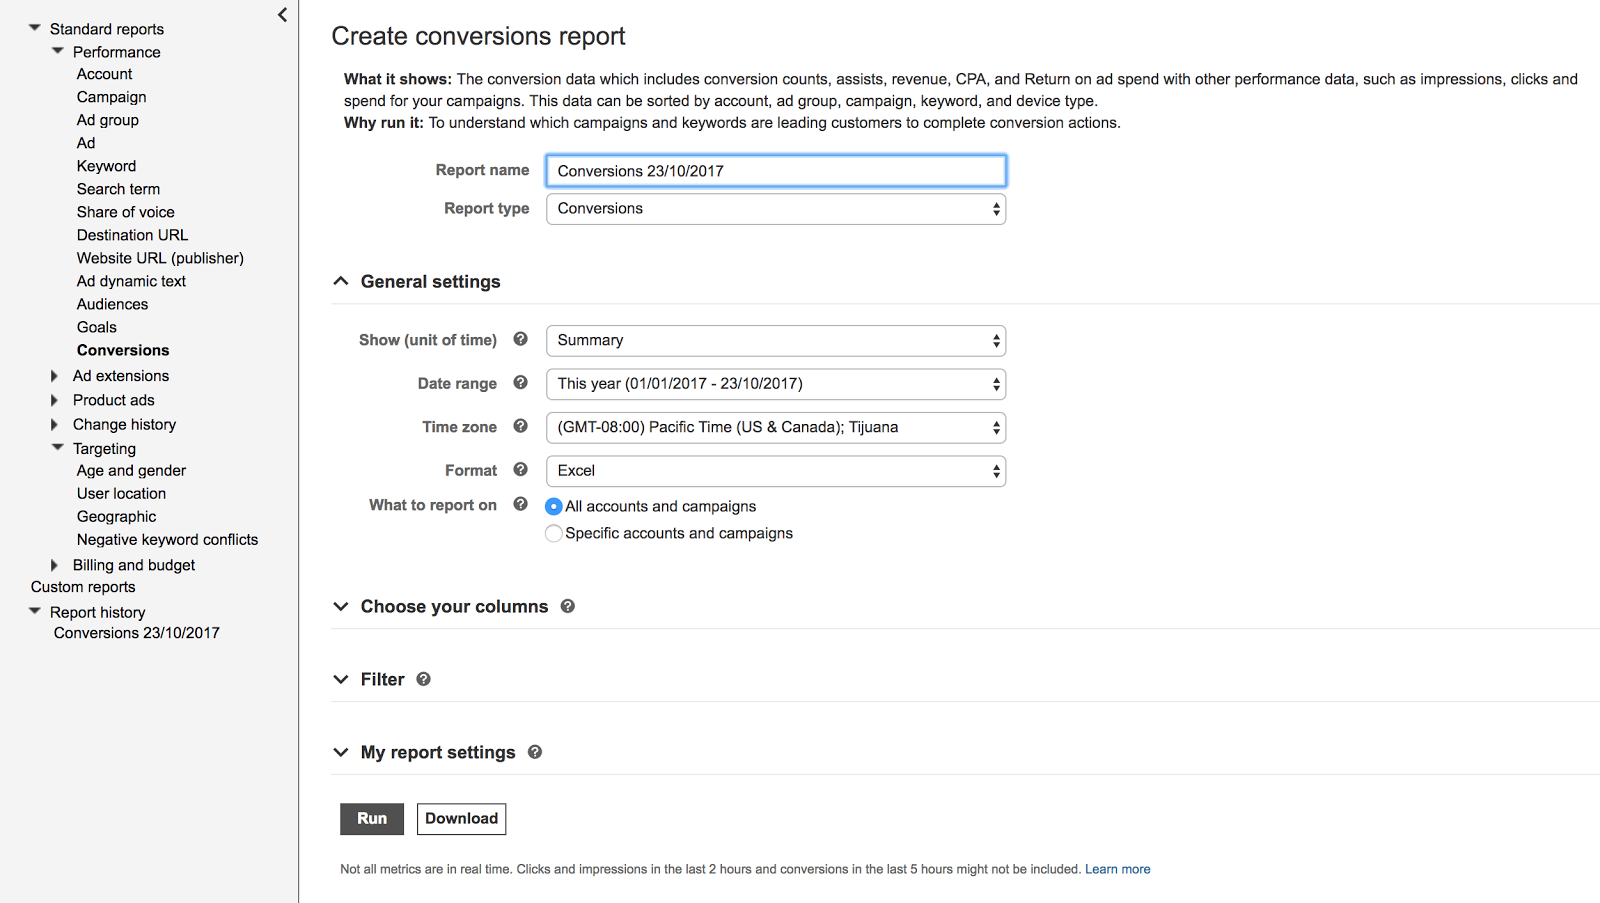
The third and most thorough way to track and report on your conversions is the Reports section of Bing Ads dashboard. It allows you to customize your conversion reports with advanced filters and settings, as well as to schedule reports to run on a regular basis.
Head over to the Reports tab at the top of your dashboard.
In the menu on the left, click Conversions; you’ll find it under Performance.
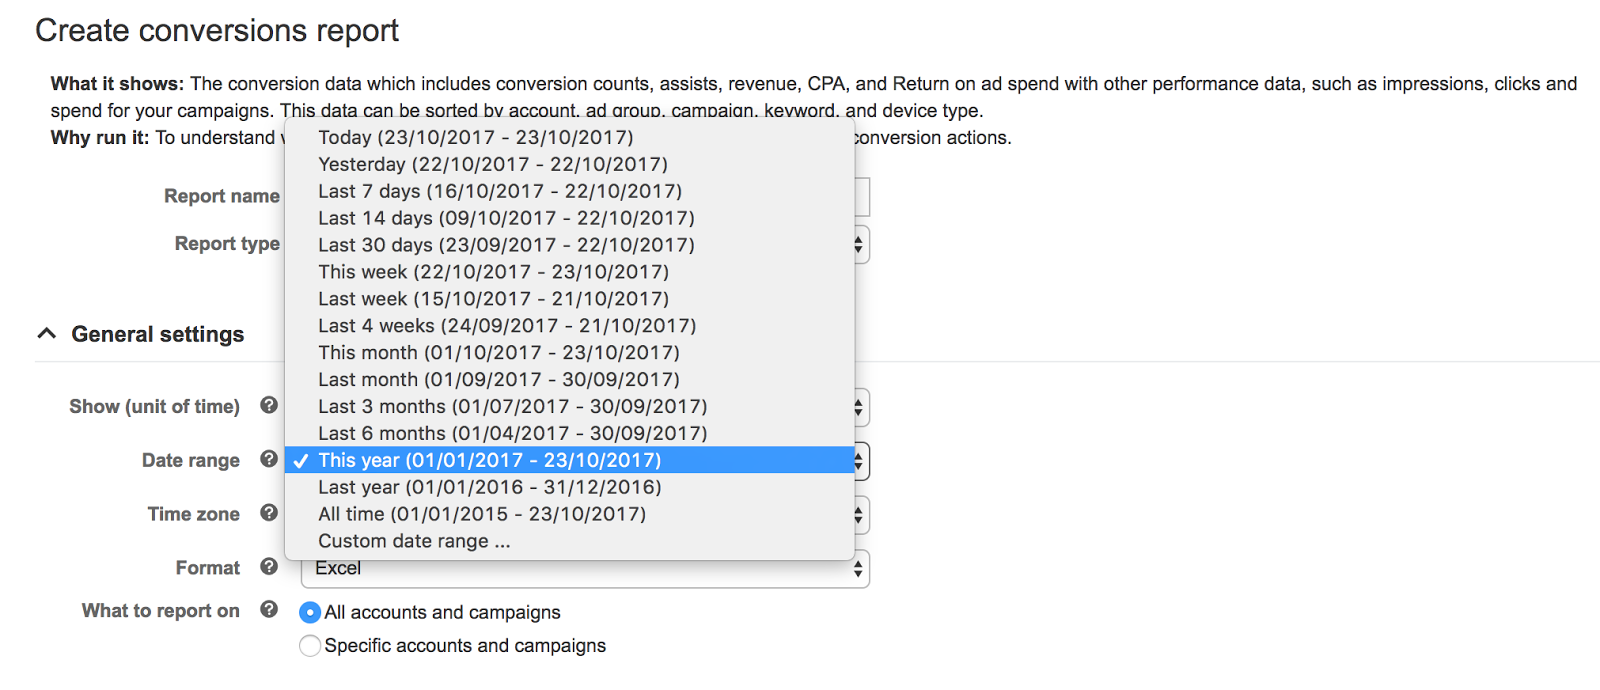
Available settings will allow you to configure the report with great detail. There are four sections available to you here.
General Settings
Select the unit of time, date range, time zone, file format and accounts/campaigns you want the report to include (you can select all accounts and campaigns, or limit the report to specific ones).
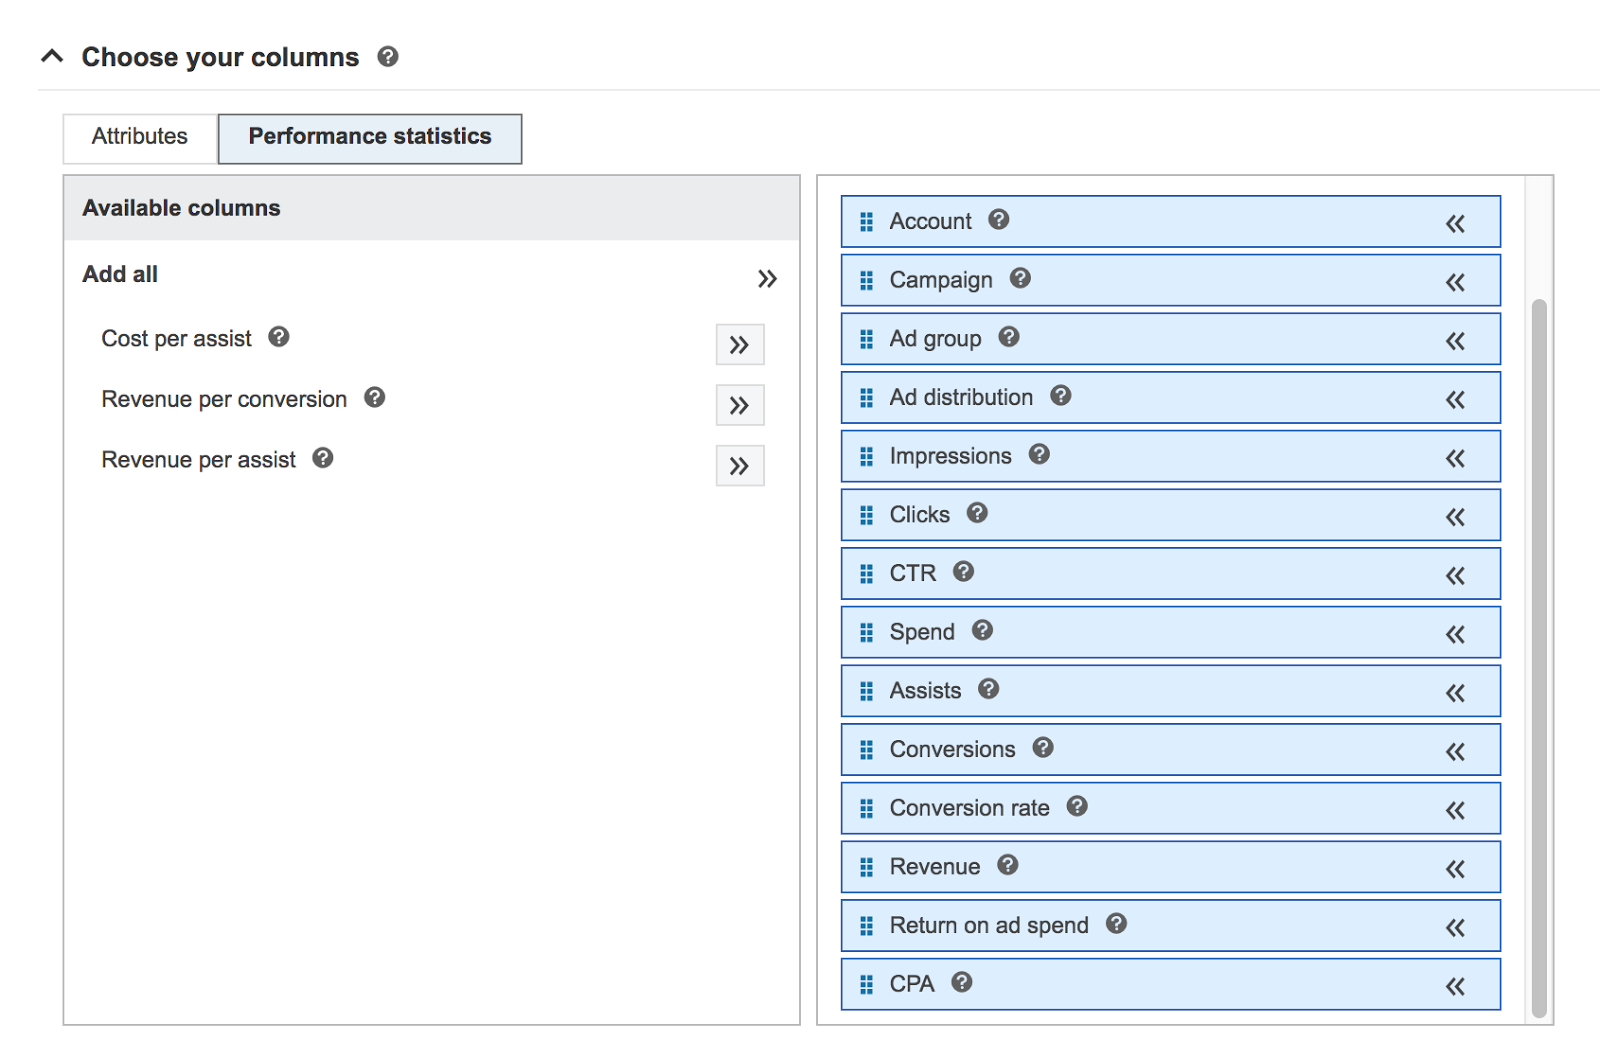
Choose Your Columns
Review the selected columns on the right and add others you need from the left side.
For conversion reporting, you may want to add Keyword and Cost per assist. If your goals have values assigned to them, you’ll want to add Revenue per conversion and Revenue per assist, too.
This will ensure you’re tracking and improving your spend and revenue based on different entities, like specific ad groups, campaigns, or keywords.
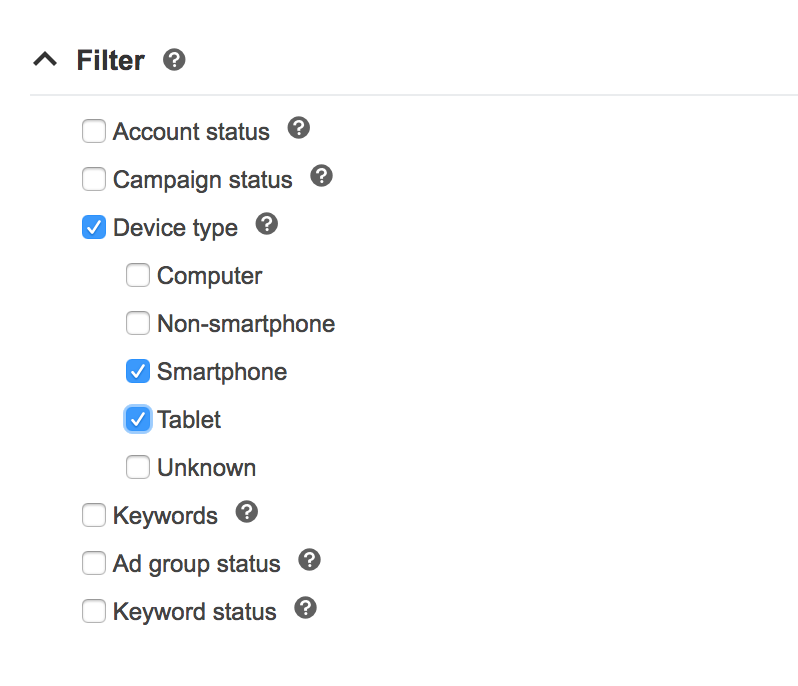
Filter
Here, you can filter your report based on account status, campaign status, device type, keywords, ad group status and keyword status.
Filters are helpful to ensure you’re not reporting on, for example, deleted ad groups or keywords, as well as to track device-specific performance.
My Report Settings
From here, you can save your report as a custom report, so you can run it again in the future or schedule the report to run on a regular basis. You can also add a total row at the bottom of your report to see the total of each performance metric column.
Once you’ve configured your conversions report, click “Run” to run the report, or “Download” in order to save it to your device after it’s run.
Conversions - Other
You can add conversion related metrics to other reports in the Reports section of your Bing Ads dashboard.
These metrics include Conversions, Conversion rate, CPA, Assists, Cost per assist, Revenue, Revenue per conversion, and Revenue per assist. You can add them to the following reports, all available from the menu on the left:
- Account
- Campaign
- Ad Groups
- Ads
- Keywords
- Search Terms
- Destination URL
- Website URL (publisher)
- Ad Extension by Keyword
- Ad Extension by Ad
- Geography
- Product Partition
- Product Unit Partition
- Product Dimension
This type of reporting is valuable when you want to report on your conversion on an even more specific level than in the previous method. It will help you focus on narrow segments of your audience and optimize your Bing Ads to them.
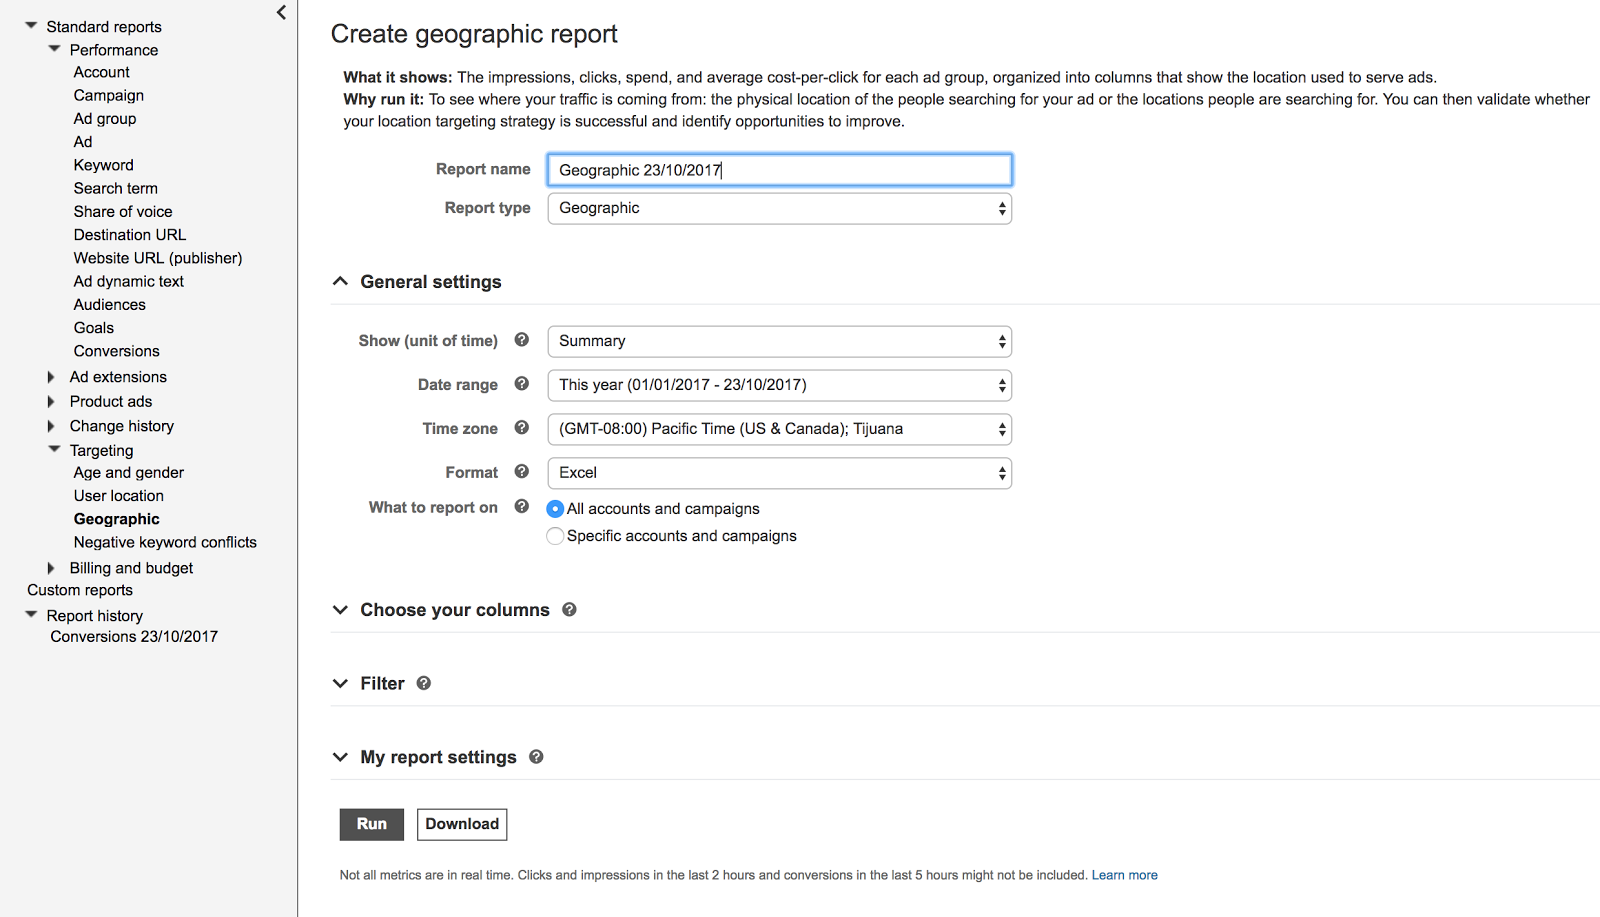
For example, you can report your conversions per ad group based on the location used to serve the ads.
To get this report, all you need to do is open the Targeting section in the menu on the left and click Geographic. Then, you can go through the four sections of settings and run your report, which will organize your data into location-based columns.
Ad Extensions Reports: Call Tracking Report
If you have set up call tracking for your Bing Ads campaign using Call Extension, you can track its performance from the Reports tab.
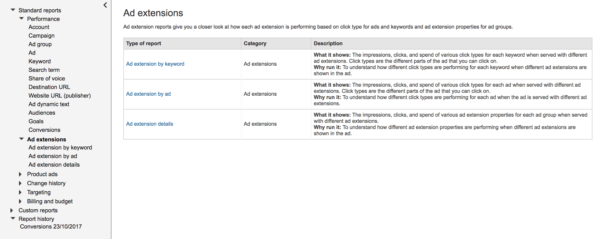
In the Reports tab, in the menu on the left, open Ad extensions under Standard reports.
Each of these reports provides the ad extension performance based on different keywords and ad versions as well as ad extension properties performance based on different ad extensions.
Running and downloading these reports works similarly to the ones previously mentioned. After adding your report name, unit of time, date range, format, and accounts or campaigns you want to report on, you can choose your columns:
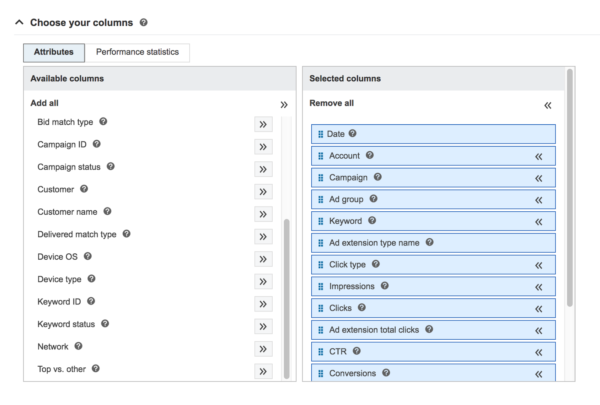
Once you decide on optional filters, you can run and download your report immediately or schedule it as a recurring report.
Bing Ads Conversion Tracking Wrap Up
I hope you’re ready to set up your conversion goals and track how your audience reacts to your PPC efforts on Bing.
It’s a low-risk and potentially high-return investment--and if your target people fall into Bing’s demographics, you may have just discovered a goldmine.
Start by setting up your UET tag tracking code, defining your conversion goals, and testing the waters with low initial investment.
If that turns out to be promising, test some more--you can never go wrong with that. Happy Binging.
