


Knowing how to use the Facebook Ads Manager is like a superpower.
And navigating this tool gives you the ability to reach more than 2.93 billion monthly active users worldwide. That’s more than a quarter of the earth's population potentially seeing your ads and reading your posts.
You could almost say that the Facebook Ads Manager can make or break new—and seasoned—marketers that want to be the heroes of their teams.
Of course, no hero is perfect. Even if you’re the superstar of your marketing team, you can’t know everything. What if your ideas get tangled up in the exhausting process of setting up Facebook ad campaigns? All those campaign levels, optimization options, and bidding methods…
Suffice to say, Facebook Ads Manager can be a tricky tool to master.
But don’t worry. It gets much easier if you take the time to discover all the options and possibilities of the Ads Manager.
We’ve put together this guide to give you a step-by-step overview of Facebook Ads Manager, from setting up your first campaign to optimizing for higher ROI.
By the time we're done, you’ll know exactly what to do the next time a team member asks for help with a Facebook campaign setup.
Ready to become a hero?
Get brand new Facebook ad strategies straight to your inbox every week. 23,739 people already are!
Why do you need Facebook Ads Manager?
Maybe you’re thinking, “What’s all this fuss about? Why do you need Facebook ads at all?”
For starters, Facebook is the leading social media platform used by marketers today. In fact, 93% of marketers use Facebook for their business.
And it can pay off. A German home décor search portal reduced its CPA by nearly 25% using Facebook custom audiences to drive high-quality traffic to its partner sites.
And that’s just one example.
We have over 100 clients that use Facebook ads, and we've shared our experiences through countless pieces of content (this being one of them).
So if you want to be among the 93% of marketers reaching their audiences via Facebook ads, there’s no way around the Facebook Ads Manager. It’s the central management hub for all your Facebook campaigns—it’s where your Facebook advertising will be built, launched, monitored, and edited.
If you’re not familiar with Ads Manager, here’s just a super quick overview of what you can do with it:
- set up Facebook ad campaigns
- create new ad sets and ads
- A/B test your Facebook ad campaigns
- manage Facebook ad bidding and budgets
- keep track of your campaign performance
- optimize your ad campaigns for higher ROI
- get more target audience insight
- create reports on your results
That’s a lot of sweet features for a single powerful tool.
You can get all those golden benefits quite easily. All you need to do is set up a Facebook Ads Manager account and learn to navigate it.
Sounds like a stellar deal to me. So let’s get into it.
Getting started with Ads Manager
To confirm, Facebook Ads Manager is a free tool by itself. You only pay when your ads show in your target audiences’ news feeds.
Sweet. With that out of the way, let’s review the three ways to get to your Facebook Ads Manager account:
1. Click this link to open your account (and bookmark the link for quick access).
2. Click the nine-dot menu icon on the left-hand sidebar of your Facebook feed. Then, scroll down to the “Professional” section and click “Ads Manager.”
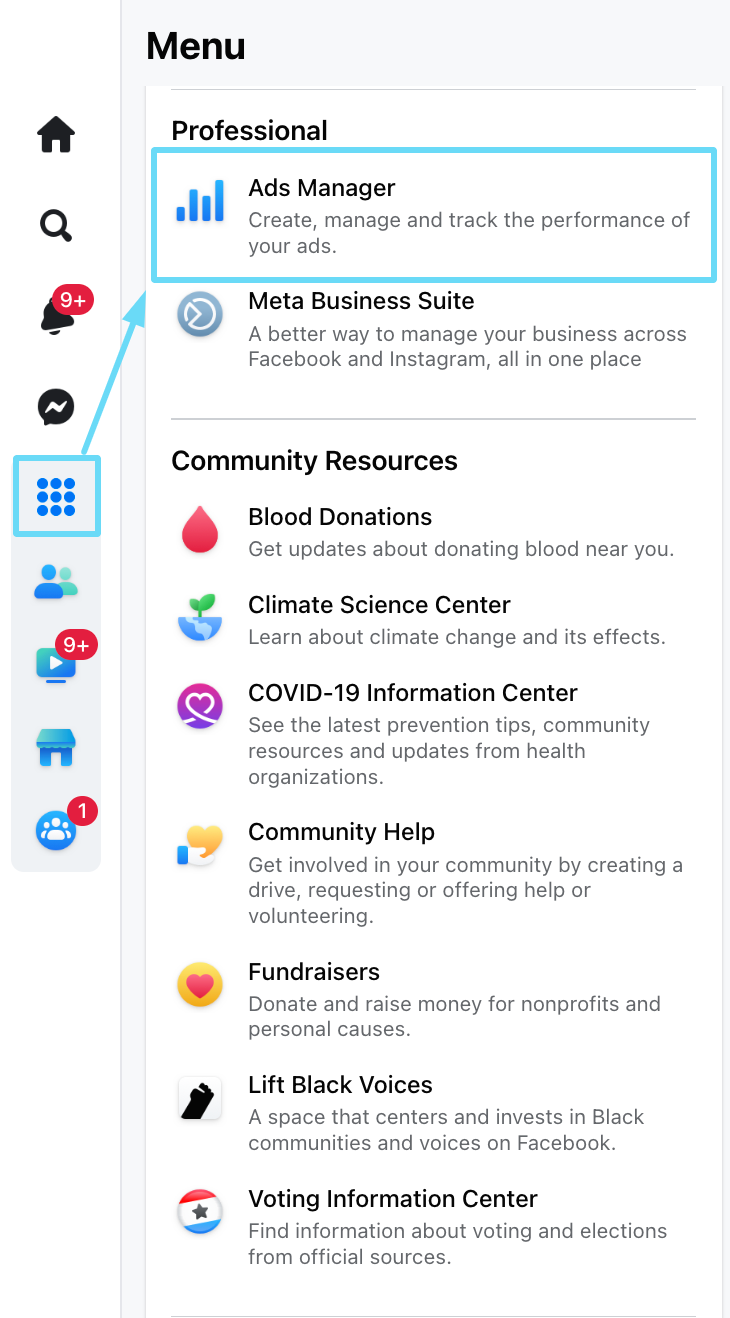
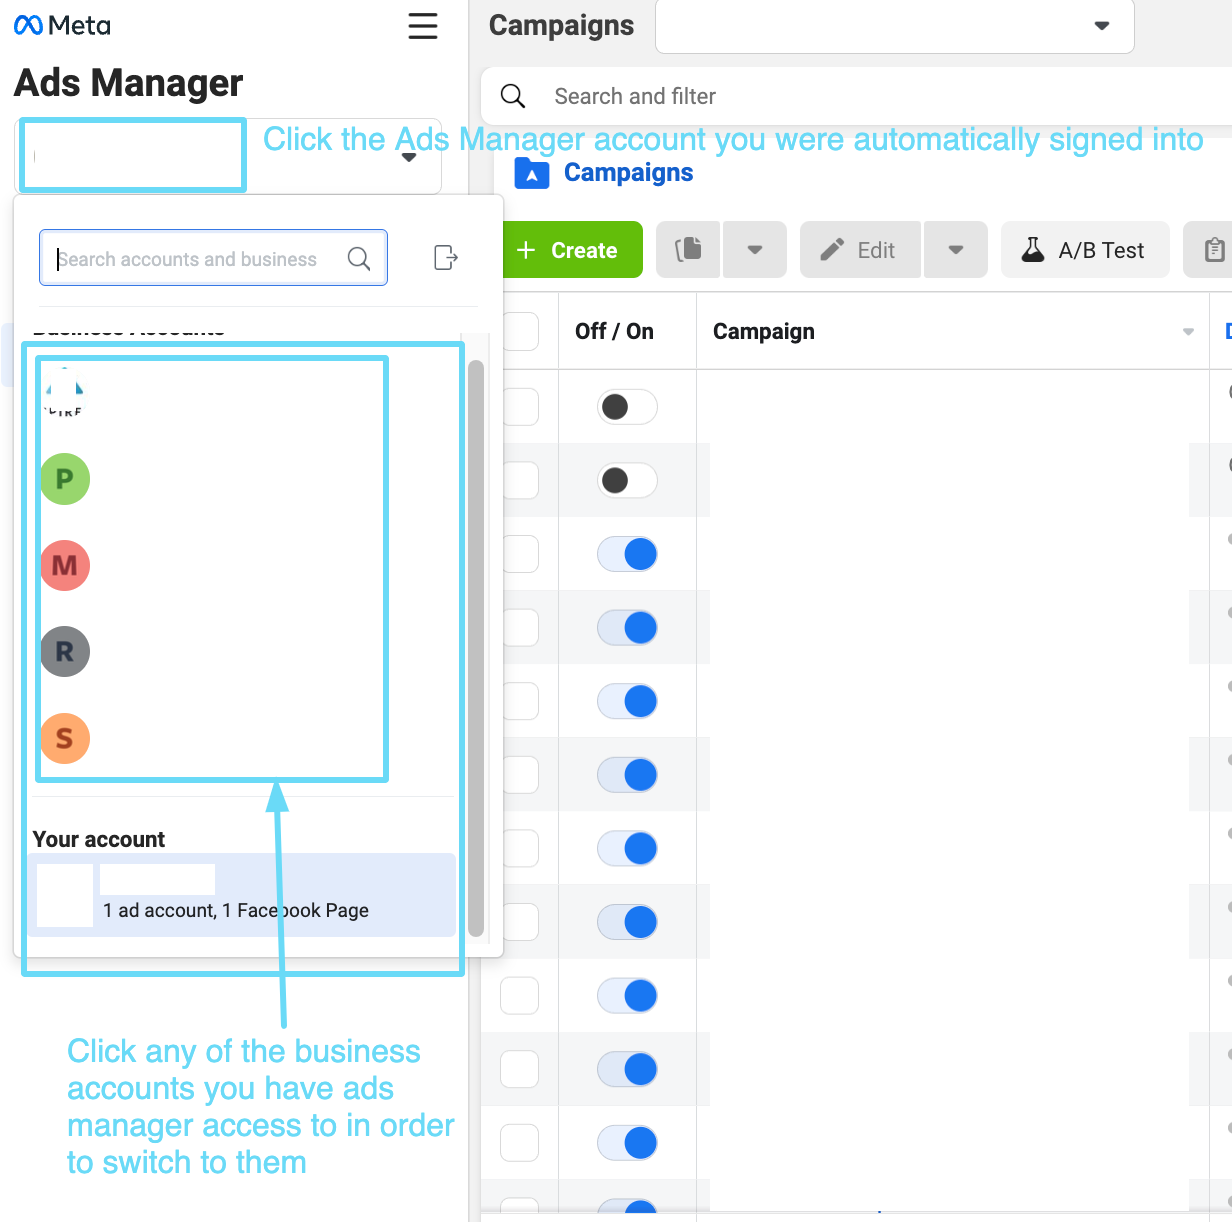
Note that this will open up the Ads Manager account for the profile you’re signed into (if that profile has an Ads Manager account). You can easily switch to the Ads Manager accounts for any other business profiles you have access to from there.
3. Use Facebook’s Ads Manager app for mobile to manage your ads on the go.
With a combination of these three options, you can access and review your Facebook ads anytime, anywhere.
Navigating Facebook Ads Manager
At first look, Ads Manager can seem slightly overwhelming. That’s why we created a little roadmap for you.
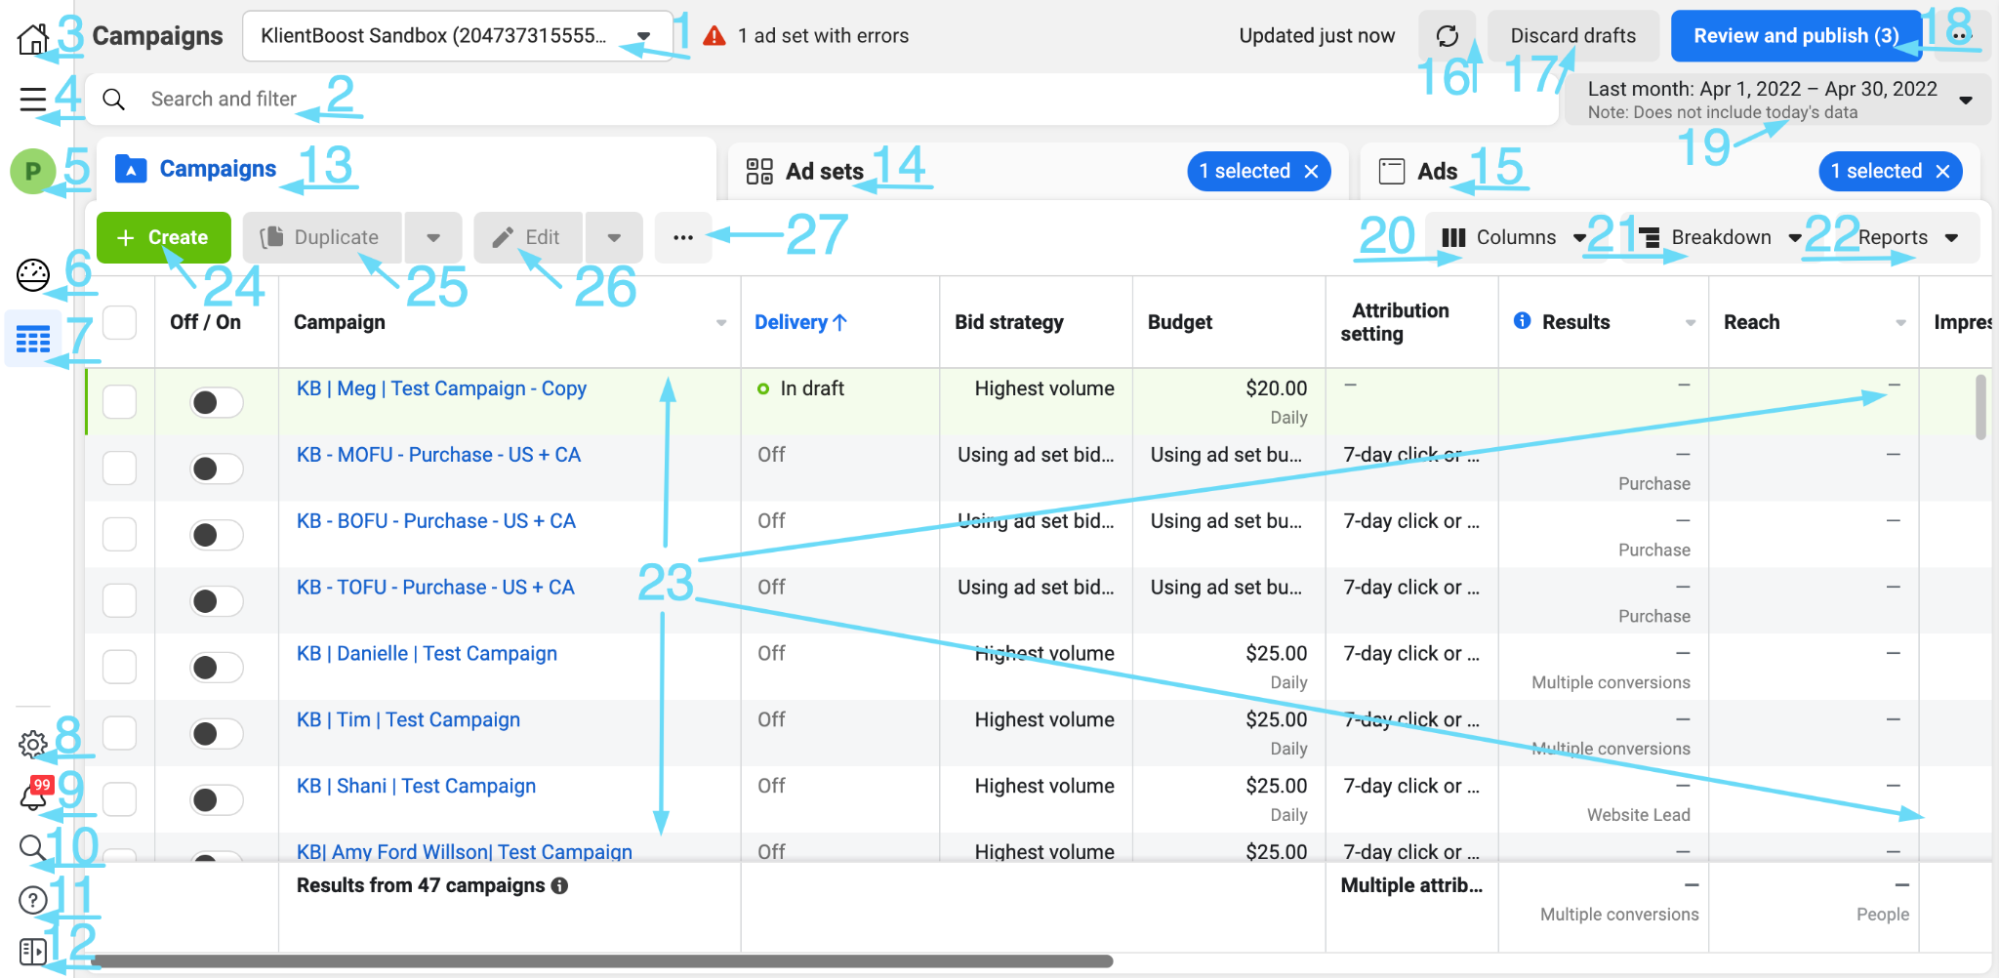
- Ads Manager business asset selection (select different business profiles you have Ads Manager access to)
- Search and filter bar for anything in your Ads Manager account (campaigns, ad sets, ads, etc.)
- Home button (will return you to your Business Suite homepage)
- All tools menu
- Ads Manager account selection
- Account overview
- Campaigns view
- Settings
- Alerts and notifications
- Search for pages, ad accounts, tools, or help
- Help
- Expand the left navigation panel
- Campaigns tab (where you view all campaigns)
- Ad sets tab (where you view your ad sets)
- Ads tab (where you view your ads)
- Refresh Ads Manager (if there is an issue with it)
- Discard drafts button (any unpublished drafts will be discarded)
- Review and publish button (review any drafts and publish them live)
- Date range selector (deciding what date range you want to view metrics for)
- Columns button (adjust the metrics columns you see)
- Breakdowns button (select more granular data segments to view per campaign, ad set, or ad)
- Reporting tool (create and share reports on data)
- Metrics overview for campaigns, ad sets, or ads
- Create new button (for making new campaigns, ad sets, or ads)
- Duplicate button (for making duplicates of selected campaigns, ad sets, or ads)
- Edit button (for making edits to selected campaigns, ad sets, or ads)
- Additional actions (like A/B testing, automated rules, import, or export)
Additionally, if you select a campaign, ad set, or ad, your options in the toolbar will expand like so:
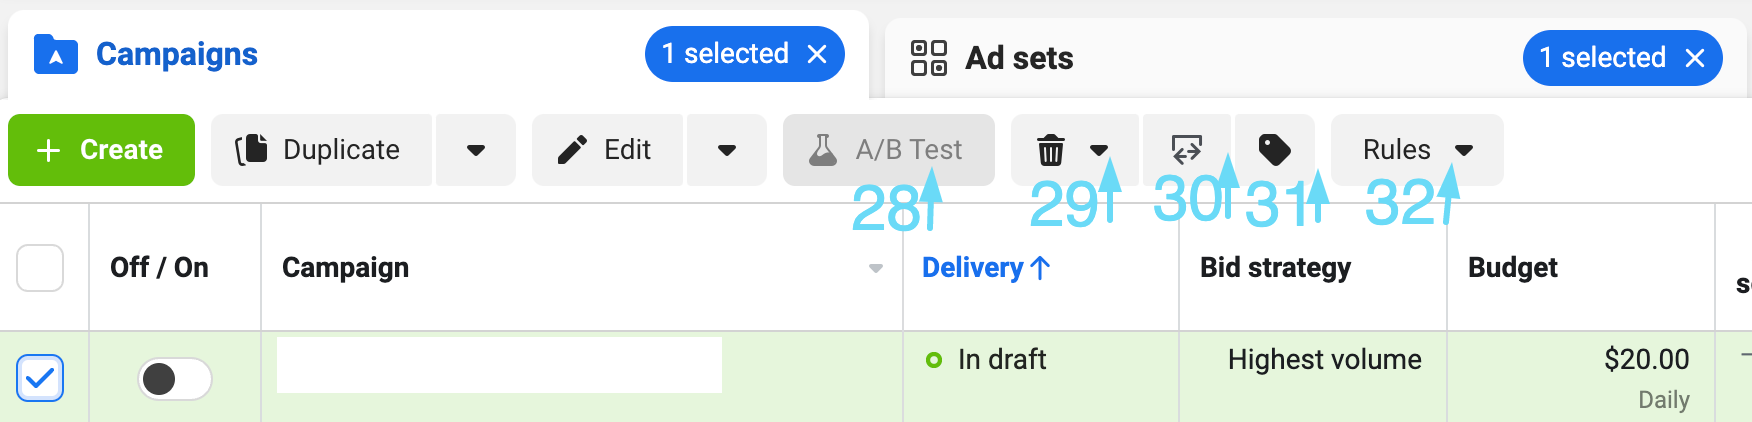
- A/B testing button, which you can use here when two campaigns, ad sets, or ads are selected
- Trash (for deleting anything; this is a permanent action)
- Import/export
- Campaign tags (labeling your campaigns for easier finding and reporting)
- Automated rules
Last but not least, the campaign tags button in the toolbar changes to a “Save audience” button at the ad set and ad levels. And exclusively at the ad set level, an ad preview button will also appear when an ad is selected.
It’s a lot to get familiar with, but not to worry—once you start using the interface day by day, it’ll become second nature.
Now, let’s get into the meat of things: how you’re going to set up your first Ads Manager campaign.
The golden rule: everything is a draft until you publish
Hold on. Before we get into how to use Ads Manager to create your campaigns, it’s imperative to understand one simple rule.
Everything you change or create as far as campaigns, ad sets, or ads is a draft until you purposely click “Review and Publish.” (Except if you’re quick-editing naming conventions and budgets from the overview.)
So, from the moment you click the “+ Create” button to make your first campaign, that entire campaign and all the work you’ve done within it is in a draft state, meaning it’s not live and won’t run ads or spend money.
For a lot of newer advertisers, this can be a huge relief.
You can mess with your settings, learn the lay of the land, and none of that will be live until you’re ready to click the “Review and publish” button. It gives us a lot of immunity to build and learn.
But for just as many advertisers, it can be confusing and lead to some mishaps. So just remember the following points to stay on the right track:
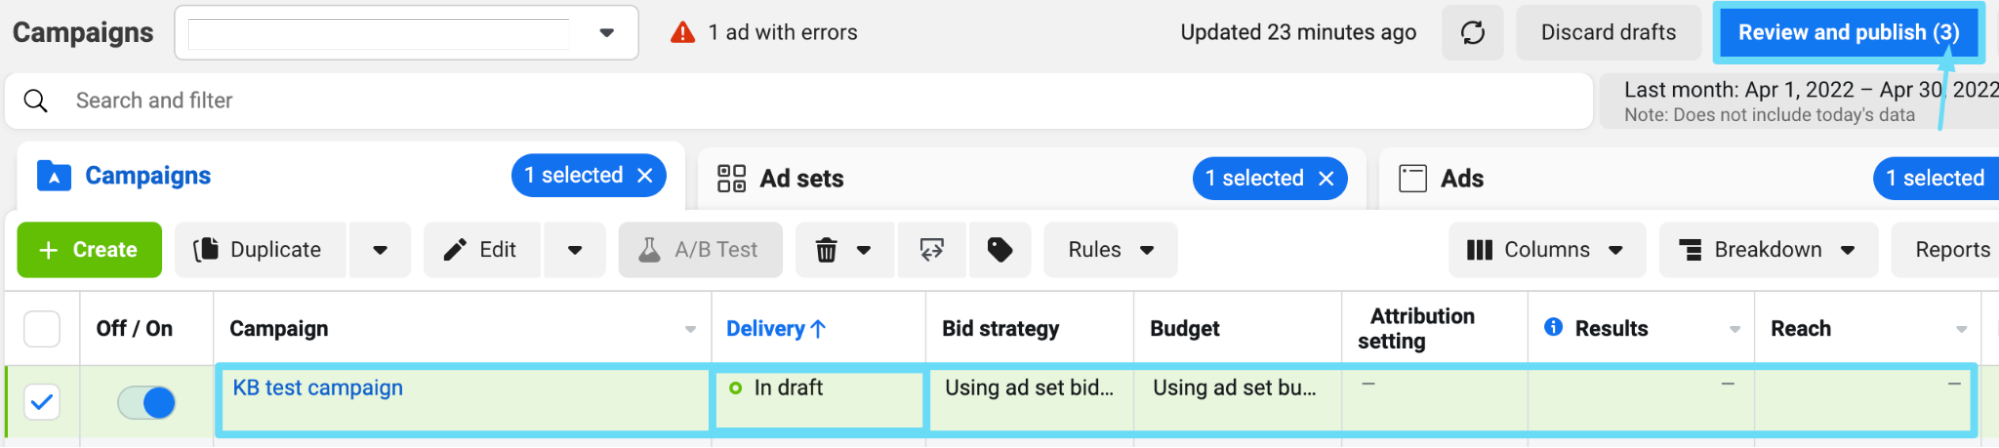
- If your campaign, ad set, or ad is shaded light-green, that means you’ve made changes to it that are still in a draft state. You can also see how many draft changes are unpublished next to the “Review and publish” button.
- If you have access to manage an account using your personal Facebook login, other users with account access can’t see drafts you’ve made under your login.
- If you’re making edits to a campaign, ad set, or ad that’s currently live, only the new edits are in draft, not the entire campaign/ad set/ad. The campaign/ad set/ad will continue to run as it was before until you publish your new changes (i.e., nothing stops running just because you’ve started making draft edits).
- Before leaving Ads Manager, make sure that you’ve published everything you wanted to be live.
There you go. The secret of Ads Manager has been revealed. Hopefully, you’ll now feel more confident moving around in the platform. 😉
Using Facebook Ads Manager for campaign setup
Learning to create and handle Facebook ad campaigns is similar to learning to dance—you may take a wrong step somewhere as you make your first moves.
But after you’ve set up a couple of successful ad campaigns and worked through this guide, you’re all set to rock the Facebook advertising landscape and beat the competition.
The Facebook campaign creation process starts once you hit the green “+ Create” button in the “Campaigns” tab.

Next, there will be a popup for campaign creation settings, and that’s where the fun begins. All you have to do now is select the options you prefer at the campaign and ad set level and enter your very best Facebook ad copy.
Don’t worry; we’re not gonna leave you hanging with only that. Let’s dive into the step-by-step of what you’ll need to do once you’ve clicked “+ Create.”
1. Choose your buying type and campaign objective
As mentioned, when you click “+ Create,” you’ll be presented with a popup asking you to select your very first campaign settings. It looks like this:
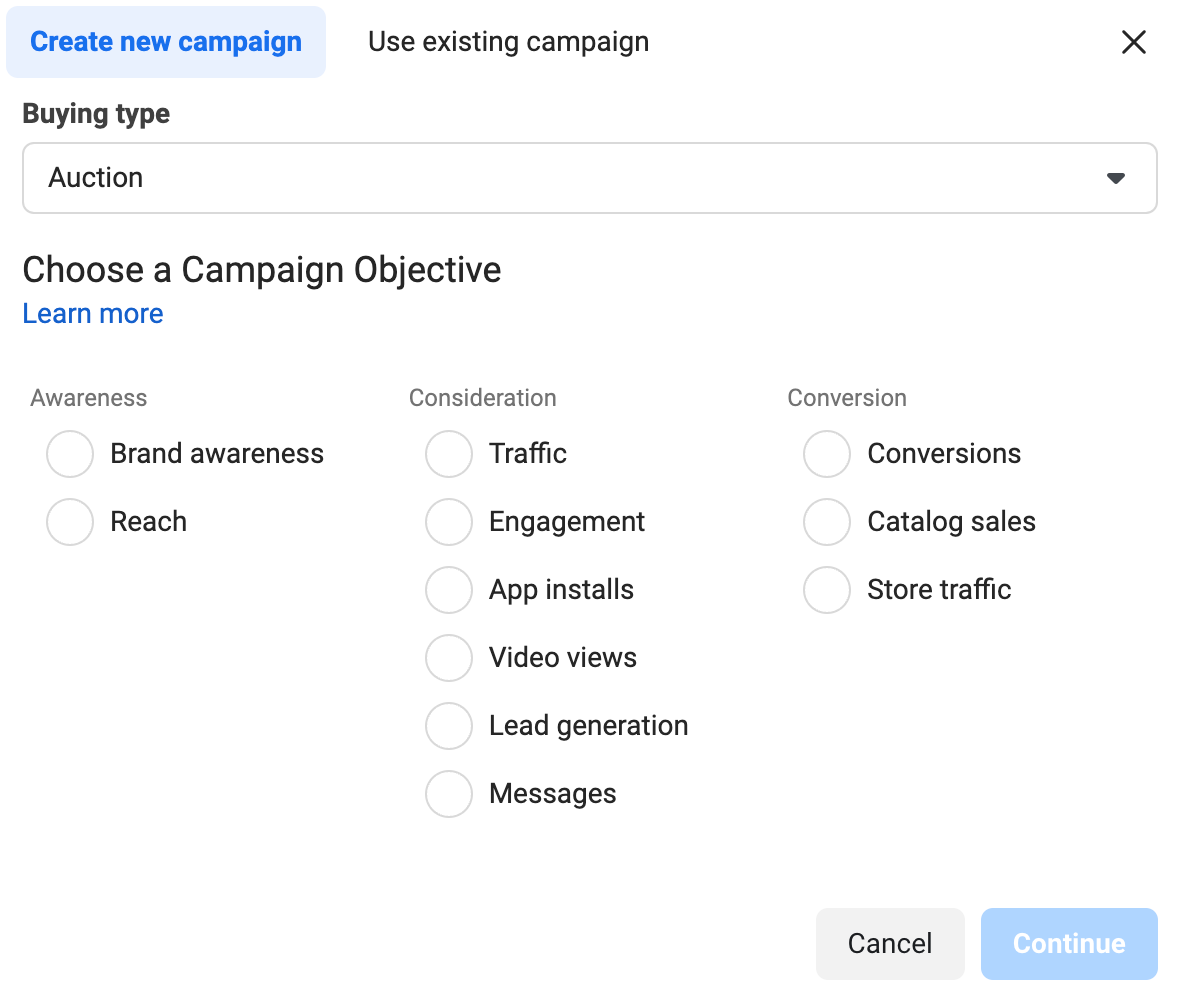
You can create a new campaign or use an existing one. But since we’re starting from scratch here, we’ll stay with “Create new campaign.”
Your buying type is how you’ll buy your ads, whether that’s the “Auction” model or the “Reach and Frequency” model.
You’ll most likely select the “Auction” model, which most advertisers use. This just means the bids you pay will vary by the auction. The “Reach and Frequency” option is a pre-buy model only available to some advertisers.
Now, your campaign objective is a fancy name for the ultimate goal of your Facebook Ads campaign. Do you want more reach? More leads? More messages?
This step is arguably one of the most decisive elements of your campaign's success. The Facebook campaign objective also determines the optimization and bidding options you’ll have later.
So, you should make sure it reflects on your final goals (i.e., conversions) instead of vanity metrics such as ad clicks or impressions. As such, we’ll typically select the “Conversions” or “Lead generation” objectives.
If you’re interested in all the bidding and delivery optimization possibilities that come with each campaign objective, see our guide to ad bidding and optimization.
2. Name your ad campaign, ad set, and ad
This one is easy: type in the name of your ad campaign.
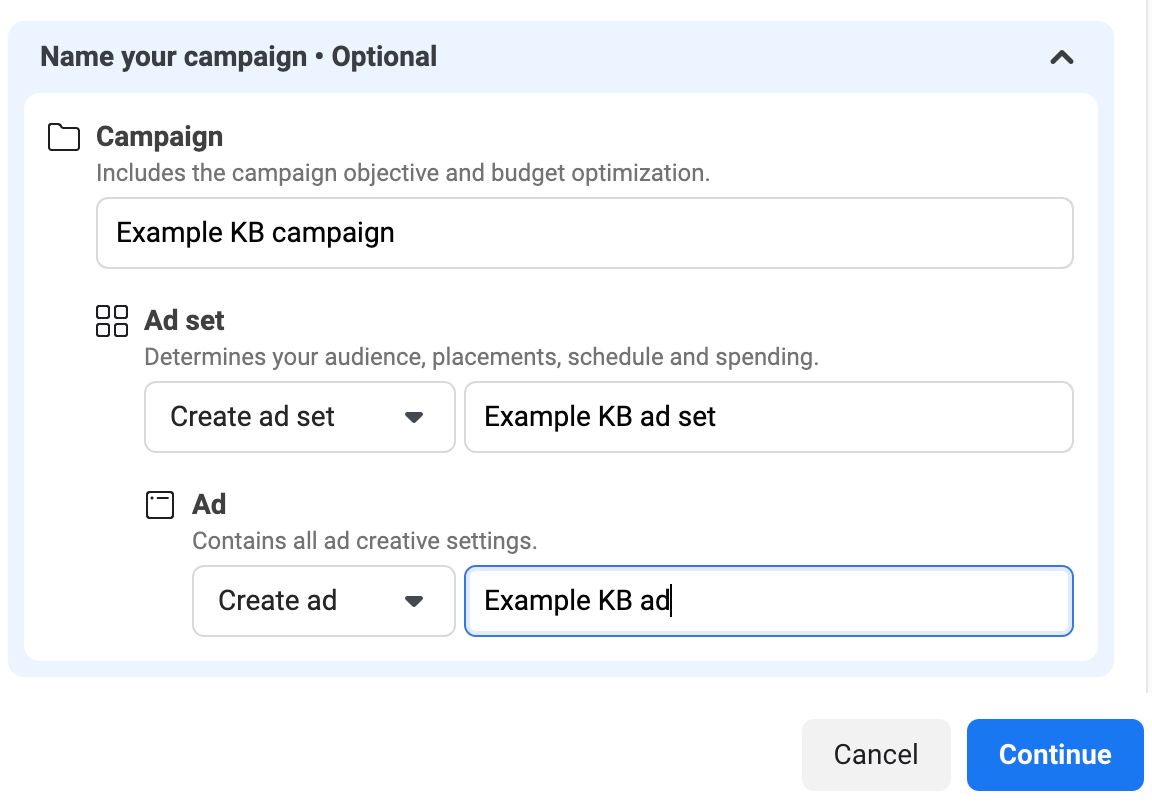
After you select your campaign objective, if you scroll to the bottom of the popup window, you’ll see a dropdown option to name your campaign.
Interestingly, here, you can also decide to create an ad set and an ad (and name those as well).
This just helps speed up your process—every campaign must have at least one ad set, and every ad set must have at least one ad. So, you may as well go ahead and create your first ones now.
If, for whatever reason, you don’t want to name anything now, don’t worry. You can always edit names at any time.
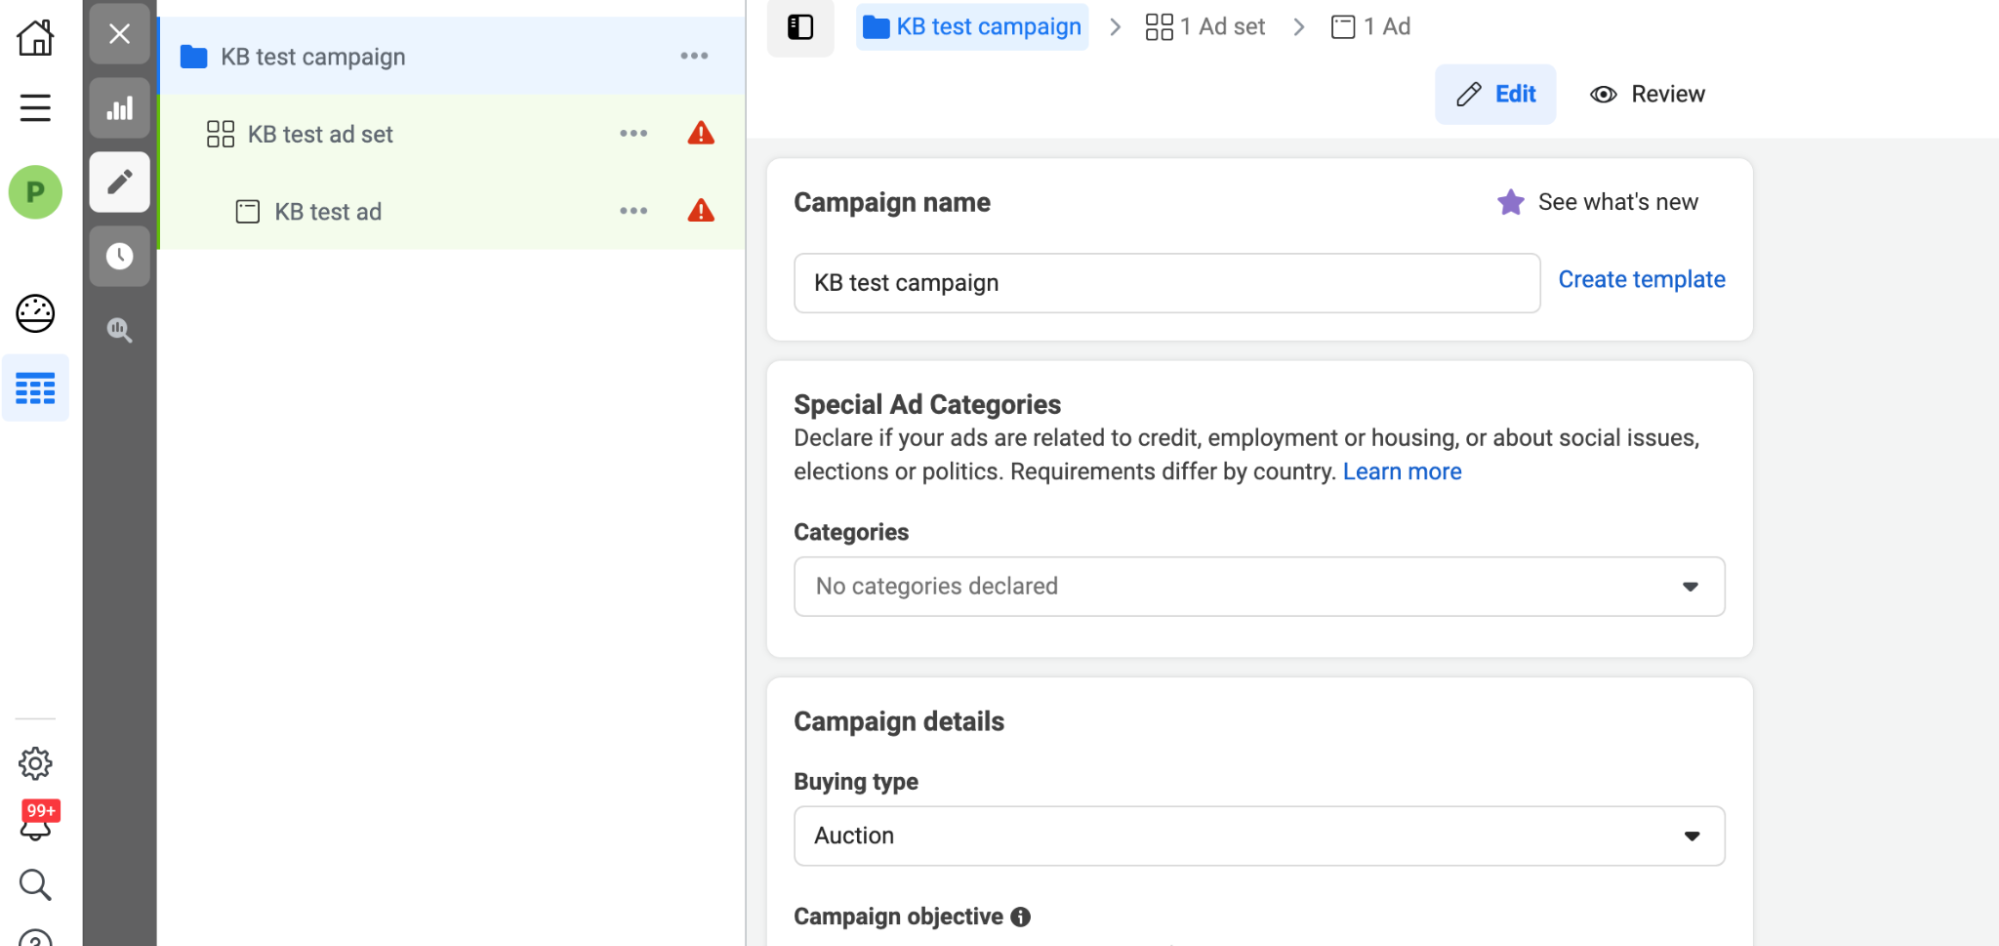
3. Finish up your campaign settings
After you’ve given your campaign a name, the real fun begins.
You’ll land in Ads Manager’s editing screen. Here, you’ll see the campaign, ad set, and ad you just created and named.
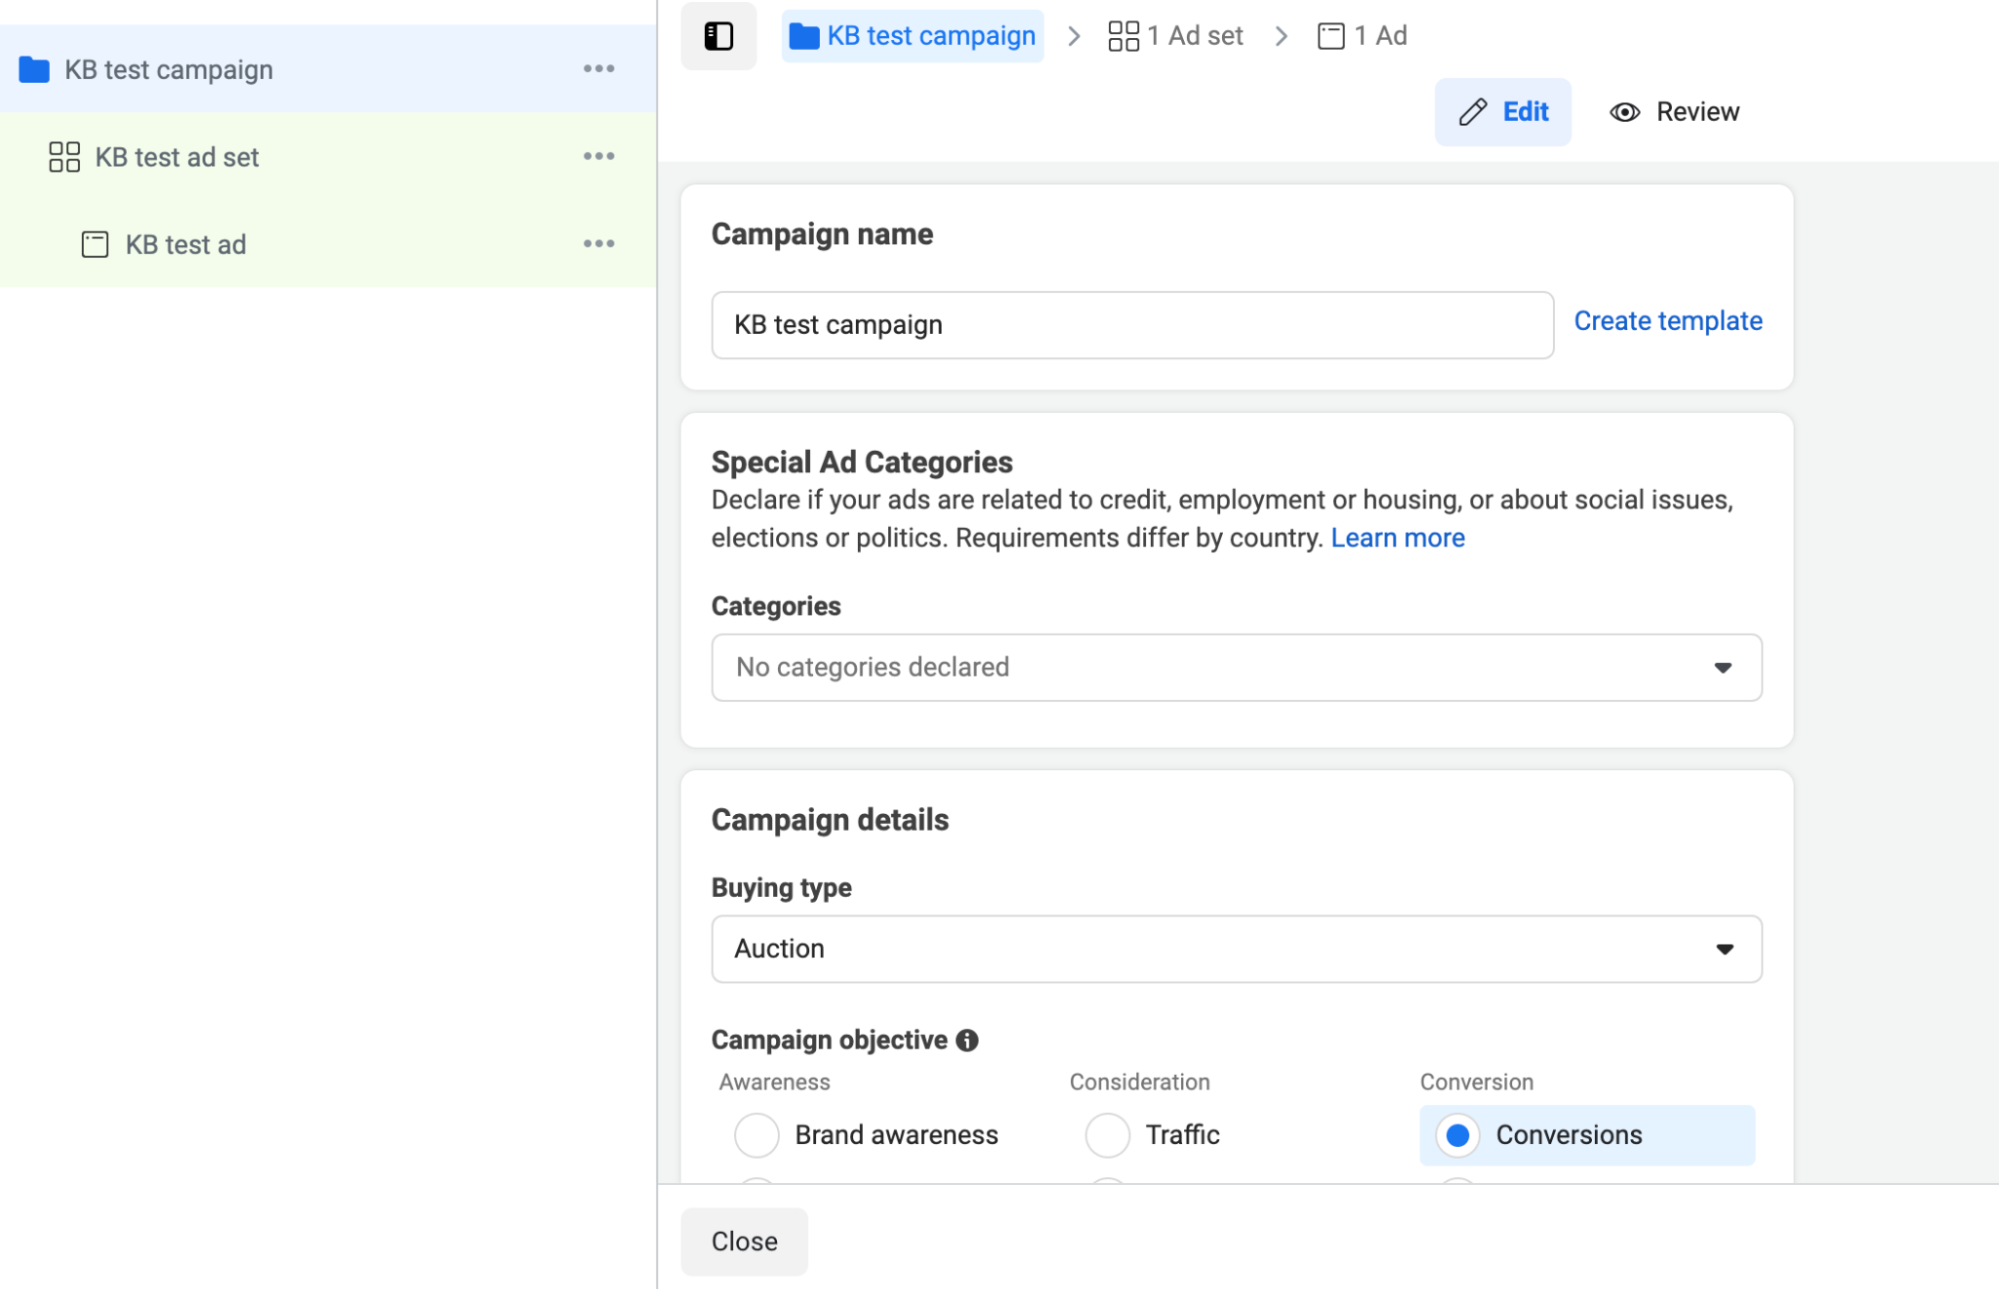
You’ve already set up your buying type, campaign objective, and campaign name, so all you’ll need to do is complete the rest of your campaign’s settings. This includes:
Declaring any Special Ad Categories
Identify any special ad categories your business falls under that might incur certain restrictions on ad targeting.
These are credit, employment, housing, social issues, elections, or politics.
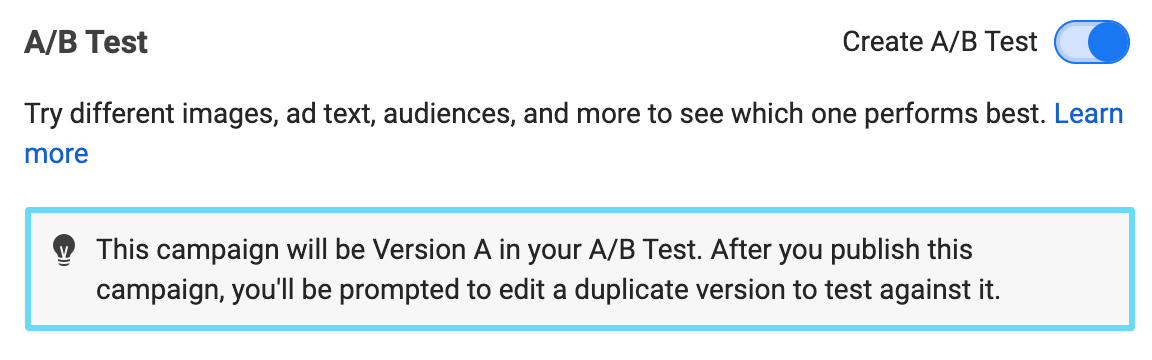
Creating an A/B test (optional)
Decide if you’d like to make another campaign after this one to A/B test against. If so, Ads Manager will direct you to create a duplicate of the current campaign after the current campaign is published (this is to make the changes you’re going to split test to version B).
Typically, for first-time campaign creation, this feature isn’t needed. And you can always make an A/B test at any other time in your campaign overview, so you don’t need to feel pressured to do it right now.
Deciding if you’ll be using Campaign Budget Optimization (CBO)
CBO means you’ll set budgets at the campaign level and let Facebook Ads distribute that budget appropriately among better-performing ad sets. We highly recommend this.
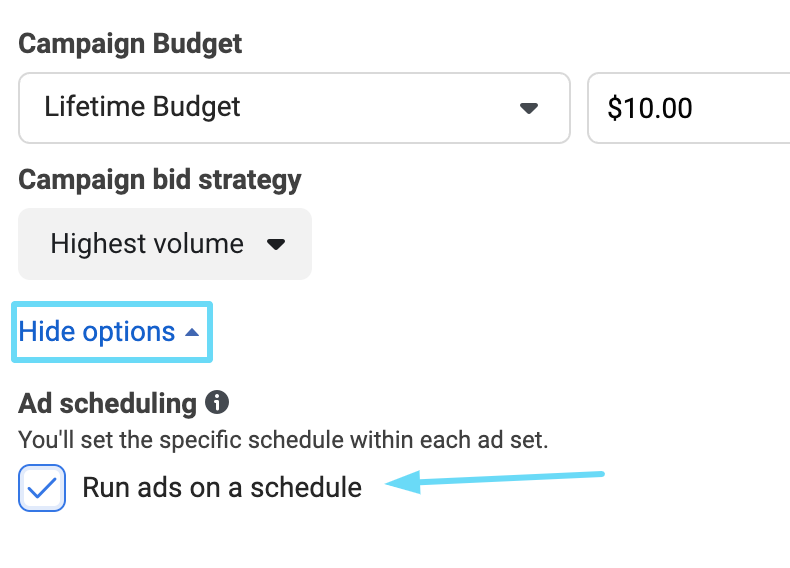
If you do turn on CBO, then you’ll need to set the campaign’s budget to one of these:
- Daily: You’ll set a monetary daily budget amount for your campaign, and Facebook will spend exactly that each day.
- Lifetime: You’ll set the total amount you want your campaign to spend for the duration it runs. (And you’ll need to set an end date on your ad sets, so Facebook knows when to spend the amount by.)
And you’ll need to choose your bidding strategy. Your current options are:
- Highest volume: Drive the most results (conversions) you can in your budget.
- Cost per result goal: Facebook will aim to meet a cost per result goal you set.
- ROAS goal: Facebook will aim to meet a ROAS (return on ad spend) goal you set.
- Bid cap: Manually set the max you’re willing to bid in any auction, and Facebook will aim to stay at or below that.
Establishing an ad schedule (if needed)
If you only want your ads to run at specific times within the day or days of the week, you’ll need to daypart by expanding the “Show more options” dropdown at the bottom of your campaign settings.
Note that you’ll only be able to create an ad schedule if you’re using lifetime budgets. And when you check the “Run ads on a schedule” box, you’ll set the actual ad schedule on the ad set level.
With your campaign settings now finished, it’s time to move on to your ad set.
4. Build out your first ad set
Your ad set consists of many settings that will ultimately determine who your ads show to. Possibly the most critical part of your ad set’s build is determining your target audience for the ad set.
I could go on for hours talking about the importance of targeting the right audiences, but I’ll restrict myself to telling you this: make sure your audiences match with your offer.
You wouldn’t want to advertise the same offer to every single person in your sales funnel. Those people have all different problems and expectations for your product, and they’re all at different points in your digital marketing funnel.
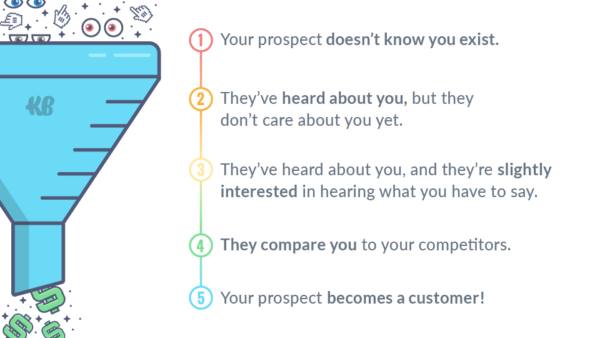
Make it a priority to define your buyer personas before you build out your audiences to hone in on the right target market and craft ad messages that fit them. By doing so, you’ll avoid one of the gravest Facebook ad mistakes that break otherwise brilliant campaigns.
And don’t forget to exclude Facebook custom audiences of past converters or people who have already visited your landing pages for particular offers.
That being said, let’s go through setting up your ad set in Ads Manager step by step. (And since we already named our ad set earlier, we’ll skip that one.)
Shore up your conversion settings
Your conversion settings ultimately determine which conversion event your ad set will be trying to drive and where that conversion will occur. This is all so you can track your conversions back to their source and optimize for the event that matters most.
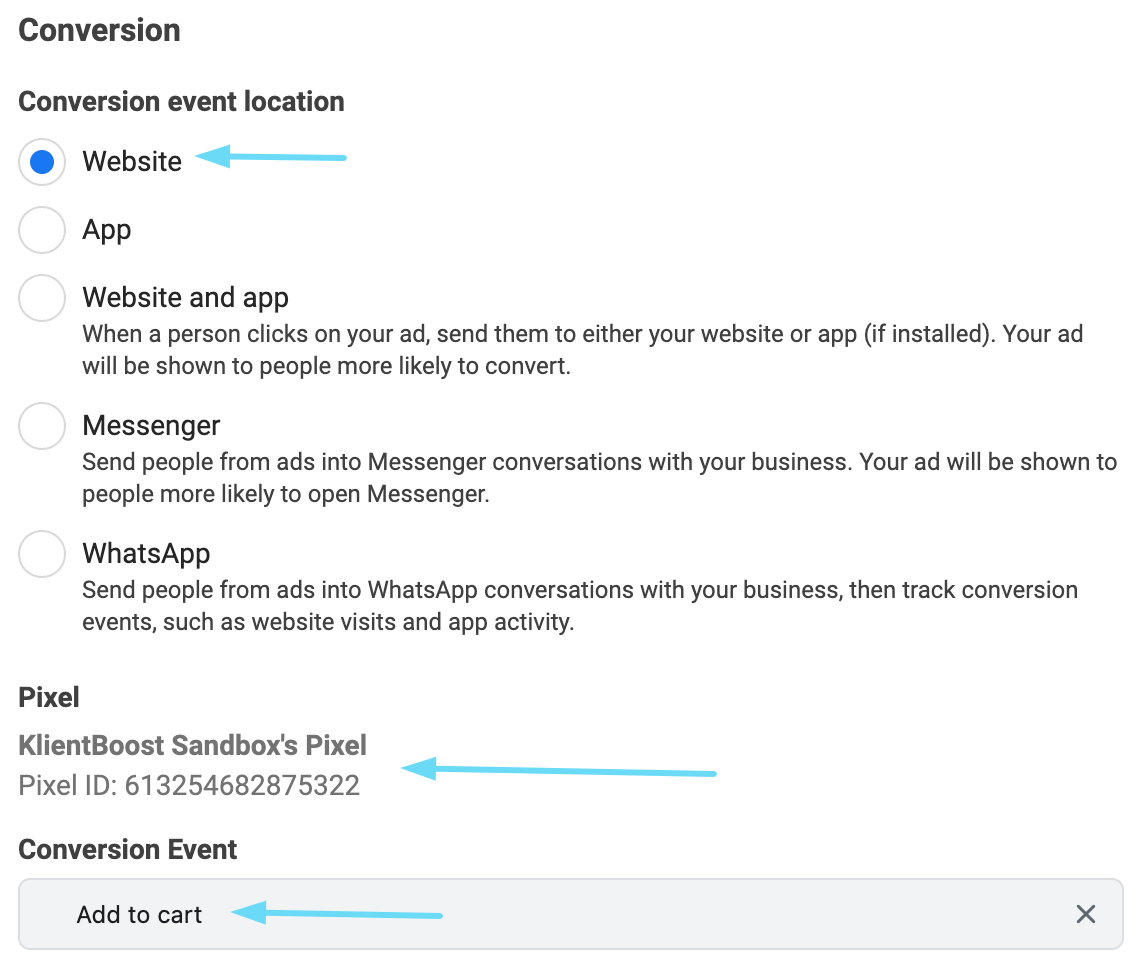
Here’s what you’ll be setting:
- Conversion event location: Where do customers complete your conversion? On your website? Or are you after app installs? In Messenger? (Most commonly, we see “website” conversions.)
- Pixel: Which Facebook pixel will your ad set use to collect conversion data? (If you only have one pixel, it should be automatically selected and unchangeable.)
- Conversion event: Which conversion event should your ad set optimize for? (You need to have your conversion events set up before this to select them.)
When you’re in this section, you might also see a yellow warning like this:

This warning just means that the conversion event you’ve selected hasn’t been prioritized in Aggregated Event Measurement yet, so you’ll need to do that if you want your ads to be shown to iOS14-opted-out users.
Decide if you want to make dynamic creative ads
This little section is like the A/B test setting from your campaign—when you select it, nothing more happens to the ad set. (You’ll see the effects of this setting when you start making your ad.)
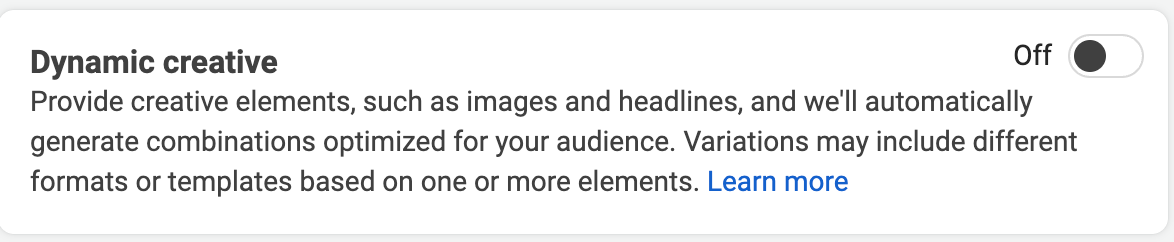
Dynamic ads allow you to insert a swathe of images of different sizes and with different content. Plus, you’ll get to enter a handful of ad text options for Facebook to choose from. Then, Facebook will dynamically combine all these elements to show as an ad.
Typically, dynamic ads work very well and are worth trying out.
But occasionally, Facebook will mess up and make some wonky combination decisions (like using three of the same ads with different color backgrounds all in one carousel ad).
By the way, even if you don’t turn this setting on, you can still make some “pseudo-dynamic ads.”
What I mean is, regular ads still allow you to make multiple headlines, primary text, and description options for Facebook to cycle through and from which to make various combinations.
The only difference is that you can only choose a single image (with various sizes for different ad placements). So when you make ads this way, Facebook can’t mess up your image combinations.
For our example, we’ll decide to leave the dynamic ad setting off.
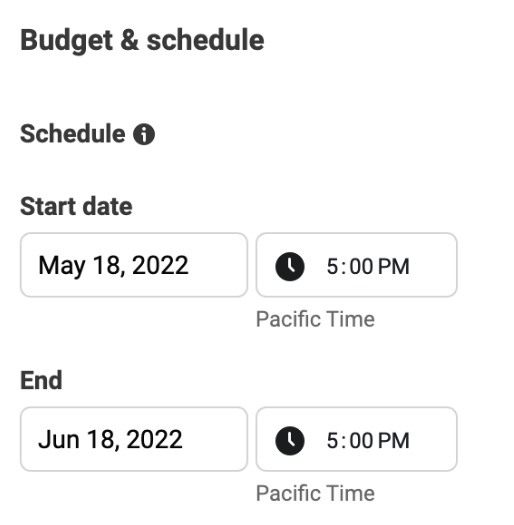
Define your budget, end dates, and ad schedule
If you’ve decided to turn on CBO, you’re probably in this section thinking, “What budget?”
This settings section will only require you to input an ad budget for the ad set if you haven’t selected CBO. Otherwise, it’s simply scheduling settings.
You’ll be able to set your ad set’s start and end dates (and times) here. Remember, setting an end date is essential if you’ve chosen lifetime budgets; this is so Facebook knows when it needs to spend that budget by.
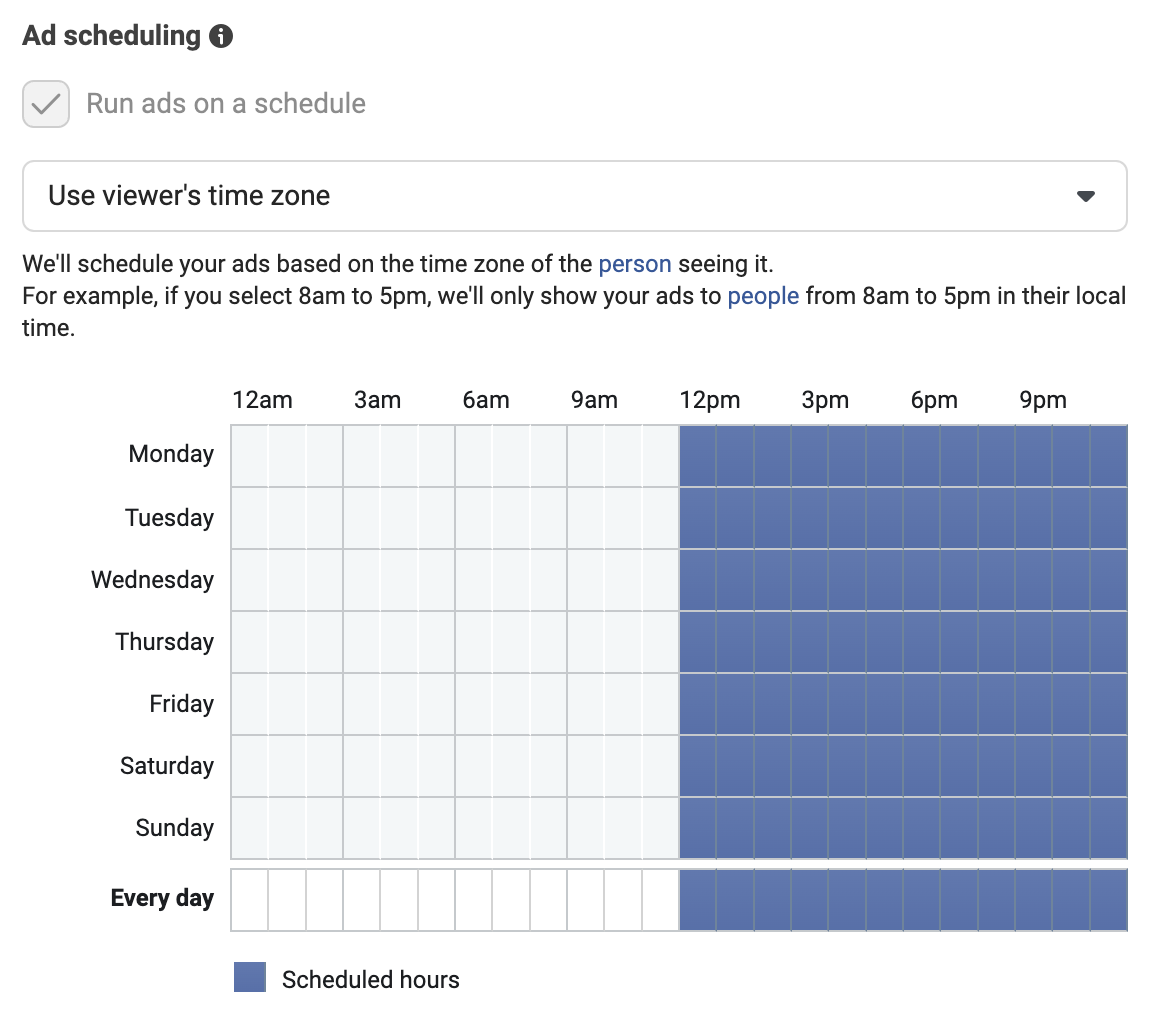
If you’ve selected the option to turn on ad scheduling at the campaign level, you’ll also see your ad schedule settings here.
You’ll need to decide whether it makes more sense to show your ads on this schedule based on the viewer’s time zone or your ad account’s time zone.
Most times, it’s better to show ads based on the viewer’s time zone. (Meaning, if you’ve set your ads to show 12 pm–1 pm, they’ll show from 12 pm–11 pm in the viewer’s local time zone.
To set your ad schedule, all you need to do is click the boxes in the schedule. Each box equals one hour, and they’ll turn blue once selected. For example, if you only clicked the top left-most box, you’d only show ads on Mondays from 12 am to 1 am.
Build your audience
Ah, now for the crown jewel of your ad groups setup—your audiences.
Your audience settings will be the driving force that determines who your ads show to. As we mentioned earlier, it’s super important to know your buyer personas and understand your target market.
There are quite a few options under the audience targeting section, so we’ll break them down to make things easier.
However, there’s one essential thing you need to know before you start: break out your ad targeting by funnel, and break those funnels up at the campaign level.
Your custom audiences are likely either at the middle or bottom of your funnel (intent is higher and proximity to sale is closer). Your detailed targeting and Lookalike audiences are more top-of-funnel, meaning their intent is lower.
So, for example, you should aim to isolate your custom audiences to their own campaign(s) and make ad sets that target only those audiences.
You should do the same for your detailed targeting and/or Lookalike audiences and then exclude the custom audiences your other campaigns target from this lower-intent campaign.
TLDR? Don’t mix and match a mishmash of custom audiences, detailed targeting, and Lookalikes all into one ad set.
That’s a one-way ticket to auction overlap (self-competition) and not knowing where your audiences are in your account.
Now, let’s go over those audience options, shall we?
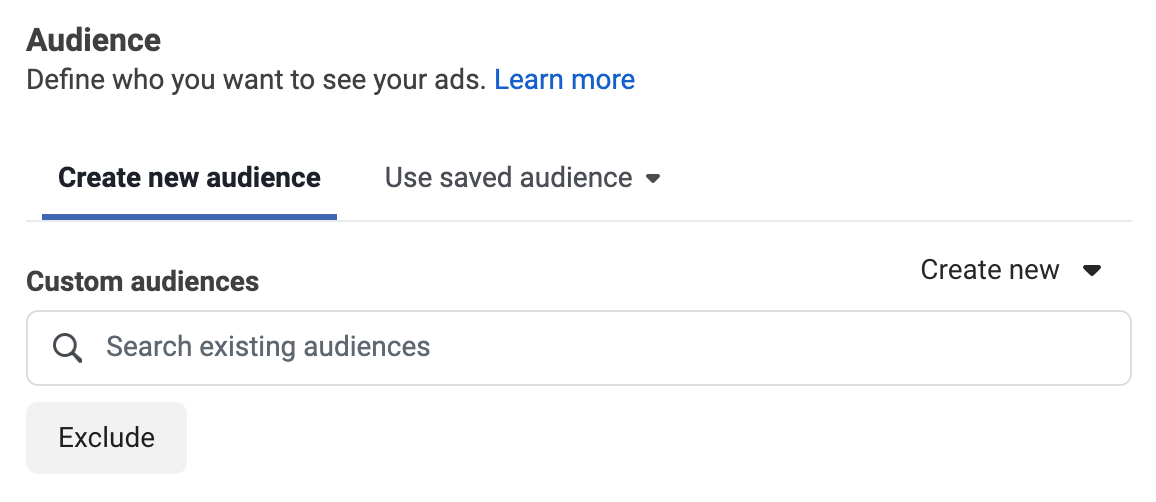
Custom audiences
First off, you’ll see an option to add custom audiences to your audience targeting (or exclude them). You can read up more about custom audiences here, but in a nutshell, these are audiences you’ve built based on how people have interacted with your business (i.e., retargeting lists and re-engagement lists).
You can also add (or exclude) Lookalike audiences you’ve made here, even though those are technically considered separate from custom audiences.
Location targeting
Next, you’ll see the option to target specific locations across the globe. This is known as geotargeting.
You can either search for locations or browse through the ones available. And you can decide whether those locations should be added to or excluded from your targeting.
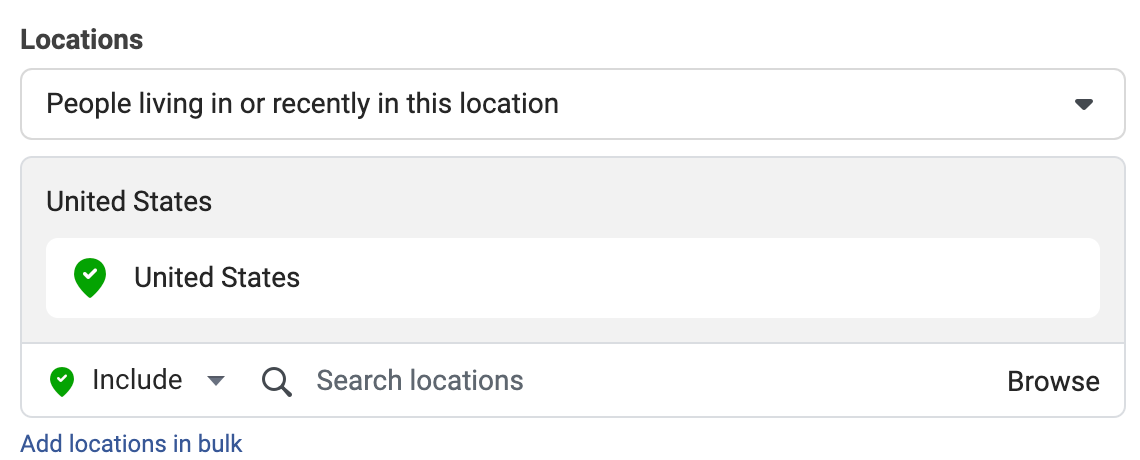
Pro tip: Choose the locations (countries, cities, etc.) that your sales have come from in the past to start with—it’s never a good idea to target the whole world. If you’re a local brick-and-mortar business, keep your location targeting within a reasonable driving distance to your location.
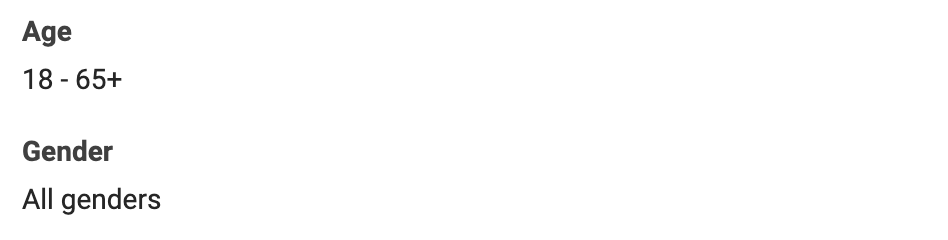
Age and gender
Some products or services appeal to any age and any gender.
But if you only sell women’s clothes, you’ll probably want to limit your targeting to females.
Or, if you have data to support that 75% of your converting audience is in the 18–24 age range, you might want to test an ad set that targets that demographic only.
Detailed targeting
Detailed targeting audiences are on the lower-intent side of things and are useful for reaching larger amounts of people within these three categories:
- Behaviors like travel tendencies, approaching anniversaries, etc.
- Interests like coffee, board games, family, etc.
- Demographics like life events, education, relationships status, etc.
These are all pre-built audiences that Facebook has made. These are Facebook users who are bucketed together based on their Facebook activities (e.g., pages they like, posts they engage with, etc.)

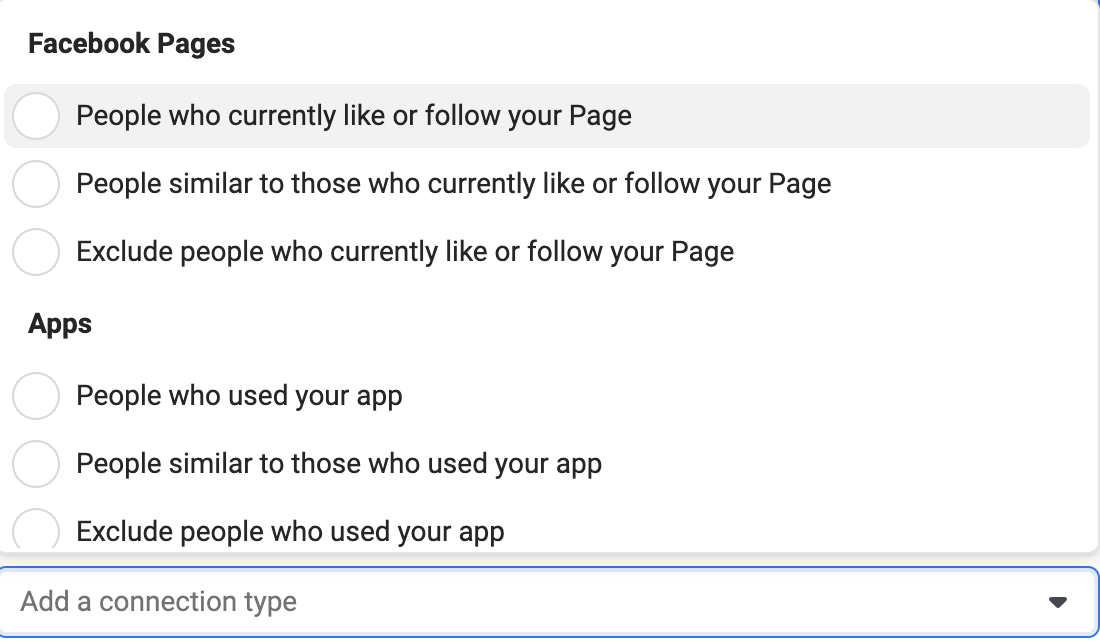
Languages and connections
Language targeting is straightforward enough—you’ll want to target the language your audience speaks.
Connections, on the other hand, are a way that you can target people based on how they’ve interacted with your business on Facebook. This setting emulates creating a “Facebook sources” custom audience.
When you’re done setting up your audience, you can also choose to save it using the “Save Audience” button at the bottom of the audience section. This is useful if you plan to use this audience again at any point—you won’t have to set it up twice.
And that’s the last piece of your audience setup, which means we’re almost done with our ad set.
Pick your ad placements
Your placements are where your ads will show across Facebook’s properties.
You can choose “Automatic placements” and let Facebook decide where ads should show based on what it thinks will perform best, or you can select “Manual placements” and cherry-pick the placements you want individually.
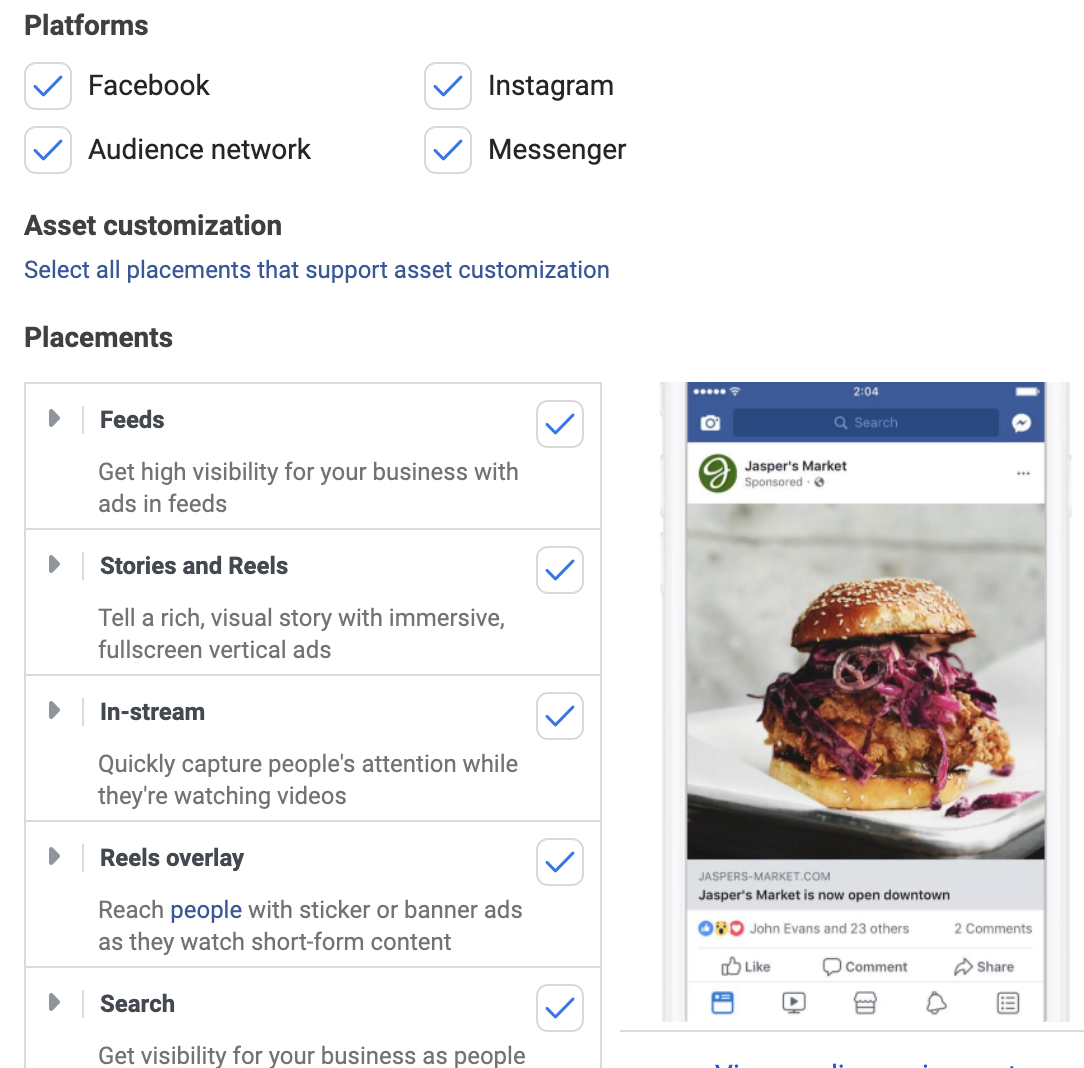
In the “More options” dropdown at the bottom of the placements, you can also tinker with settings like specific devices on mobile and operating systems and brand safety assurances.
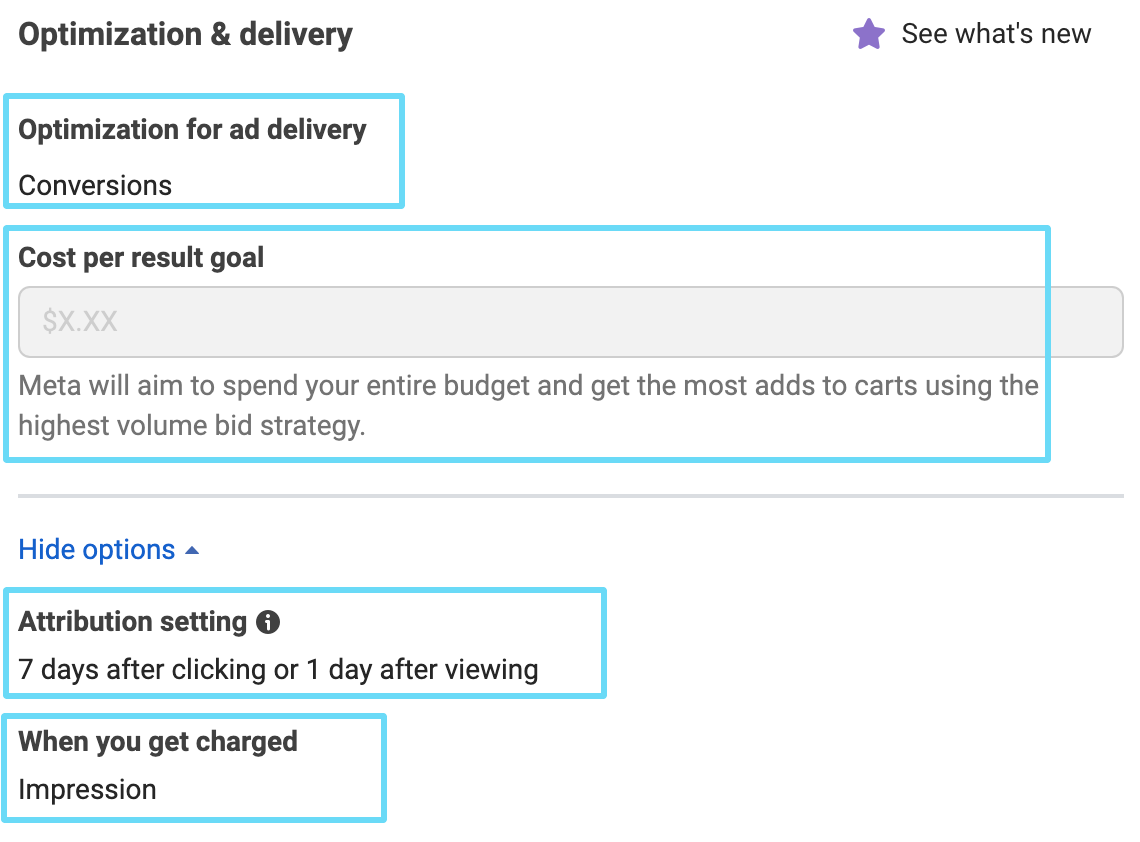
Optimization and delivery
Last but not least is the optimization and delivery section of your ad set. Here, you’ll be distinguishing a few things:
- Optimization for ad delivery: This is the desired outcome you want your ad set to push, whether that’s conversions, link clicks, value, landing page views, impressions, or daily unique reach. (We recommend conversions.)
- Cost per result goal (optional): Set a cost per result goal you want to try to achieve in this ad set.
- Attribution setting: The window after which conversions can be attributed to your ads. (We recommend 7-day click, 1-day view.)
- When you get charged: What you’re paying for, whether that’s impressions, clicks, etc. Typically, this is set for impressions and can’t be changed, but it may vary depending on your campaign objective.
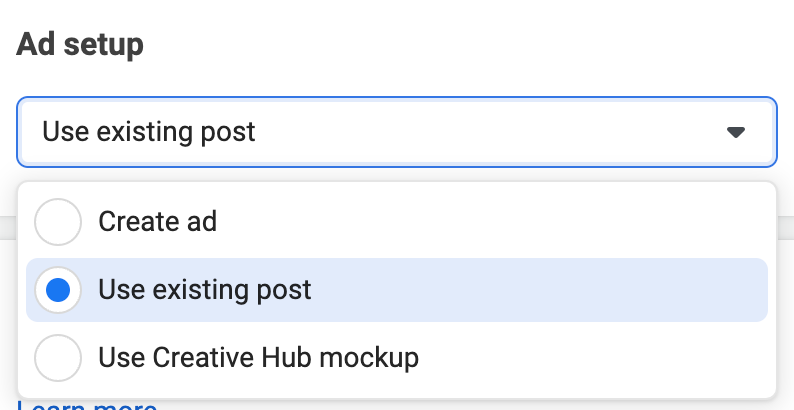
5. Create your first Facebook Ad
Now that we know who our ads will show to, it’s time we actually created the ads that’ll show. First of all, you can decide to use existing page posts as ads, use a Creative Hub mockup, or you can create a new ad altogether.
Let’s look at each method.
Use existing page posts as your ads
There are at least three reasons why promoting your Facebook page posts can pay off big time.
- You can uncover your best-performing page posts by measuring their organic engagement level. Instead of guessing what works, you’ll be promoting an already-tested Facebook post.
- Using Facebook page posts across multiple ads ensures that all the likes and shares the ads get in different campaigns show up in one place.
- As you promote a single page post in multiple ad sets to different audiences, all of the likes (your social proof) will accumulate under this one post.
To use an existing Facebook post in your ad campaigns, you’ll obviously need to post it on your Facebook page first.
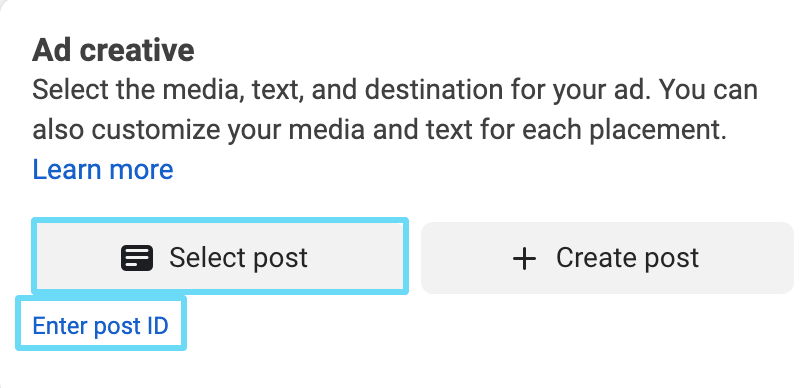
Next, select “Use existing post” in the ad creation phase.
Then, select the existing post you want to use.
Including the same page posts in multiple ad sets will also save you lots of time (that you can use for drumming up more winning strategies).
Use a Creative Hub mockup
Facebook (Meta) Creative Hub is a tool where you can create ad mockups (designs) and share them with other team members.
If you’ve been collaborating with others or if all of your ads need to go through a mockup collaboration process before running, you can make your mockups in Creative Hub and simply use them as paid ads when everyone’s approved them.

Create a new ad
If neither of those first two methods applies to you, you’ll just create a brand new ad, and there’s nothing wrong with that.
For many beginners, this’ll probably be the route you take initially (and most of the time down the line) anyway.
Select “Create ad” at the first part of your ad setup to get started.
Then, select the Facebook ad type you’d like to use.
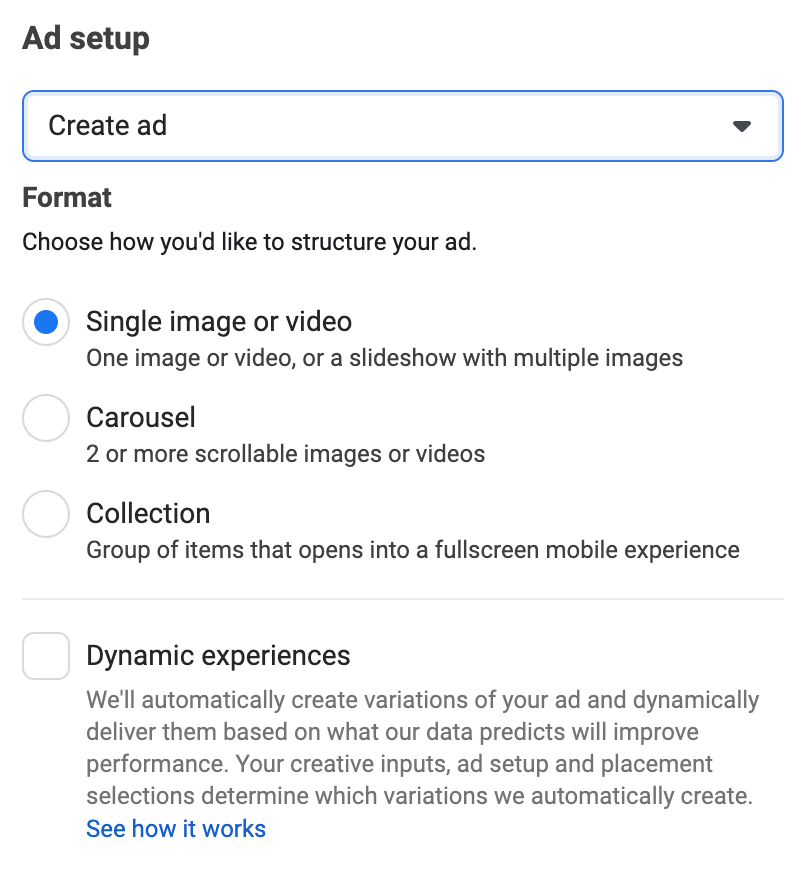
The most popular options to start with are a single image or a single video ad. But, for example, if you have multiple images that work well together or tell a story, a carousel ad might be appropriate.
Your choice of ad type should depend on which ad layout matches best with your offer and your advertising goals.
And keep in mind that a mobile ad requires a different input than a desktop ad. Not all ad designs and messages look great across each channel.
Guided reading: To master this ad creation phase and create some heroic Facebook ads, check out our guide to our favorite Facebook ad hacks. And don’t miss out on these sweet Facebook ad examples, too.
For this example, let’s go with a single image ad. Here’s everything you’ll need to do:
- Select your image: Even though this is a “single image” ad, you’ll need at least three different sizes of that same ad to fit across multiple placements.
Typically, we’ll use 1:1, 9:16, and 1.91:1 ratio sizes, and those apply across most placements. You can crop and optimize your images as needed after uploading them.
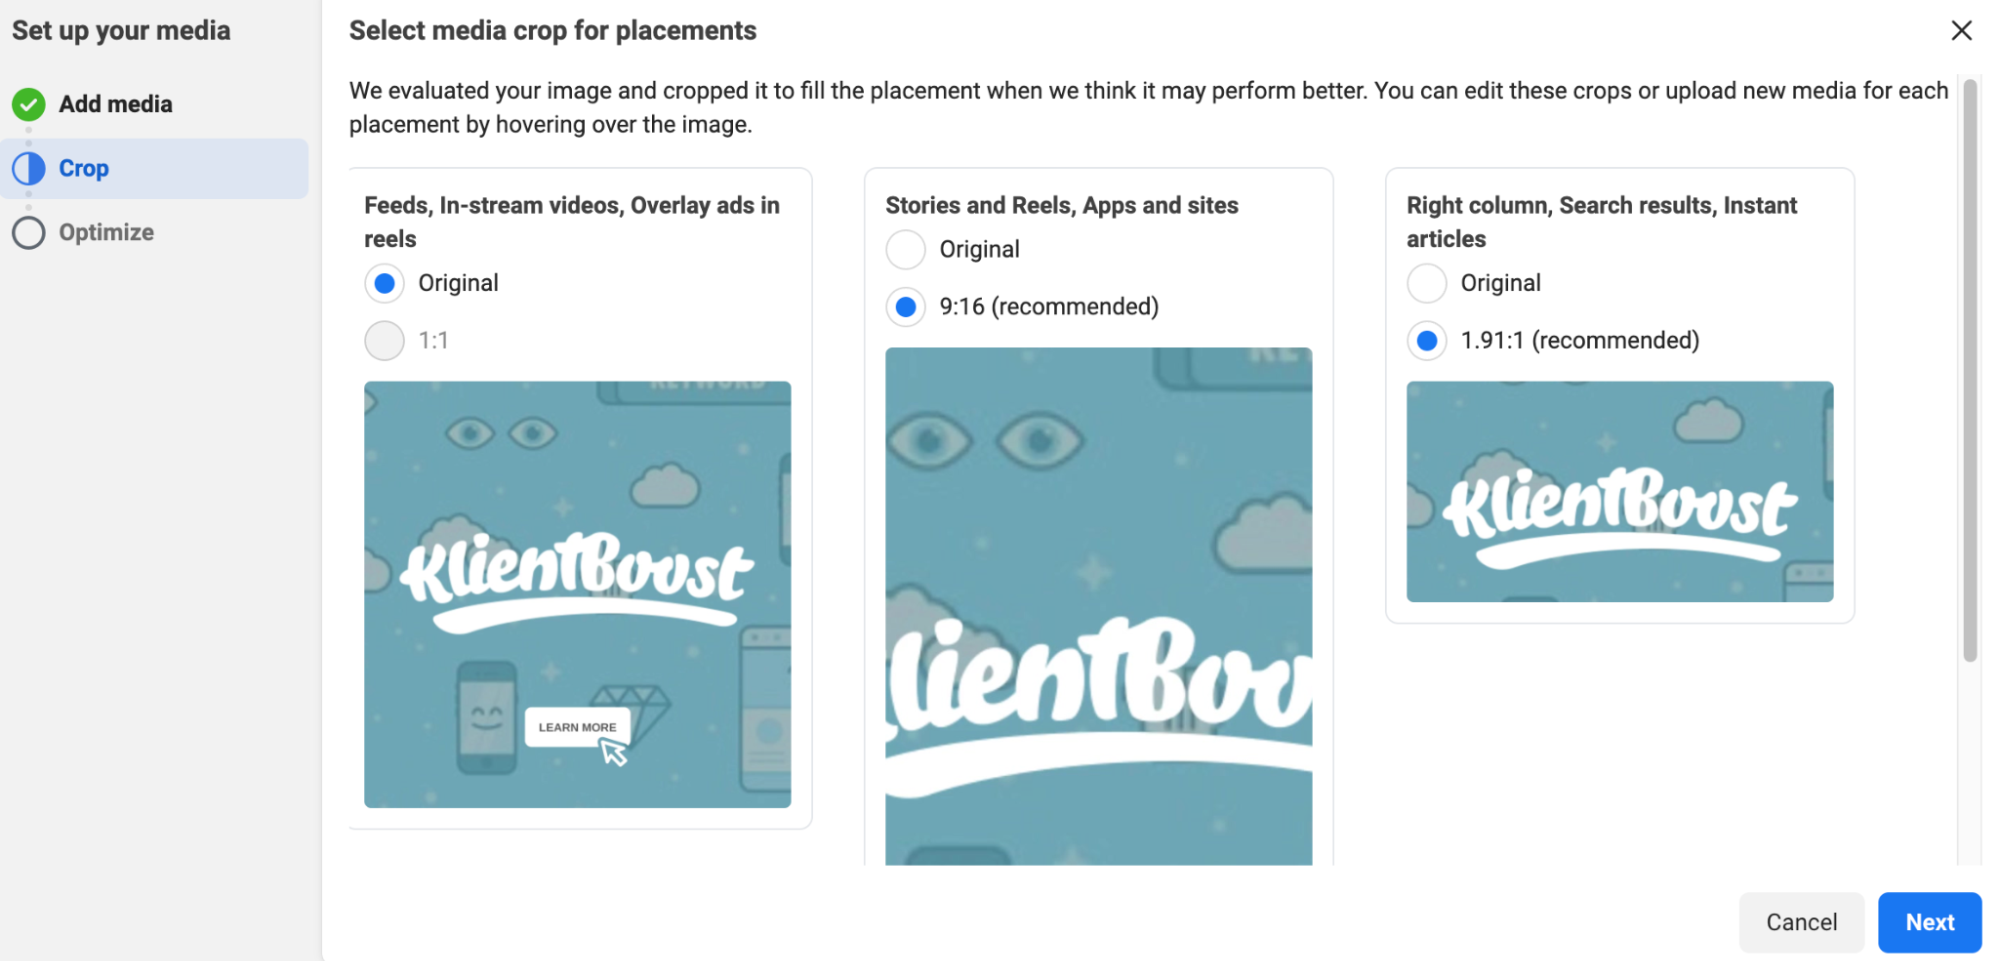
Additionally, when you’re uploading your images, you’ll notice you can only select one size, and Facebook applies it to all placements.
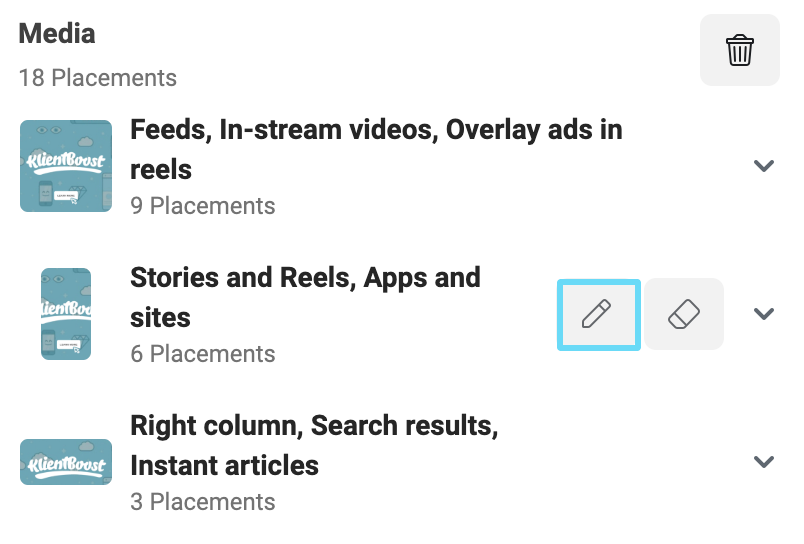
To change this and upload appropriate image sizes for different placements, finish uploading your first size, and then when you’re done, select the edit pencil next to the placement you need to change.
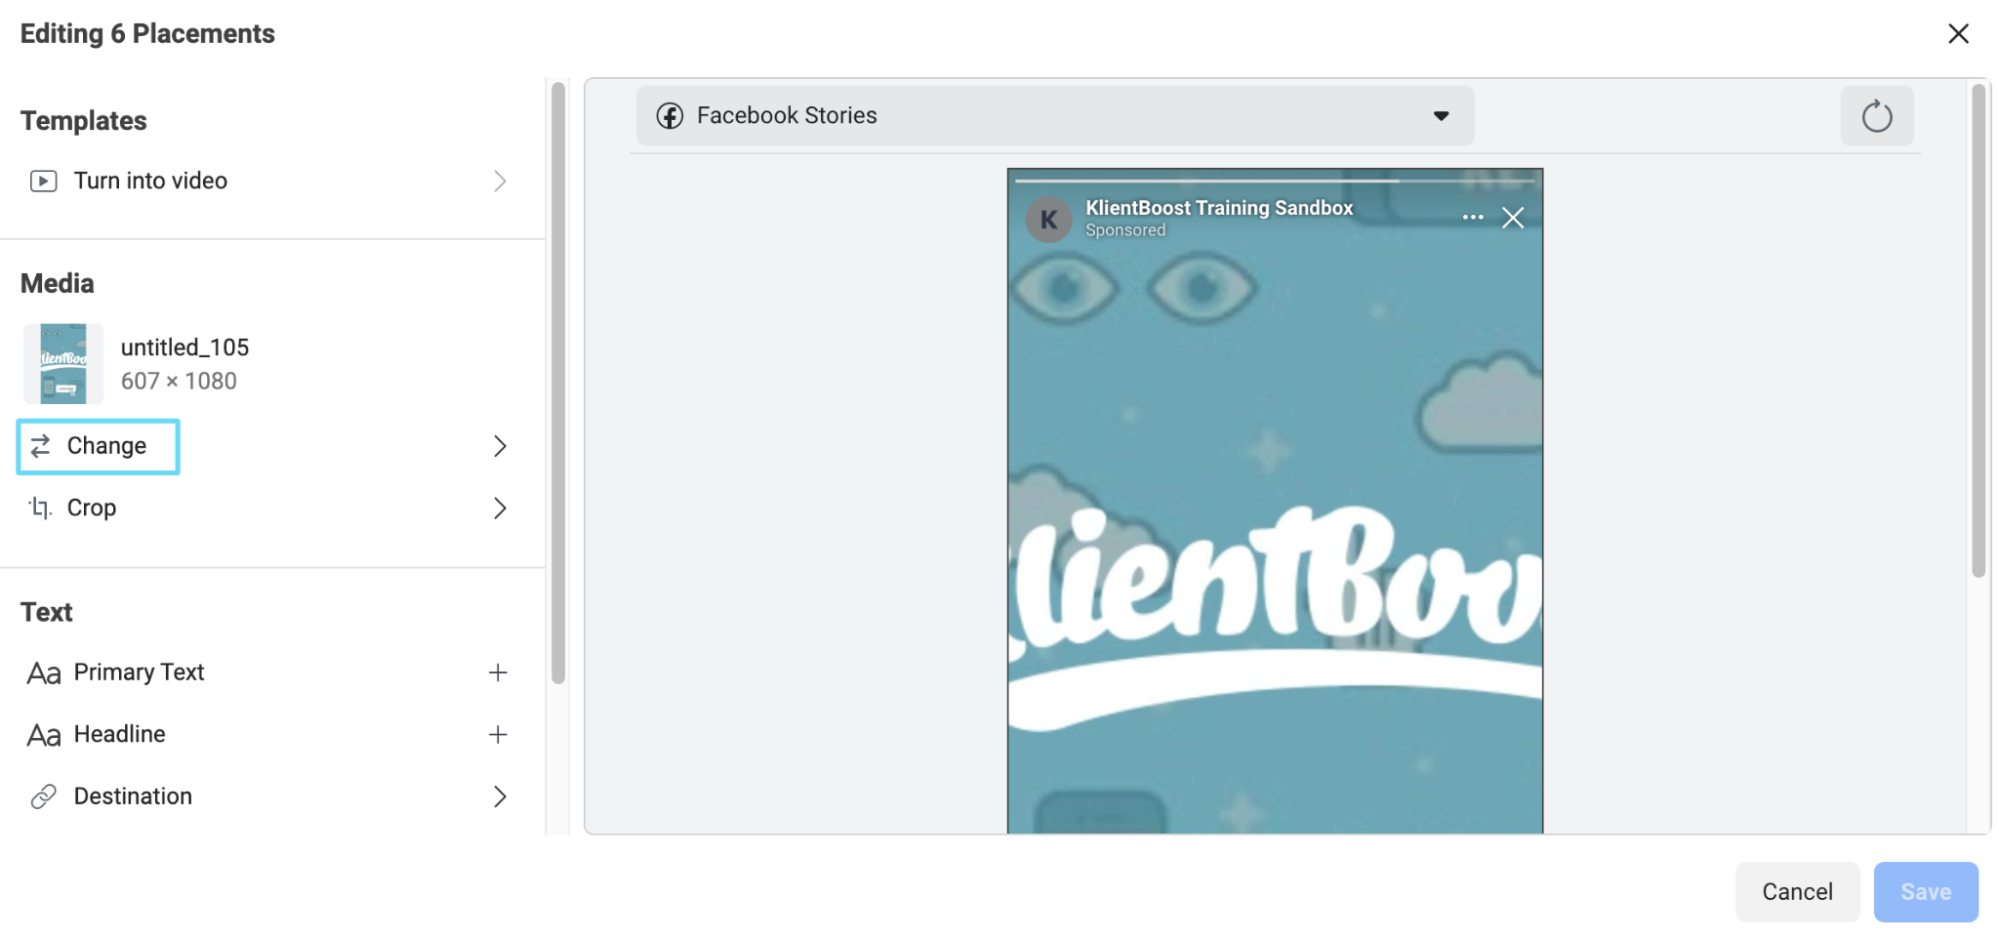
Then, click “Change” in the edit panel that pops up, and select the right-sized image for the placement.
- Write your primary text(s): This is your ad's primary “body” copy. You can write up to five for Facebook to make combinations with.
- Write your headline(s): This is a short piece of copy usually used to express incentives to buy, CTAs (calls-to-action), or UVPs (unique value propositions). Use your headlines to spark interest and drive clicks. You can write up to five of them.
- Write your description(s) (optional): Descriptions are secondary body copy. They might not always show depending on the placement, or if they do, they’re likely to be cut off behind a “more…” expansion button. Use descriptions to explain additional benefits or talk more about the product or brand; just don’t put anything vital here, like your offer.
- Choose whether to optimize text per person: This means that Facebook might take the text you’ve written for one part of the ad and use it in a different part if it’s likely to improve performance (e.g., using a headline you originally wrote as primary text).
- Choose your CTA: Your CTA will be a clickable button that shows text instructing potential customers what you’d like them to do.
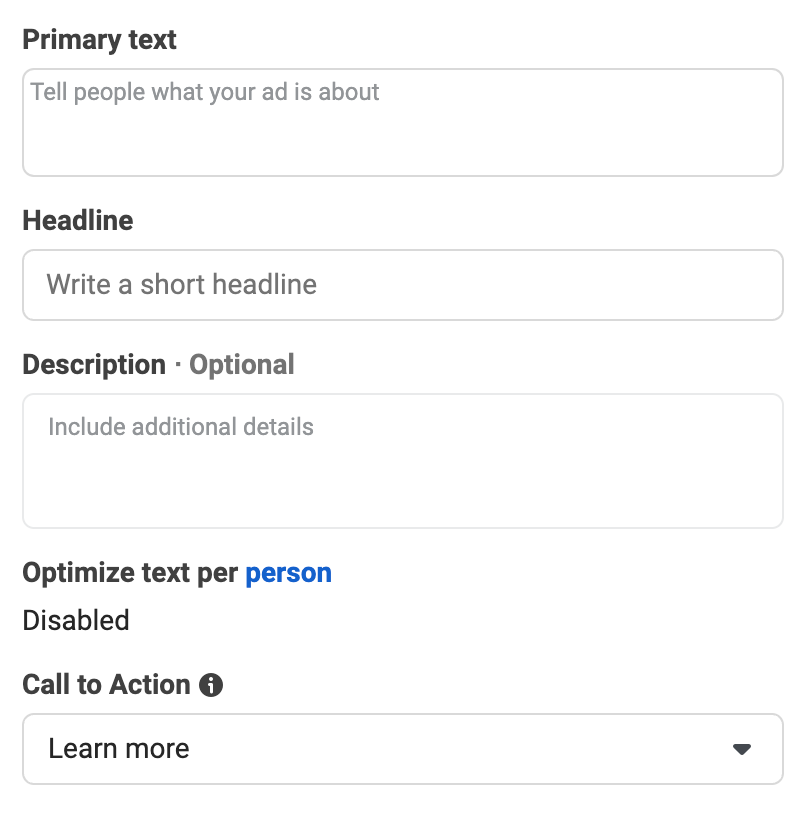
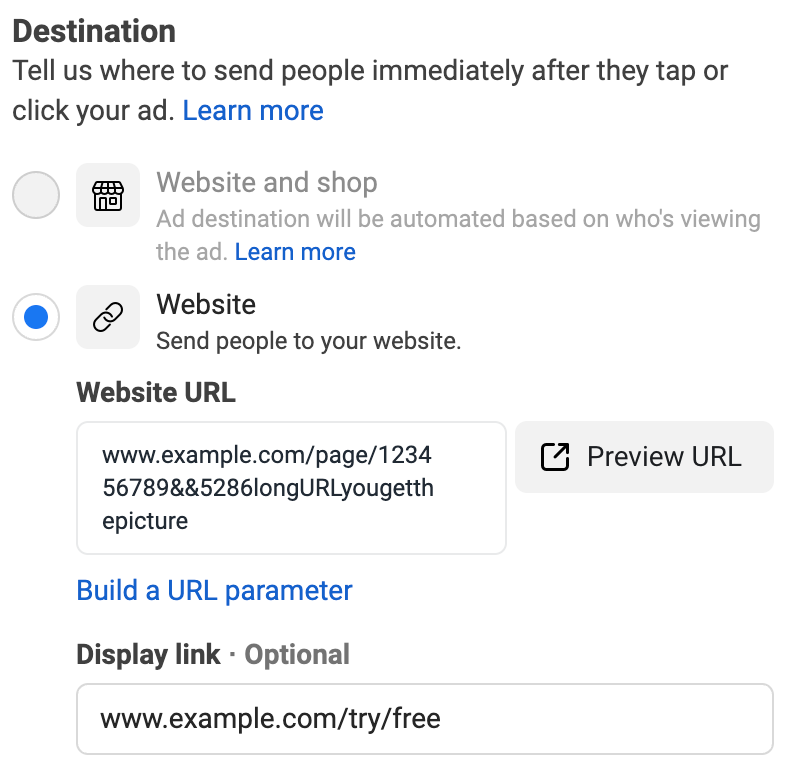
- Destinations: Your destination is where you want your ad to send customers once they click (i.e., a website page or landing page). You can also add a display link within the ad that’s shorter (and prettier) than your full URL.
After selecting the right ad image(s) or a video and filling in all the text boxes, you’ll have an ad that looks like the ones in your Facebook news feed—pretty spiffy.
We typically recommend you make at least one other different ad (whether it’s the text or images you’re changing) for the ad set, so you’ll want to apply this knowledge later to create another ad.
Additional ad settings
So the meat of your ad is completed, but there are a few more settings to consider.
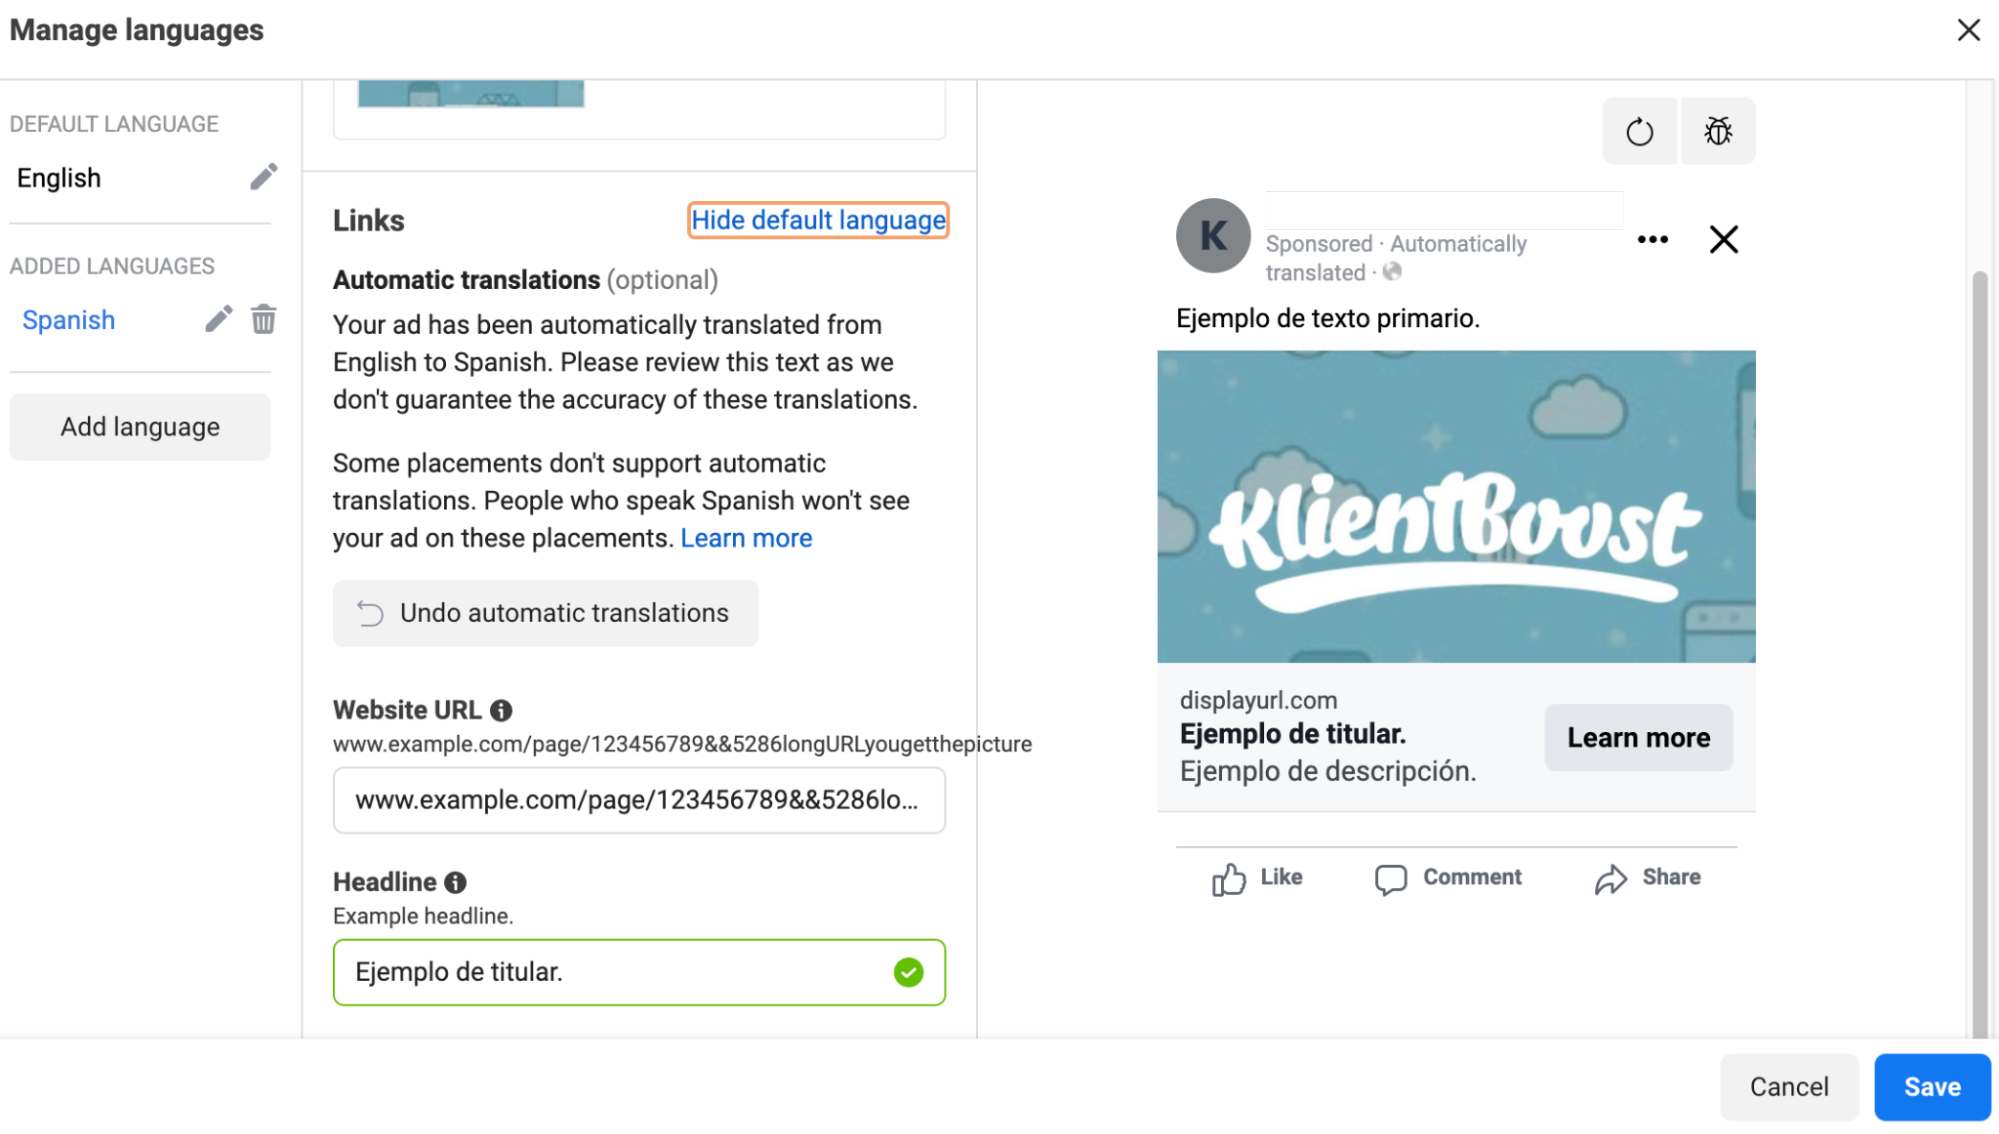
First, using the languages feature, you can either 1) translate your ad to another language yourself to be shown when Facebook determines that language is the best fit to show, or 2) decide to have Facebook auto-translate for you.
General reception of the auto-translate feature is that it’s fairly accurate. However, keep in mind that your ads written in other languages should then lead to landing pages also written in those languages (and Facebook isn’t going to do that for you).
Lastly, you’ll need to establish the Facebook pixel that will report the events this ad might draw in (if you only have one pixel, it’ll be auto-selected).
And optionally, you can add or build any URL tracking parameters you want to place on your ad’s destination URL.
And voilà—your ad is complete, and so is your first basic campaign.
Using Facebook Ads Manager to edit your campaigns
Proper Facebook campaign optimization can make or break ad campaigns.
Once you’ve published your Facebook ad campaigns, you’ll probably want to adjust and update the ads, ad sets, and campaign setup every so often.
These changes could even be as simple as noticing a small typo in your ad copy and wanting to change it ASAP.
To edit an existing Facebook campaign, ad set, or ad, hover over its name and click on the “Edit” icon.
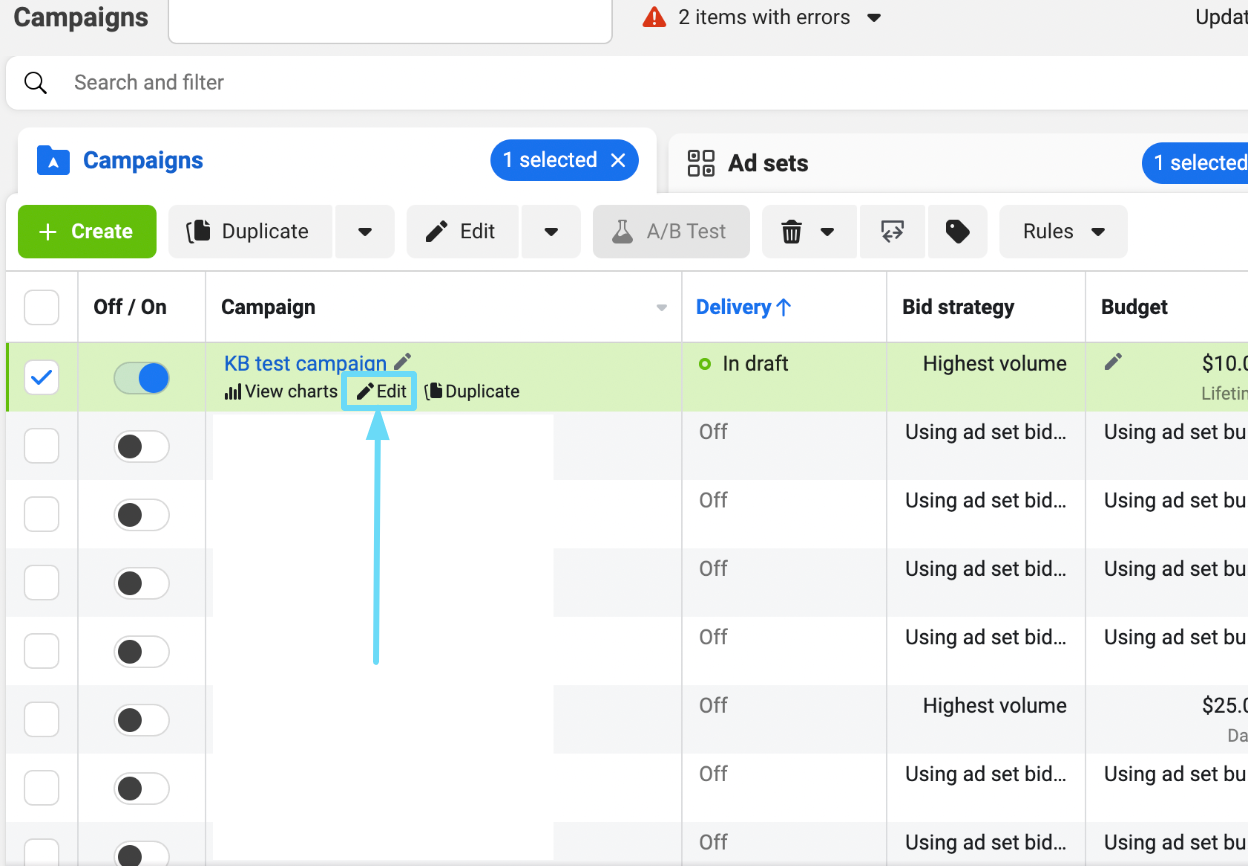
Note: If you click the pencil icon next to the name of the campaign, ad set, or ad, you’ll only be quick editing the name. To jump into the edit panel, you need to click the edit button underneath the name.
Once you click the edit button, the editing window will open, and you can make your changes.
Make sure you publish your edits when you’re done with them. Otherwise, they’ll stay in draft mode and won’t go into effect.
Also, wait at least 24 hours before editing newly-published Facebook ad campaigns. It takes about that long for Facebook to review your campaign, ad set, and ad changes and optimize delivery.
Using Facebook Ads Manager for reporting
Facebook Ads Manager isn't just for campaign setup and quick edits. You can also use it for reporting.
Honestly, your ads can get wild without a bit of discipline. This can lead to a slowdown in ad delivery and decreased campaign results.
Fortunately, you can track relevant campaign metrics without breaking a sweat—as long as you know what to look for in your ad reports.
These metrics typically provide a detailed overview of each campaign, ad set, and ad’s performance:
- Cost-per-conversion: This is how much it costs to get a conversion (i.e., acquire a new customer or lead, have your content downloaded, etc.).
- Conversion rate: This is how many people that see your ad will convert.
- Click-to-conversion rate: This is how many people who click on your ad will also convert.
- Ad frequency: This is how many times, on average, a person has seen your ad.
- Ad relevance diagnostics: This measures how relevant your ad is to your target audience.
Piece of advice: Unless you're solely focused on brand awareness, avoid getting stuck with the nice-to-have vanity metrics. Vanity metrics include total ad impressions, cost-per-click, click-through rate, and cost per thousand impressions.
There are a few major ways you can view and report on your campaign, ad set, or ad data:
- You can look at your metrics overview and adjust your columns and breakdowns to see relevant info.
- Select campaigns, ad sets, or ads and select the “See charts” button for a snapshot overview.
- Head to the Facebook reporting tool to build, download, and share custom reports.
- Head to the ad creative reporting tool to see creative-specific reports.
More reading: Head to this article and brush up for a more detailed look at Facebook reporting. For now, we’ll go over each briefly.
Looking at columns and breakdowns in the overview
In the columns menu, you can select between different columns that change the metrics you see in your ad report. You’ll want to use the metrics that matter most to you and organize the most important ones at the top of the list.
To do so, click the “Columns” button at the top-right just above your overview and scroll to the bottom to select “Customize columns.”
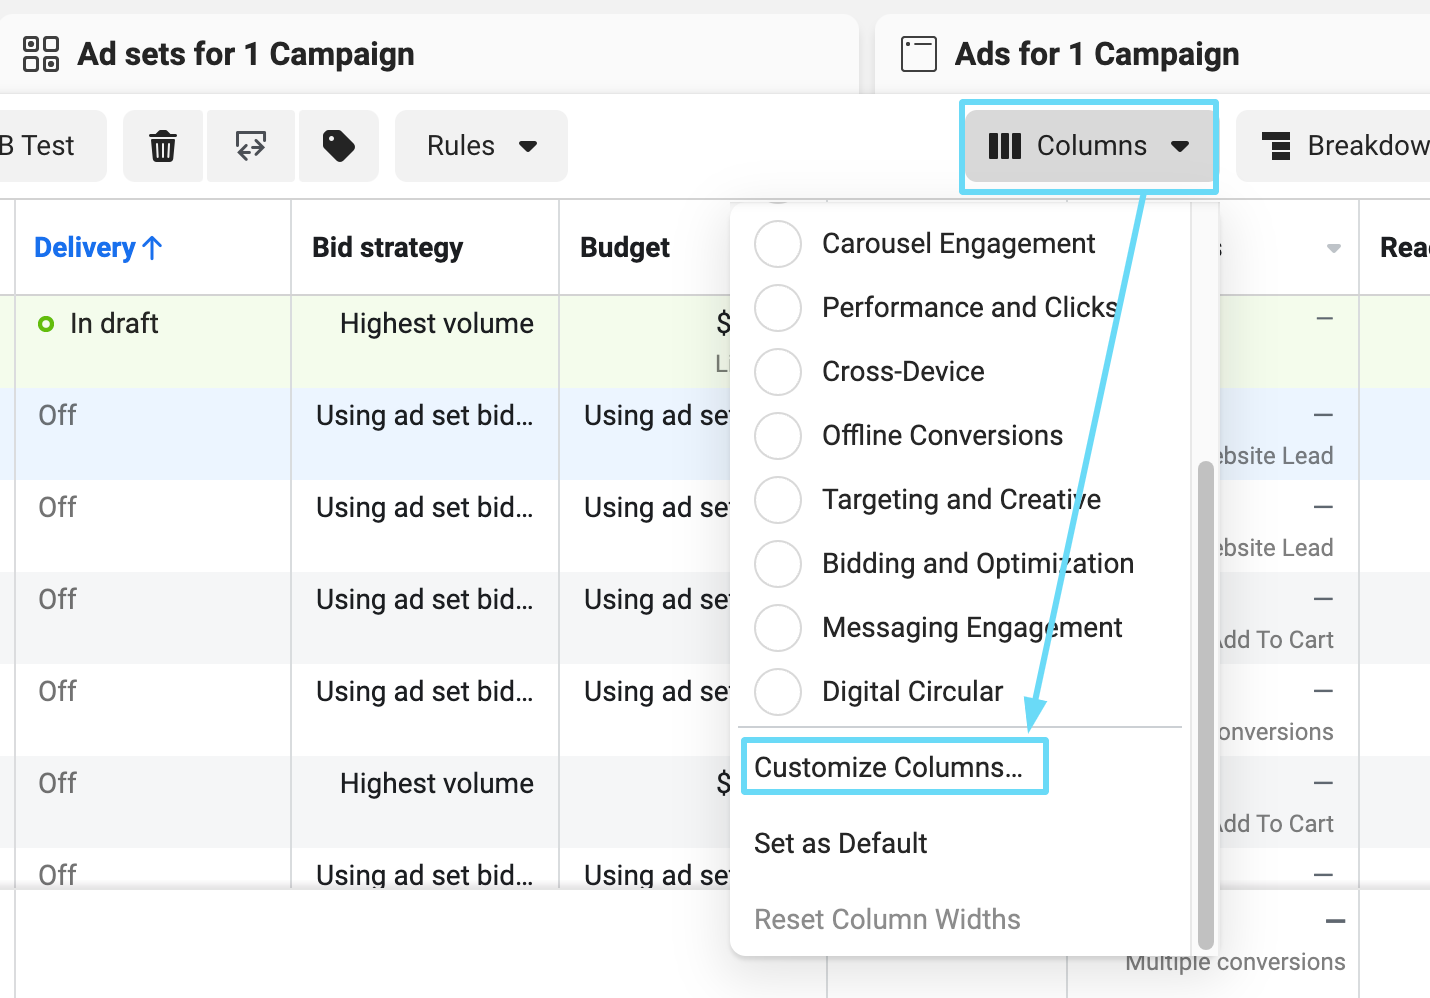
Then, search or browse the metrics options, and check the box next to them to add them to your list. Drag and drop metrics on your right-hand list to reorganize them (the top of the list is the closest to your campaign name).
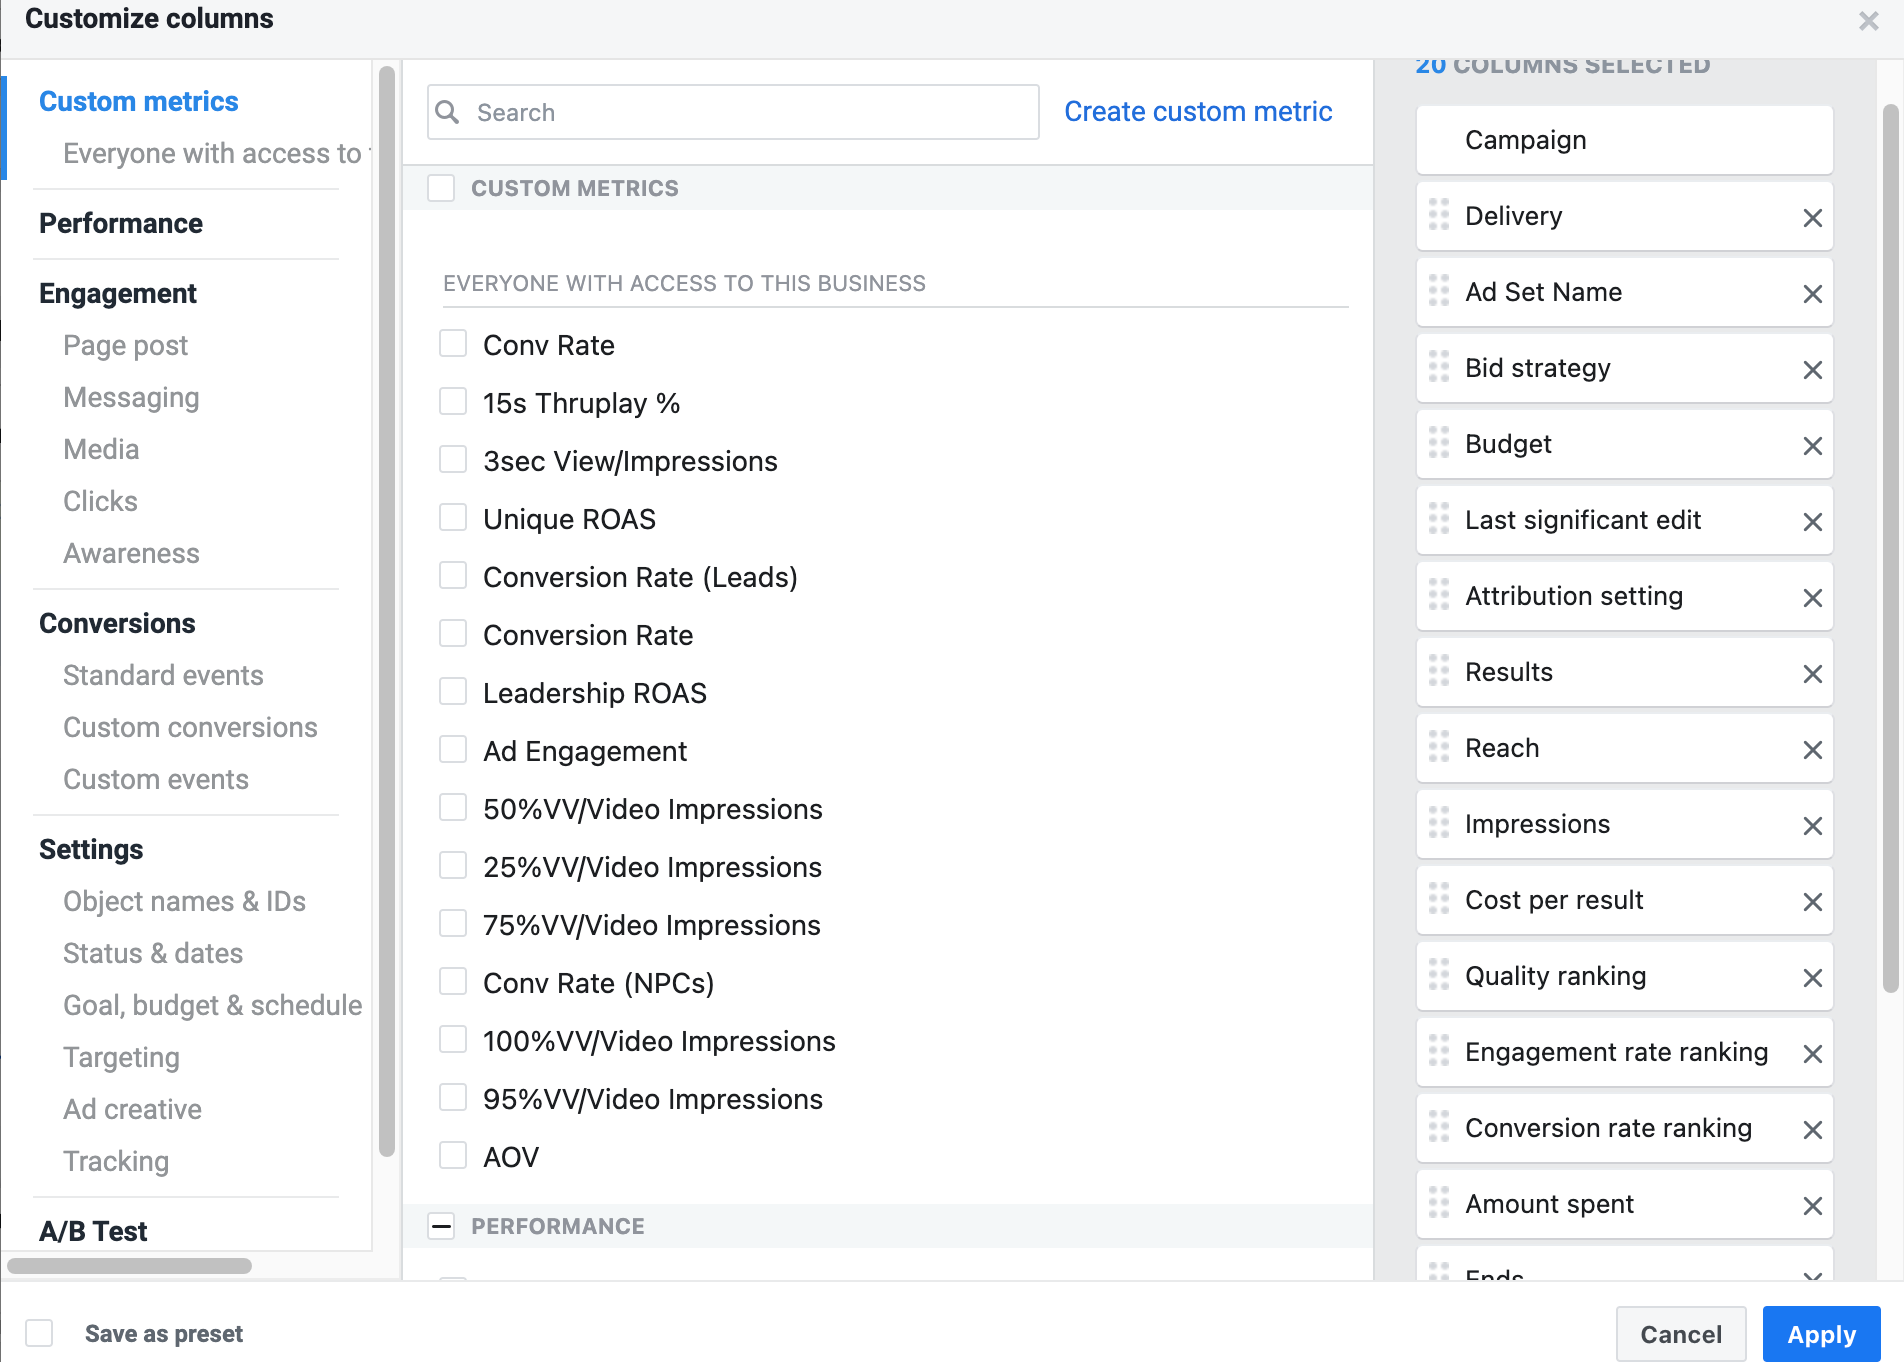
Now, breakdowns come into play if you want to see more detailed segmented data on a campaign-by-campaign, ad set-by-ad set, or ad-by-ad basis. Breakdowns are rows of additional data used in combination with your columns.
Breakdown metrics are divided into three categories:
- Delivery
- Action
- Time
There are many breakdown options within these categories, but we’ll let you explore those and find what works best for you.
But we’ll go ahead and give you an example, too, so you know what the heck we’re talking about when we say “breakdowns.”
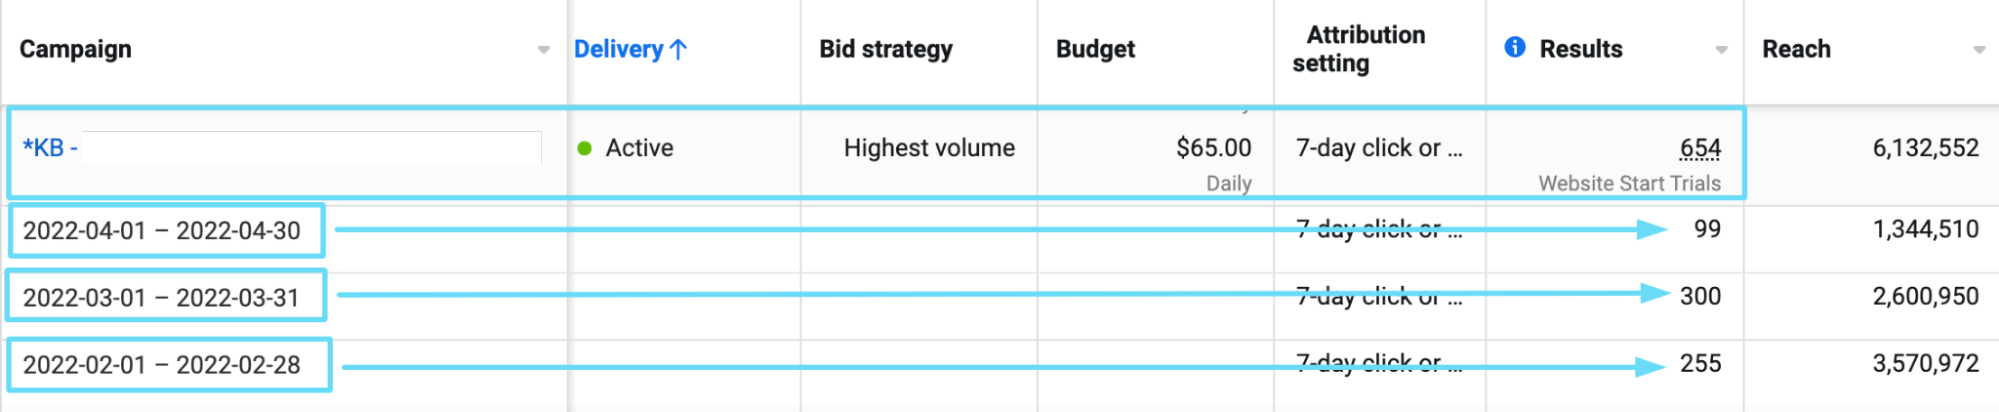
Let’s say that I’ve selected a data viewing time frame from February 2022 through April 2022, and I want to see my data for each campaign broken down by each of those three months.

I’ll click the “breakdowns” button, hover over the “time” category, then select “month.”
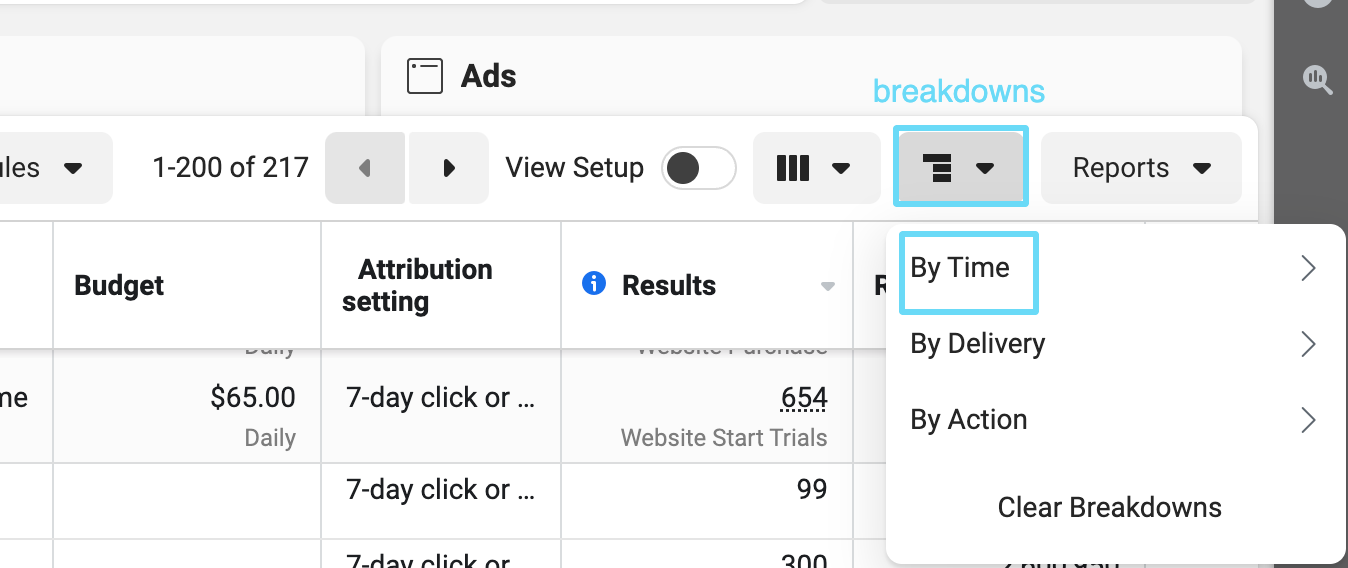
Then, I’ll see each campaign’s data broken down by each month in the time frame I’ve selected.
To clear your breakdowns, go back to the breakdowns button and select “Clear breakdowns.”
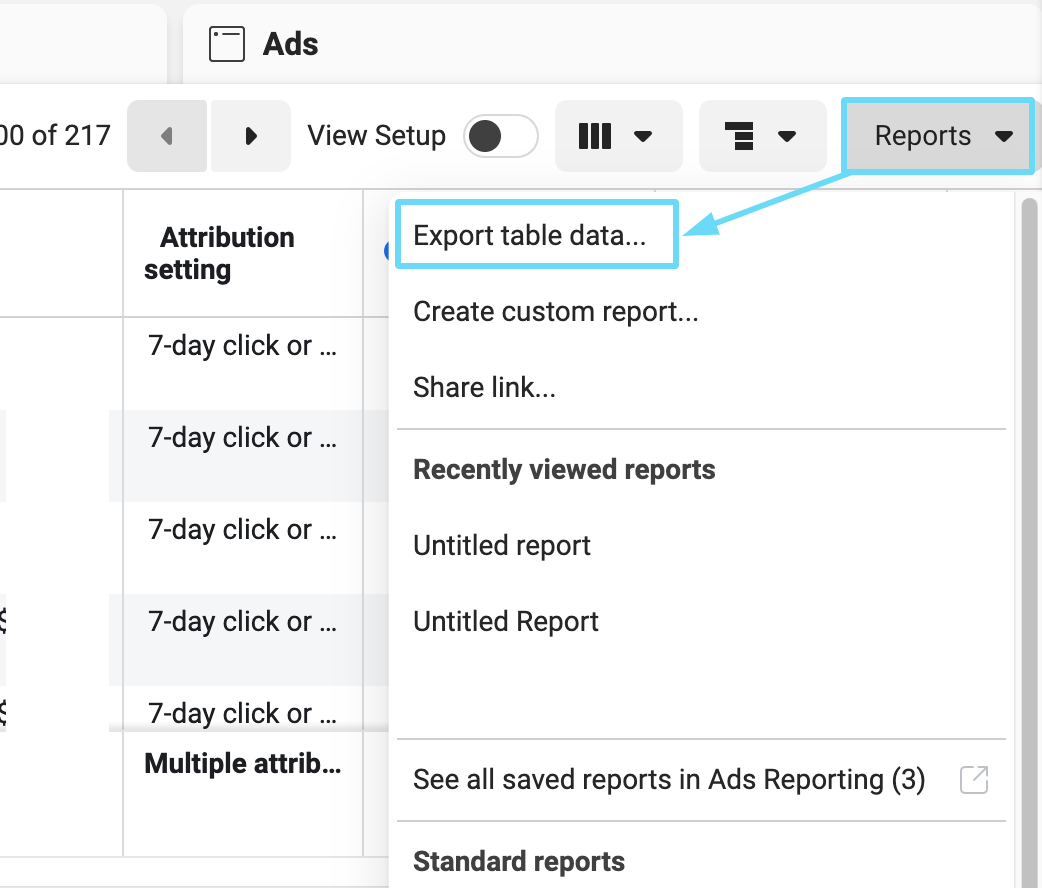
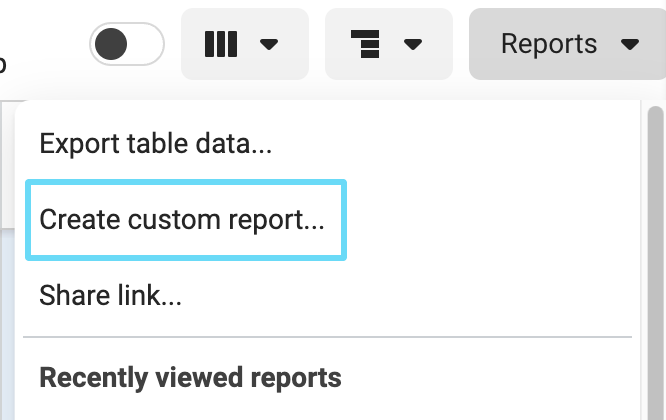
Pro tip: You can also export this table view as a report by going to Reports > Export table data.
Note: Since iOS14 changes, we haven’t been able to see conversion data for some breakdowns, like age, gender, platform, etc. (most options under the delivery category).
“See charts” with selected campaigns, ad sets, or ads
This might be one of the most overlooked reporting abilities Facebook has, simply because the button is so dang small and out of the way.
To see charts for one campaign/ad set/ad (or multiple), select them in your overview and click the “See charts” button on the far right.
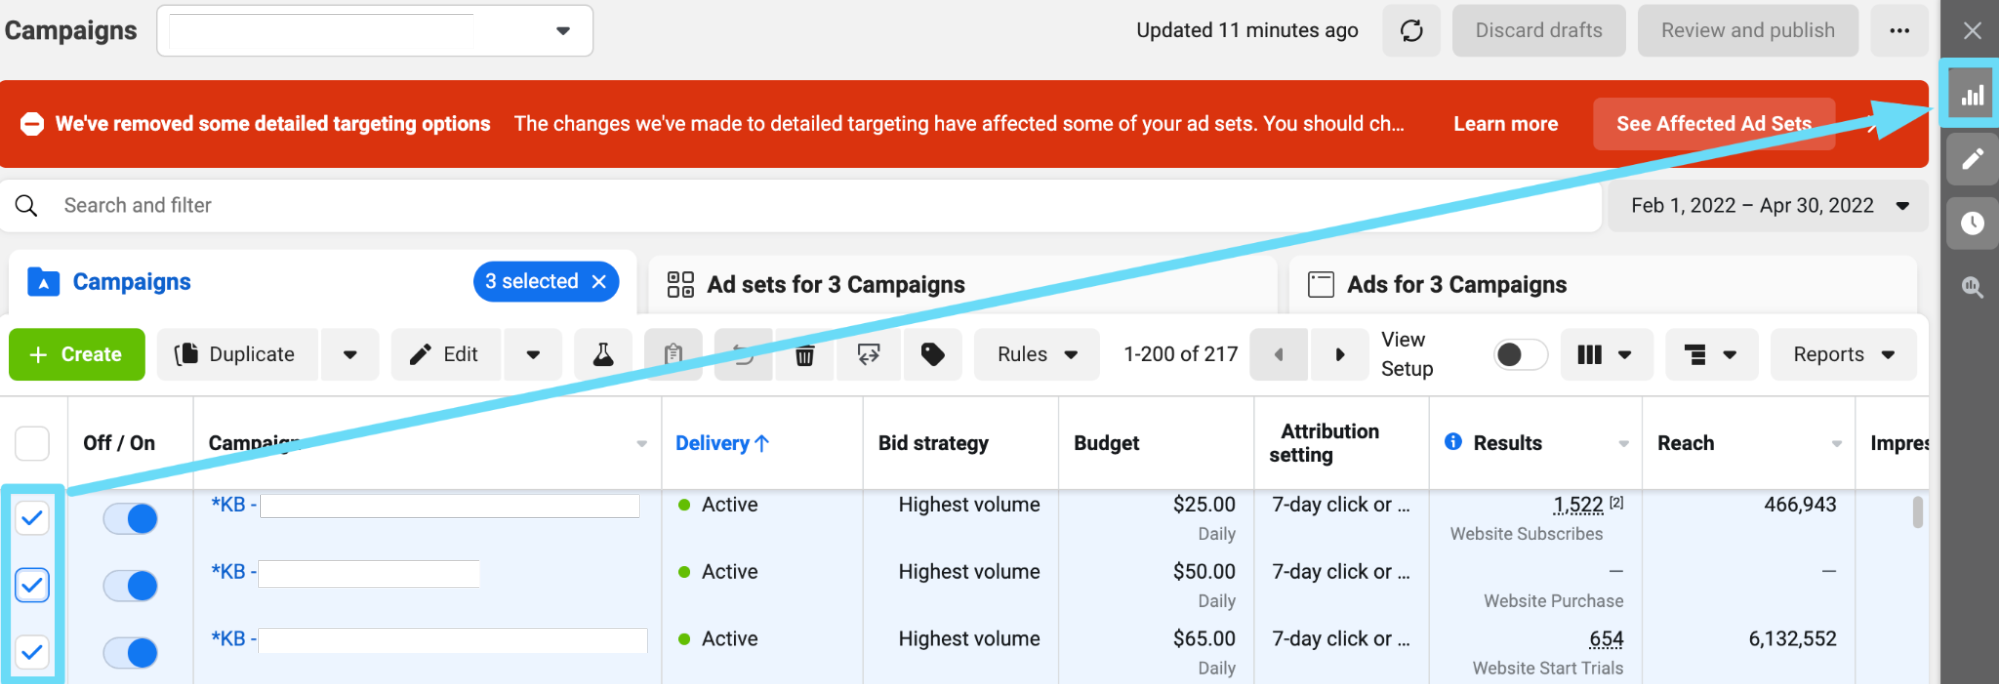
“See charts” gives you relevant info in a different visual package, plus recommendations and age, gender, and platform distribution.

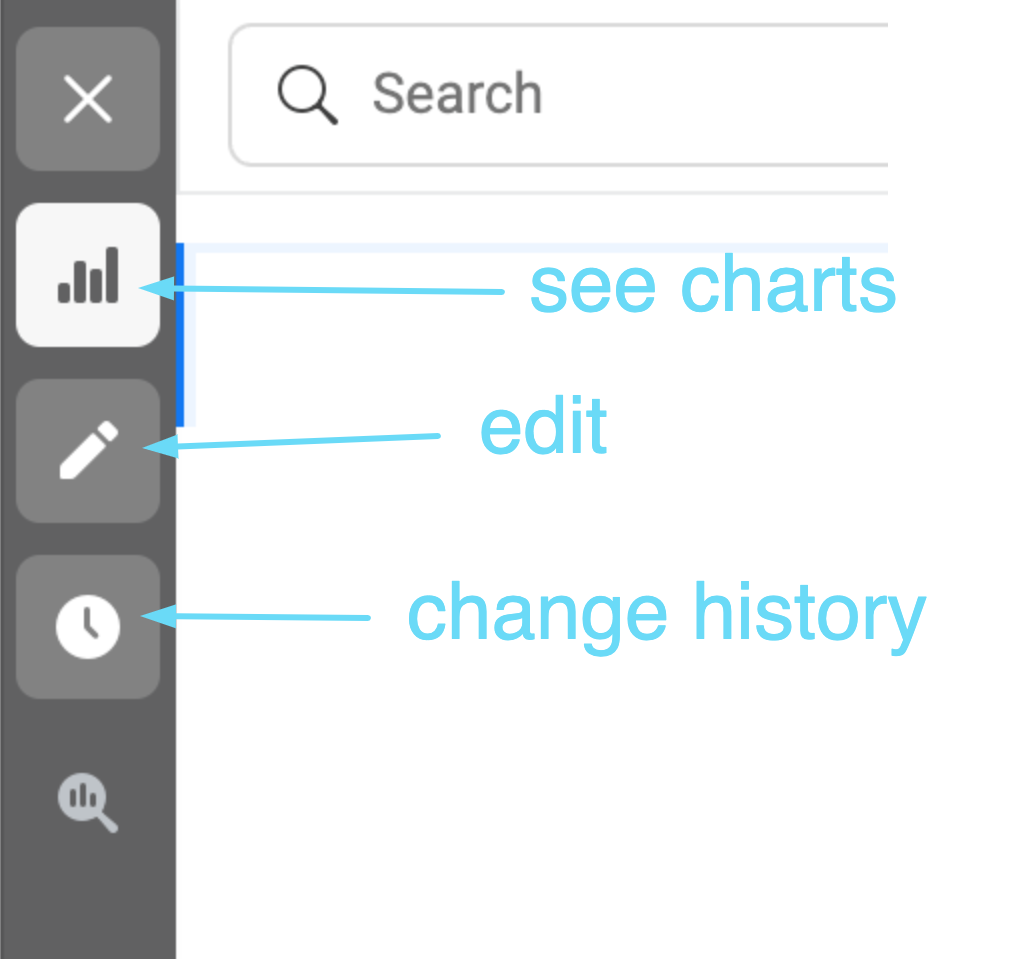
You can also find the “See charts” button on the left-hand side of the edit panel. So if you’re already in there making edits and want to see some data, look for the button that’s a staircase of bars.
Use the reporting tool for custom reports
We’ll keep this one fairly simple because building custom reports is a time-intensive process that varies for each business.
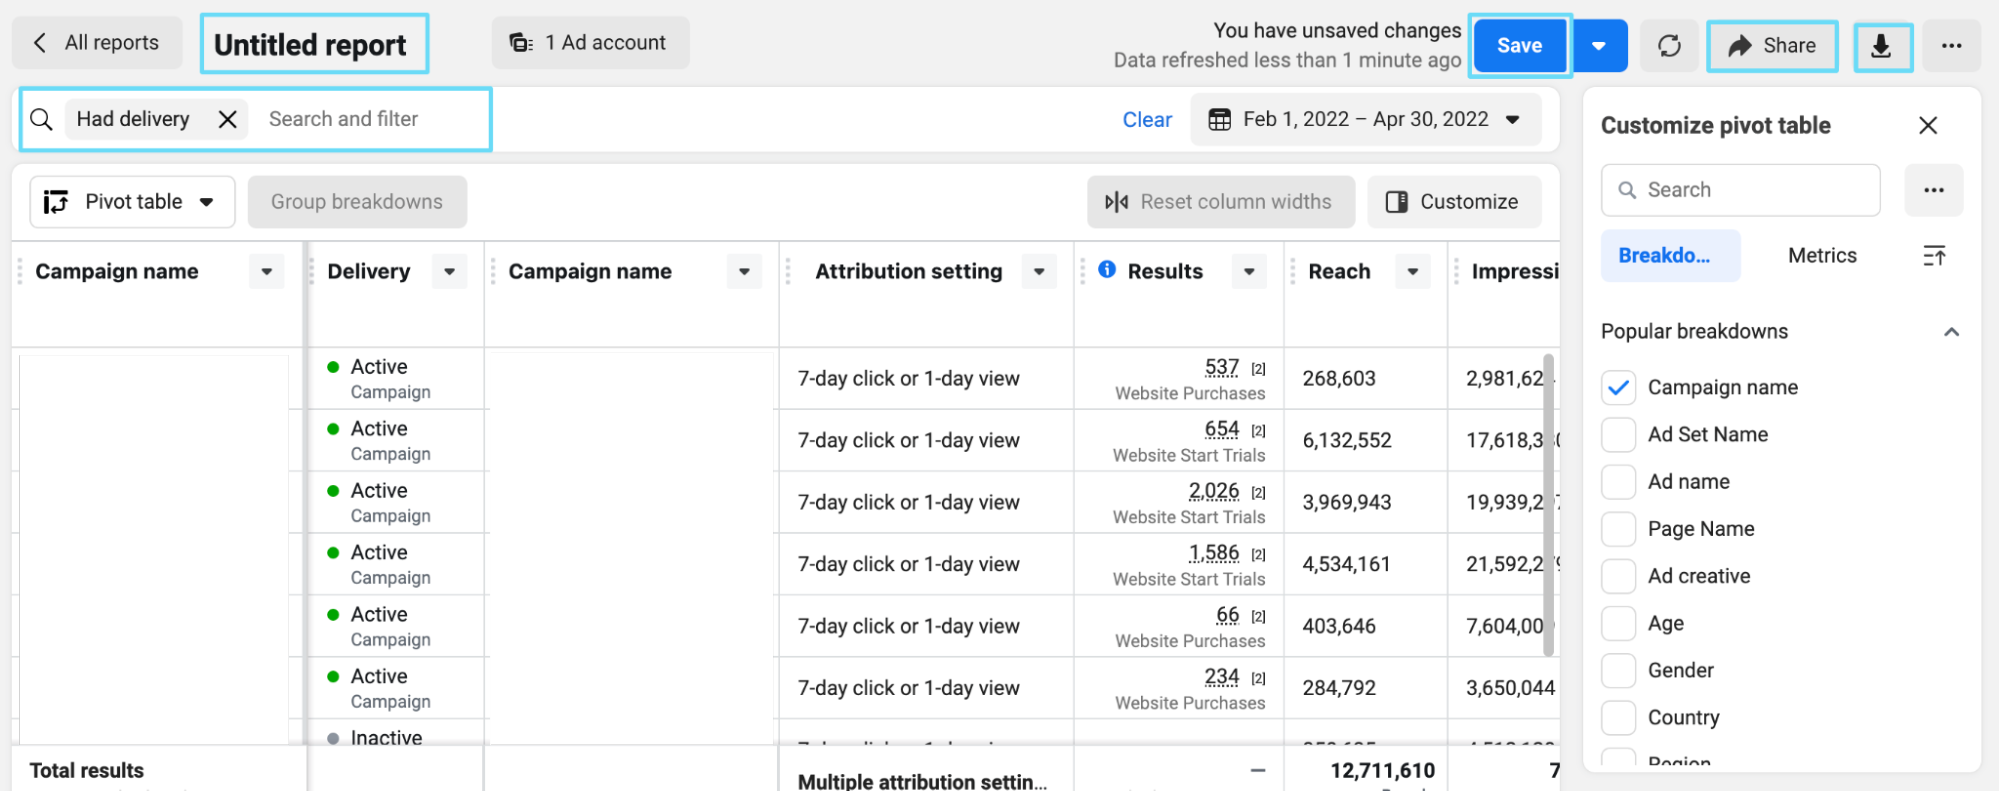
If you go to Reports > Create custom report, you’ll be redirected to a fully-powered custom reporting tool that allows you to build, download, and share the reports of your dreams.
You’ll be able to search and filter your data. Then, feel free to name, save, download, and share your report. You can also organize metrics columns and breakdowns in your pivot table.
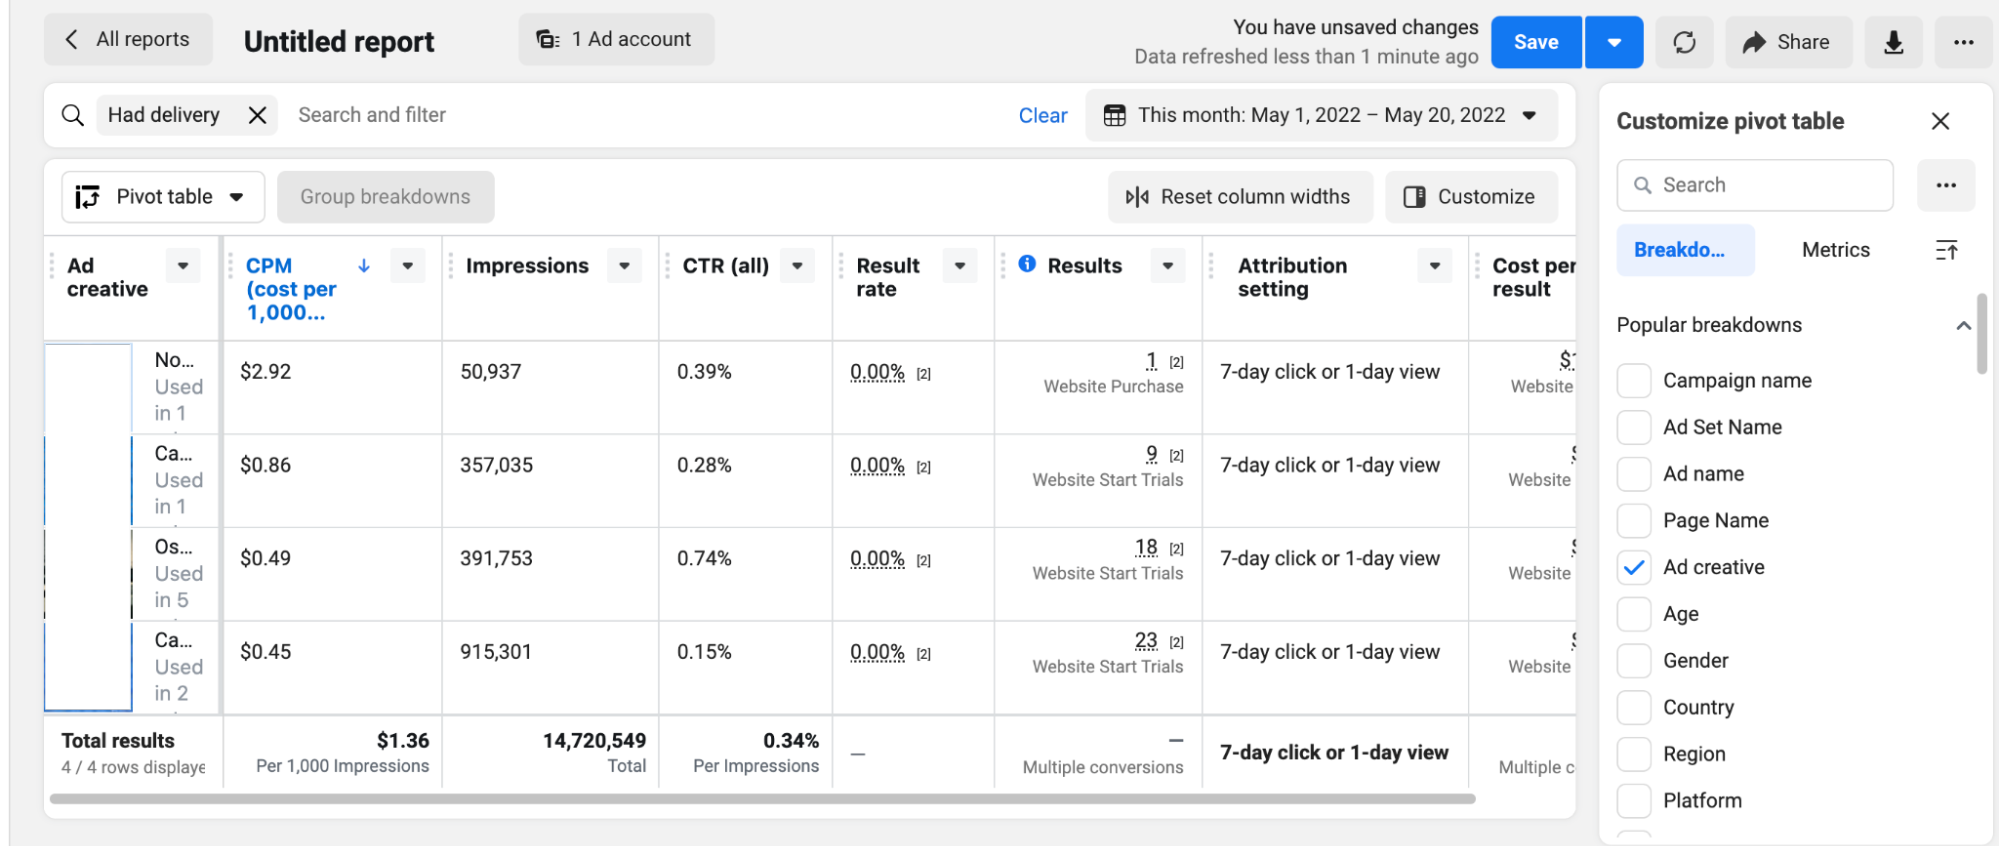
Using the creative reporting tool for ad insights
The creative reporting tool is super cool and helpful, but I’d also say that it’s underused. It’s not hidden per se, but if you don’t spend a lot of time in the “All tools” menu, then it’s easy to miss.
To find it, click on your “All tools” menu and scroll down to the “Analyze and report” section.
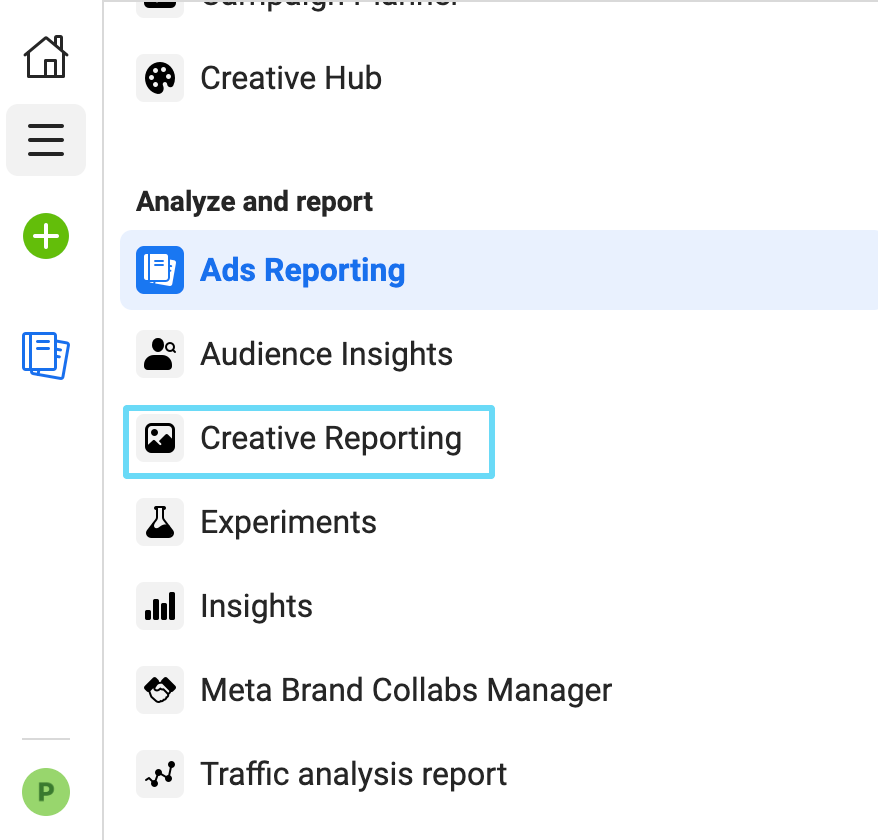
Click on that, and it’ll take you to a world of insights about your creatives. This is also useful for seeing ad performance and how each ad is doing compared to another.
Recap of Facebook Ads Manager
After reading this guide, Facebook Ads Manager doesn’t seem that complicated anymore, does it?
As a quick reminder, in Ads Manager, you can
- create and manage Facebook ad campaigns
- edit existing campaigns
- track and report on ad campaigns
Even if it seems a bit overwhelming right now, it will get easier once you get your hands dirty and create your first ad campaign. From there, you’ll pick everything up twice as fast.
Now, the other side of the coin in managing your Facebook ads and your business page on Facebook is getting familiar with your Facebook Business Manager account. Why not get started?


